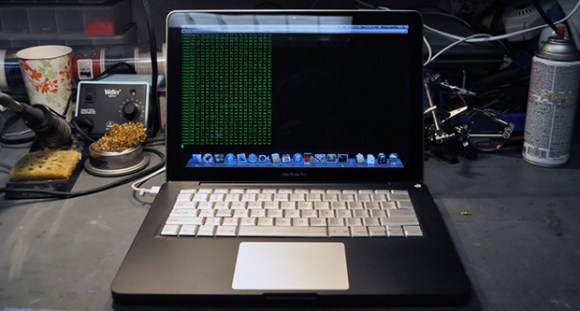
Resurrecting A Hi-Fi Cabinet

[VintagePC] pulled this old stereo out of a barn. It was in pretty shabby shape, but he managed get it running again and make it look great as well.

While it had been protected from the elements, it had not been protected from the rodents. Mice had chewed their way through the fiberboard backing and made a nice home inside. He mentions that they chewed the string which operates the tuning dial, and we’re sure they were the cause of other problems as well. He gives the wise advice of not powering on an old set like this until you have a chance to assess the situation.

The insides of the amplifier were about as disorderly as the last radio repair we looked at. But after carefully working his way through the circuits, replacing capacitors and resistors as needed, he started to make some progress. The receiver coil needed to be rewound and he used wire from an old CRT monitor for this purpose. The loop antenna was remounted and the record player arm was given a new cartridge and balanced using a clever LEGO apparatus. Some veneer work and wood finishing brought the case itself back to its original beauty. We’d say the hard work was well worth it. He’s got a big piece of furniture he can always be proud of!

Ancient Radio Repair

They sure don’t build them like that anymore. [J.W. Koebel] managed to take this 1934 Simplex Model P radio and bring it back to life.

So where do you start with a repair job like this one? Being a ham radio guy he has a good idea of what he’s doing, and started by replacing the AC capacitor with one which will provide quality noise filtering. He tried to make fixes throughout that would improve functionality and declutter the wire mess. This led him to find a snapped solder connection on the volume knob. Next he tested out the speaker and found that the primary transformer needed replacing. After as replacing the A67 converter (we’ve got no idea what that is) he swapped out the rest of the original capacitors, most of the resistors, and fixed the mechanical problems with the tuning dial. The result is a working radio that looks fantastic!

[via Reddit]

Resurrecting A PS3 Controller That Won’t Charge

[SJM4306] grabbed a used PlayStation 3 from a game store that was going out of business. He got a pretty good deal on what had obviously been the floor model for a number of years. The one real problem was the controller that came with it. The thing was so filthy that he literally used gloves to disassemble and sanitize it. It worked just fine after that,until he discovered that it wouldn’t charge from the USB port as it’s supposed to. But he managed to replace the charging circuitry with some of his own.

When cleaning the insides of the controller he found there were numerous deposits of sludge which he attributes to spilled soda. This must have damage one of the chips responsible for charging because he was probing an unstable 2V rather than the regulated 5V which should be coming in on the USB lines. His solution was to desolder the USB port in order to separate its 5V pin from the PCB. He then etched a tiny board to host a MAX1555 charging IC. With the new hardware in place the controller is back in action.

CD/DVD Polisher May Save Your Backups Someday

CD and DVD payers can often keep the music or movie going despite a small scratch. But occasionally you’ll have to skip to the next chapter/track or the player will just give up. But with data back-ups, a scratch can bork a whole set of files. We think that most of the time these headaches can be cured with this simple polisher.

[Wotboa’s] thrift store finds yielded almost all of the components needed to build the device. It’s made up of a couple of motors and a jig. One motor slowly rotates the upturned optical disc while the other spins the polishing pad. That pad is made from felt weather-stripping and is helped along with some plastic polishing compound. [Wotboa] asserts that five minutes in the noisy contraption will work wonders on any disc. You can get an idea of what it’s capable of by watching the video clip after the break.

Continue reading “CD/DVD Polisher May Save Your Backups Someday”

Repairing A Thermal Imaging Camera

[Mike] got his hands on this thermal imaging camera which is designed for use by Firefighters. As he’s demonstrating in the image above, it clips to a helmet and has a display what will let rescuers see through heavy smoke. But this one isn’t working right so he cracked it open and repaired the damaged board.

The hour-long video (embedded after the break) is quite interesting. He starts with a disassembly of the unit, before diving head-first into trouble shooting. There is a PCB inside that fills the entire U-shaped enclosure. The thermal sensor’s habit of cutting out seems to be a symptom of this design. There is one weak point where the board is very narrow. Flexing or vibrating that section will reset the sensor, and [Mike] ends up replacing a couple of components before the thing is fixed. These include a resistor and a ferrite bead both of which are suspected of having cracks due to that board flexing. The rest of the video is spent with an EEVblog-style look that the components and the construction.

Continue reading “Repairing A Thermal Imaging Camera”

Hacking Together Two Shop Vacuums

Unfortunately the result of hacking together two shop vacuums isn’t a double-power monstrosity. This is actually the story of combining broken and substandard parts into one usable machine. The guys at the Shackspace originally bought a cheap shop vacuum whose motor gave up the ghost way too quickly. The replacement had only a tiny container for rubbish. So they did what any group of hackerspace members would and combined the two.

Since they wanted to use the voluminous enclosure from the broken vacuum the first order of business was to remove the dead motor assembly. Quick work was made of this by melting away the plastic using an old soldering iron. The motor assembly from the small machine was then mounted in place with screws, and sealed with caulk. It was now working, thanks to salvaged hoses and attachments from other long-lost vacuums.

But a boring hack this might have been if they stopped there. The team added a wall outlet to the top, and adorned the beast with RGB LEDs which are powered from a wall wart (hence the added wall outlet). It can double as a mood light when not in use.

[Thanks Momo]

Rebuilding A Fried Fan Motor

The fan motor on [Pete’s] oscillating tower fan conked out on him. It’s a shame to throw away the whole thing, but it’s near impossible to source parts for a small appliance like this one. So he set out to rebuilt the motor and get the thing working like new.

The motor in question is of the brushless AC variety. [Pete’s] gut told him that the failure was due to bad lubrication of the bearings at the factory. It stopped working because the commutator could no longer rotate freely. A check of the continuity of each of the coils led him to this thermal fuse. When the motor seized the AC current built up a lot of heat. This fuse is made to burn out before a fire can start but now it needs to be replaced. With a new one in place he reassembled the motor, making sure to pack the bearings with some quality lubricant. Now he’s once again ready for a long hot summer.