Persistence of vision Death Star

Persistence Of Vision Death Star

Death Stars were destroyed twice in the Star Wars movies and yet one still lives on in this 168 LED persistence of vision globe made by an MEng group at the University of Leeds in the UK. While Death Stars are in high demand, they mounted it on an axis tilted 23.4° (the same as the Earth) so that they can show the Earth overlaid with weather information, the ISS position, or a world clock.

More details are available on their system overview page but briefly: rotating inside and mounted on the axis is a Raspberry Pi sending either video or still images through its HDMI port to a custom made FPGA-based HDMI decoder board.  That board then controls 14 LED driver boards mounted on a well-balanced aluminum ring. All that requires 75W which is passed through a four-phase commutator. Rotation speed is 300 RPM with a frame rate of 10 FPS and as you can see in the videos below, it works quite well.

Continue reading “Persistence Of Vision Death Star”

Old Motor Donates Rotor For Coaxial Wind Vane And Anemometer

Problem: build a combined anemometer and wind vane where the pivots for both sensors are coaxial. Solution: turn an old universal motor into a step-wise potentiometer for the wind vane, and then pull a few tricks to get the whole thing assembled.

commutatior-with-series-resistors
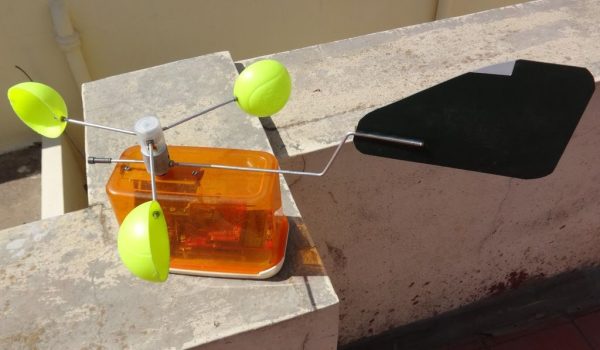
We have to admit that when we first saw [Ajoy Raman]’s Instructables post, we figured that he used a universal motor to generate a voltage from the anemometer. But [Ajoy]’s solution to the coaxial shafts problem is far more interesting than that. A discarded universal motor donated its rotor and bearings. The windings were stripped off the assembly leaving nothing but the commutator. 1kΩ SMD resistors were soldered across adjacent commutator sections to form a series resistance of 22kΩ with taps every 1k, allowing 0 to 2.2V to be read to the ADC of a microcontroller depending on the angle of the vane.

As clever as that is, [Ajoy] still had to pull off the coaxial part, which he did by drilling out the old motor shaft from one end to the other using just a drill press. The anemometer shaft passes through the hole in the shaft and turns a small DC motor to sense wind speed.

There might have been other ways to accomplish this, but given the constraints and the low cost of this solution, our hats are off to [Ajoy]. We’re a little concerned with that motor used for the anemometer, though. It could result in drag when used as a generator. Maybe a better solution would be a Hall-effect sensor to count rotations of a hard drive rotor.

Continue reading “Old Motor Donates Rotor For Coaxial Wind Vane And Anemometer”

Scratch-built Motor Uses A Clever Design

[Lou] is on a hot streak when it comes to interesting builds. This time around he made his own motor using wood, PVC, some fasteners, and a bunch of enameled wire.

His method of building a commutator is intriguing. He first builds a rotor by cutting two opposing sides off of a PVC four-way connector and pushing a short galvanized pipe through what’s left. After adding two PVC nubs with caps and nails as pivot points he wraps the PVC and metal pipe with a continuous length of enameled wire. The enamel is then sanded off the windings around the PVC, and half is covered with electrical tape. The spinning rotor will cause the brushes to contact the bare wire during half of the rotation, and be insulated by the tape during the other half. The video after the break shows the motor in action, then walks you through each step of the build.

If you liked this video you should check out [Lou’s] water bottle rocket launcher, or his automated Ping Pong table topper which stores the game in the ceiling.

Continue reading “Scratch-built Motor Uses A Clever Design”

Rebuilding A Fried Fan Motor

The fan motor on [Pete’s] oscillating tower fan conked out on him. It’s a shame to throw away the whole thing, but it’s near impossible to source parts for a small appliance like this one. So he set out to rebuilt the motor and get the thing working like new.

The motor in question is of the brushless AC variety. [Pete’s] gut told him that the failure was due to bad lubrication of the bearings at the factory. It stopped working because the commutator could no longer rotate freely. A check of the continuity of each of the coils led him to this thermal fuse. When the motor seized the AC current built up a lot of heat. This fuse is made to burn out before a fire can start but now it needs to be replaced. With a new one in place he reassembled the motor, making sure to pack the bearings with some quality lubricant. Now he’s once again ready for a long hot summer.

Dead Motor? Think Again

While hobby brush motors are pretty cheap now adays, there’s always that feeling of why replace when you can rebuild and reuse. As such [John Carr] presents how to change the brush position in motors to revive a dead motor. So long as the motor dies from natural causes commutator wear, the idea is the brushes can be moved along the axes and fixed to a new portion of commutator that’s not worn at all. [John] also goes through the details of some tricky reassembly, but we think to make this complete a guide on brush replacement and commutator replacement might be in order hint hint.