[Ben] at workbench with 3D-printed sea scooter

Watertight And Wireless In One Go: The DIY Sea Scooter

To every gadget, tool, or toy, you can reasonably think: ‘Sure I could buy this… but can I make it myself?’ And that’s where [Ben] decided he could, and got to work. On a sea scooter, to be exact.

This sea scooter was to be a fully waterproof, hermetically sealed 3D-printed underwater personal propulsion device, with the extreme constraint that the entire hull and mechanical interfaces are printed in one go. No post-printing holes for shafts, connectors, or seals. It also meant [Ben] needed to embed all electronics, motor, magnetic gearbox, custom battery pack, wireless charging, and non-contact magnetic control system inside the print during the actual print process.

As [Ben] explains, both Bluetooth and WiFi ranges are laughable once underwater. He elegantly solves this with a reed-switch-based magnetic control system. The non-contact magnetic drive avoids shaft penetrations entirely. Power comes from a custom 8S LiFePO₄ pack, charged wirelessly through the hull. Lastly, everything’s wrapped in epoxy to make it as watertight as a real submarine.

The whole trick of ‘print-in-place’ is that [Ben] pauses the builder mid-print, and drops in each subsystem like a secret ingredient. Continuing, he tweaks the printer’s Z-offset, and onwards it goes. It’s tense, high-stakes work; a 14-hour print where one nozzle crash means binning hundreds of dollars’ worth of embedded components.

Still, [Ben] took the chance, and delivered a cool, fully packed and fully working sea scooter. Comment below to discuss the possibilities of building one yourself.

Continue reading “Watertight And Wireless In One Go: The DIY Sea Scooter”

3D Printing A Giant Beyblade Arena

Beyblade spinning tops are pretty easy to find at toy shops, department stores, and even some supermarkets. However, the arenas in which the tops do battle? They’re much harder to come by, and the ones on sale in any given market often leave a lot to be desired. [LeftBurst] got around this problem by printing a grandiose Beyblade arena.

[LeftBurst]’s desire was to score a Beyblade stadium more similar to those featured in the anime, which are much larger than those sold as part of the official toy line. [Buddha] was enlisted to model the massive arena, but it then needed to be printed. Given its size, printing it in one piece wasn’t very practical. Instead, [LeftBurst] decided to print it in segments which would then have to be assembled. Super glue was used to put all the parts together, but there was more left to do. The surface finish and joins between the parts would cause issues for tops trying to move across the surface. Thus ensued a great deal of post-processing with primer, putty, and a power sander.

The final result is a massive stadium that plays well, and is ideal for larger multi-Beyblade battles that are more akin to what you’d see in the anime. If you’re playing at this scale, you might appreciate some upgraded launcher technology, too.

Continue reading “3D Printing A Giant Beyblade Arena”

Squishy Beyblades Made With 3D Printer Fail To Compete In The Arena

When Beyblades first came out a couple of decades ago, they quickly became a fad across Japan and several Western countries. There was a whole ecosystem of parts that you could buy and use to build competitive fighting spinning tops. These days, though — 3D printers are ubiquitous. There’s very little stopping you from printing whatever Beyblade-compatible parts your heart desires, as [JettKuso] demonstrates.

For [JettKuso], the rubber attack tips were a personal favorite. They had high grip on the plastic arena floor and would allow a top to make rapid, aggressive moves that would knock other tops out of the arena. Not desiring to import specific Beyblade parts at great expense, he decided to print some rubber tips and associated parts instead. The result? Squishy Beyblades!

[JettKuso] built various tops with official and custom TPU parts, and put them in battles to see what worked and what didn’t. In many cases, the TPU replacement parts didn’t make a big difference or proved worse than the standard parts. However, when [JettKuso] got crazy, he found one thing that kind of worked. A mega-heavy TPU top blade, which weighed as much as the standard metal rings, was able to successfully win battles against less competitive standard builds.

Ultimately, the video serves as a testament to the developers of the original toys themselves. It’s not so simple to just print up some parts and have them be competitive with the tried-and-tested gear that comes off the store shelves. The experience ultimately gave [JettKuso] a greater appreciation for all the thought that went into the commercial toys. Video after the break.

Continue reading “Squishy Beyblades Made With 3D Printer Fail To Compete In The Arena”

Farewell Shunsaku Tamiya: The Man Who Gave Us The Best Things To Build

In the formative experiences of most Hackaday readers there will almost certainly be a number of common threads, for example the ownership of a particular game console, or being inspired into engineering curiosity by the same TV shows. A home computer of a TV show may mark you as coming from a particular generation, but there are some touchstones which cross the decades.

Of those, we are guessing that few readers will not at some point have either built, owned, or lusted after a Tamiya model kit at some point over the last many decades, so it’s with some sadness that we note the passing of Mr. Tamiya himself, Shunsaku Tamiya, who has died at the age of 90.

Continue reading “Farewell Shunsaku Tamiya: The Man Who Gave Us The Best Things To Build”

Building A Color Teaching Toy For Tots

Last year, [Deep Tronix] wished to teach colors to his nephew. Thus, he built a toy to help educate a child about colors by pairing them with sounds, and Color Player was born.

The build is based around the TCS34725, an off-the-shelf color sensor. It’s paired with an ESP32, which senses colors and then plays sounds in turn. [Deep Tronix] made this part harder by insisting on creating their own WAV playback system, using the microcontroller, an SD card, and its on-board digital-to-analog hardware.

The map of colors and sounds.

The toy operates in three primary modes. Color-to-tone, color-to-sound, color-to-voice. Basically, a color is scanned, and then the Color Player creates a tone, plays back a pre-recorded audio sample, or spells out the name of the color that was just scanned.

[Deep Tronix] also included jolly mode, which just color cycles a few RGB LEDs. However, there’s a game inside jolly mode as well, created for an older nephew to play with. Enter the right button combination, and you unlock it. Then, the device suggests a color and you have to run around, find it, and scan it to score.

We love a good color game; somehow this build seems even more compelling than Milton Bradley’s classic Simon toy.

Continue reading “Building A Color Teaching Toy For Tots”

A photo of a fully assembled PVCSub.

PVCSub: A Submarine From The Plumbing Aisle

Today in the submersibles department our hacker [Rupin Chheda] wrote in to tell us about their submarine project.

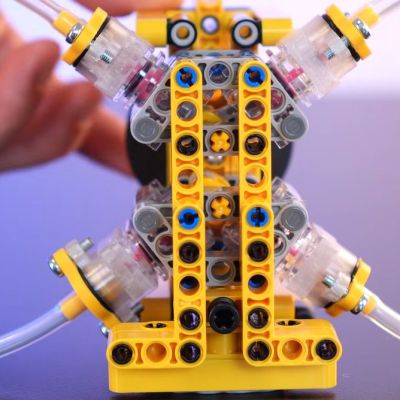
This sub is made from a few lengths of PVC piping of various diameters. There is an inflation system comprised of a solenoid and a pump, and a deflation system, also comprised of a solenoid and a pump. The inflation and deflation systems are used to flood or evacuate the ballast which controls depth. There are three pumps for propulsion and steering, one central pump for propulsion and two side pumps for directional control, allowing for steering through differential thrust. Power and control is external and provided via CAT6 cable.

Continue reading “PVCSub: A Submarine From The Plumbing Aisle”

Improved Jumping Bean

2025 One Hertz Challenge: Building A Better Jumping Bean

Do you feel nostalgia for a childhood novelty toy that had potential but ultimately fell short of its promise? Do you now have the skills to go make a better version of that toy to satisfy your long-held craving? [ExpensivePlasticCrap] does and has set off on a mission to make a better jumping bean.

Jumping beans, the phenomenon on which the novelty of [ExpensivePlasticCrap]’s childhood is based, are technically not beans, and their movement is arguably not a jump — a small hop at best. The trick is that the each not-a-bean has become the home to moth larvae that twitches and rolls on the ground as the larvae thrash about, trying to move their protective shells out of the hot sun.

The novelty bean was a small plastic pill-like capsule with a ball bearing inside what would cause the “bean” to move in unexpected ways as it rolled around. [ExpensivePlasticCrap]’s goal is to make a jumping bean that lives up to its name.

Various solenoids and motors were considered for the motion component of this new and improved bean. Ultimately, it was a small sealed vibrating motor that would be selected to move the bean without getting tangled in what was to become a compact bundle of components.

An ATtiny microcontroller won out over discrete components for the job of switching the motor on and off (once per second), for ease of implementation. Add this along with a MOSFET, battery and charging board for power into a plastic capsule, and the 1  Hz jumping bean was complete.

[ExpensivePlasticCrap] offers some thoughts on how to get more jump out of the design by reducing the weight of the build and giving it a more powerful source of motion.

If insect-inspired motion gets you jumping, check out this jumping robot roach and these tiny RoboBees.