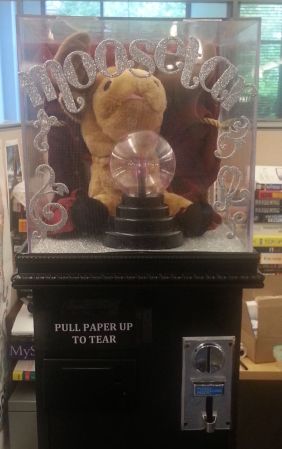
Winning A No Holds Barred Pinewood Derby

Every year, [ilektronx] and a few other guys get together and compete in a ‘no holds barred’ pinewood derby for kids of all ages. Of course this results in an immense amount of engineering to push a wooden block with wheels down a track, and [ilektronx]’s car is no exception. He won the competition with electronics from a remote control airplane bolted on to a piece of wood.

The electronics for [ilektronix]’s build are pretty much what you’d find in any small electric RC plane: a cheap transmitter / receiver combo sends commands to an ESC which powers a small brushless motor with a small LiPo battery.

Like all good pinewood derby cars, the success of [ilektronix]’s entry relied on the overall design. The wooden chassis cleverly hugs the raised guide in the track, and the slight downward angle of the propeller keeps the car from popping a wheelie when it is released from the starting line.

You can check out a video summary of the pinewood derby competition after the break. Also shown are a few of the other derby cars, including an amazing futuristic tank entry built by [Ken Cook]. [Ken] spent the better part of a year on his build, and the amazing detail of making his own tank treads by hand made him a shoe-in for the winner of the ‘style’ competition.

Continue reading “Winning A No Holds Barred Pinewood Derby”

Zeppelin On The Fisher Price Record Player Now Thanks To A 3D Printer

[Fred Murphy] went ahead and revised his method of making custom records for a Fisher Price toy record player. He’s now able to 3D print the discs. The toy works much like a music box, with a comb in the “cartridge” of the record player and notches in the record that pluck the fingers of the comb as it turns. He had previously developed a subtractive method that let him mill records out of a solid piece of plastic. But this additive method means less waste.

The music creation portion of the project is the same as the previous version. That’s because it’s pretty hard to outdo the C# software he wrote which serves as a composition studio. The difficulty comes in getting a clean print for the disk. The ridges on the discs are 0.7mm so you’re going to need a well-aligned printer with fine resolution. [Fred] printed in both ABS and what he calls “Vero clear” plastic. The former works but he got better results with the latter.

Labor Day Weekend Water Gun Spectacular

In the US, summer is marked by two holidays. In late May, Memorial day traditionally marks the the beginning of summer, the opening of public pools, and the day shopping malls are invaded by scores of petulant teenagers. In early September, Labor day marks the traditional end of summer, a great weekend to fire up the grill, and finally – finally – an end to the neighborhood kids screaming their heads off outside. Being Labor day weekend, we were very happy to see two builds show up in the tip jar concerning the one object that defines summer: water guns.

Homemade Super Soaker

[Michael] had the genius idea of building a water gun out of a diaphragm expansion tank (German, here’s the terrible translation). These tanks – usually connected to a house’s hot water line near the hot water heater – allow for the expansion of hot water and protects pipes from excessive pressure. It does this with a rubber membrane separating the inside the tank into two halves. Half the tank is filled with water while the other half is filled with compressed air from a bicycle pump.

[Michael] connected a hose and made a nice gun out of aluminum pipe to build the ‘gun’ part of his build. With 9 bar of pressure in the expansion tank, [Michael] can shoot a stream of water 20 meters.

Water gun turret with a laser sight

This build comes from [Valentin]. He picked up a automobile water pump for just a few Euros, and attached it to a 1 liter bottle filled with water. A pan/tilt turret was constructed out of CNC milled aluminum and a pair of servos.

After [Valentin] got the water-shooting turret part of the build out of the way, he installed a 2.4 GHz wireless camera on the pan/tilt mount and taped a receiver to the back of his remote control.

The addition of a small LCD screen displaying the turret’s point of view makes for a very cool build, perfect for pestering those annoying neighborhood kids.

Video of [Valentin]’s build after the break.

Continue reading “Labor Day Weekend Water Gun Spectacular”

RC Plane Made Specifically For UAVs

We’ve seen our fair share of remote-controlled planes turned into UAVs and FPV platforms, but the Techpod is the first airplane we’ve seen specifically designed to be used as a camera-equipped robotic airplane.

The Techpod is the brainchild of [Wayne Garris]. He has been flying camera-equipped FPV airplanes for a while now, but recently realized the current offerings of remote control planes didn’t match his needs. [Wayne] decided to design his own plane specifically designed with a pan/tilt camera mount in the nose.

[Wayne]’s prototype was designed with some very fancy aeronautical design software packages and milled out of foam. From the videos after the break, we can see the Techpod flies beautifully, but needs the Kickstarter community to bring his model to the masses.

The specs for the Techpod put it up there with other high-performances FPV and UAV models; with its 102 inch (2590 mm) wingspan and a pair of batteries wired in parallel, the Techpod can stay aloft transmitting video for up to one hour.

Video of the plane in action after the break.

Continue reading “RC Plane Made Specifically For UAVs”

Rebuilding The Electronics In A Remote Control Car

Inspired by the many autonomous rovers such as Curiosity and the self-driving Google car, [Rohit] decided to build his own by taking an off-the-shelf remote control car and adding his own electronics. Unfortunately, he couldn’t find the datasheet for the chip used to receive radio signals and drive the motors, so he ended up building his own electronics and putting them in the car.

[Rohit]’s car – the Thunder Rumbler RC Car – is driven by applying power to two motors. This is an easy system to control, as only two channels are needed to make the car go forward, left, right, or backwards. To drive these two motors, [Rohit] found an SN754410 quadruple half-H bridge driver chip lying in his box of assorted electronic components. Thanks to a helpful instructable, this chip was easily controlled with an Arduino.

That left the problem of sending a wireless signal to the Arduino. [Rohit] accomplished this by relying on an Android phone to provide the remote control.

[Rohit] whipped up a small program running on his desktop that allows him to send ‘L’, ‘R’, ‘U’, or ‘D’ to the Android phone to dictate if the car should go left, right, forward, or reverse. The Android phone receives these commands via the Internet and sends an audio signal through the headphone port. This audio signal is connected to two analog pins of the Arduino. With a little bit of software and a bit of reading up on frequency shift keying, [Rohit] was able to make his car move in any direction.

Even though [Rohit] realized his goal of controlling a remote control car on his own terms, the build is far from done. He plans on adding some ultrasonic sensors and using the Android’s camera for object detection.

Umbrella-based Windmills

[Niklas Roy] is at it again. He’s applying wind power to his projects by using umbrellas. He was inspired by the shape of an anemometer, and umbrellas turned out to be a great choice because they’re cheap and easy to find.

Anemometers measure wind speed by capturing it with egg-shaped sails (in fact, we’ve seen them built from plastic Easter eggs before). The umbrellas have a much larger area and will capture more wind. Still it’s a big jump from measuring wind speed to generating energy. That’s why he’s not trying to generate electricity, but instead using the mechanical force directly. He took a page from one of last year’s projects and used the dual umbrella setup to power a music box, thereby reinventing the wind chime. The triple-umbrella unit seen above serves as a bubble machine, driving a series of plastic rings through a soapy solution and letting the wind do the rest. We’ve embedded his demo video after the break.

Continue reading “Umbrella-based Windmills”

programmable-rc-car

How To Control Your Cheap RC Car With A Computer

[Jon] wrote in to tell us about his programmable RC car, and the Howto guide that he’s made. According to him, this project can be constructed with $9 worth of parts plus an Arduino and a small toy car. So around $50 if you’re starting from scratch.

At it’s core, this project is about using the Arduino to allow your computer to send signals to the toy car. For this, [Jon] has included JAVA code that should be able to run on Mac, Linux, and PC operating systems. The Arduino code is also included.

Most small RC cars like those used in this project switch on at full speed or turn off, but this project allows the PC/Arduino to give the car PWM signals to control the speed. As pointed out in the video after the break, this can be a bit jerky at slow speed, but still a neat effect. A decent amount of soldering is required to get this project working, but it may be a good project especially if you have some of the parts already available! Continue reading “How To Control Your Cheap RC Car With A Computer”