Tank Tread Robot Build Aims For A Smooth Ride

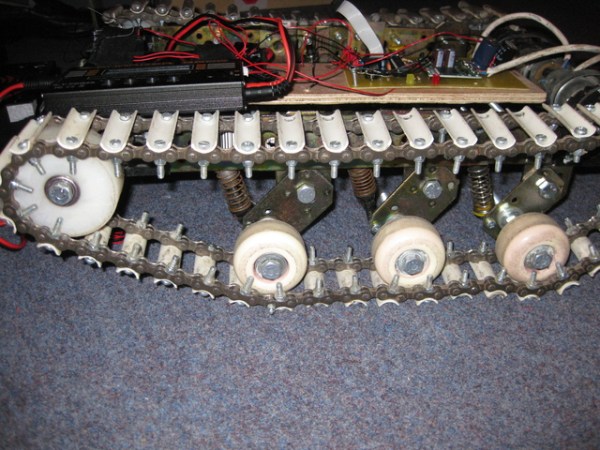
There’s all kinds of interesting things going into this tank robot build, but that beautiful suspension system immediately caught our eye. It helps to protect the body of the robot from being shaken apart when traveling over rough surfaces. Make sure to check out the four parts of the build log which are found on the left sidebar at the post linked above.

This a Master’s thesis project and has been built from common parts. The motors for the treads are pulled from a pair of cordless drills, with some capacitors added to help combat the draw when they start up. The treads themselves are each made from a pair of bicycle chains connected with numerous PVC pipe segments. The curved section of each PVC piece goes toward the chain, leaving the edges toward the ground for great traction. The tree wheels which support the middle of the tread each have a hinge and spring to absorb the shock of running full speed into concrete sidewalk corners like we see in the video after the break.

Continue reading “Tank Tread Robot Build Aims For A Smooth Ride”

GD-ROM Drive Emulated To Use SD Cards Instead

This board is the prototype which [Deunan] has been working on in order to use an SD card in place of a GD-ROM drive. The idea is to fully implement the hardware protocol used by a GD-ROM drive so that it can be completely replaced. The end goal is to do away with the optical drive on a Dreamcast game console.

As these game systems age, the optical drive is the most likely part to fail first as it involves moving parts and a lens that may degrade over time (we’re basing that assumption on our experience with DVD-ROM and RW). This may sound like a way to play pirated games, but [Deunan] makes it clear in his question and answer post that the firmware for his prototype is written to only play proper disc images and will probably not play the rips which are found in the darker recesses of the interwebs.

He’s been at this for quite a while. Here’s an earlier project he did that uses an FPGA board for the hardware.

[Thanks Walt]

Reverse Engineering Solari Soft Flap Displays

This is a side view of the guts of a one character Solari soft flap module. This is the type of mechanical display used in some transportation hubs that have a flap for each letter. The motor turns the flaps through the alphabet until it gets to the target letter. Recently [Boz] had a client approach him who needed a custom controller for a 20-character soft flap display. (Link fixed in 2022. Thanks Wayback Machine!)

The process started out with a magnifying glass and multimeter which yielded a rather complicated hand-drawn schematic. An optical encoder is used to judge which character is currently displayed. After analyzing the output using an oscilloscope [Boz] designed a PIC based driver board which is controlling the display seen in the clip after the break.

The great thing about these displays is that they don’t use any electricity except when they change letters. This sounds like the predecessor of ePaper and makes us wonder if there are any companies developing high-contrast ePaper to replace soft-flap digits?

Continue reading “Reverse Engineering Solari Soft Flap Displays”

Nebulophone Microcontroller Synthesizer Project Sounds Great

Judging from the video (found after the break) the Nebulophone is one of the best sounding DIY synthesizers we’ve seen. Especially when you consider the simplicity of the hardware design. It uses an AVR chip and an OpAmp. The rest of the parts are just a few handfuls of inexpensive components.

The device was developed by Bleep Labs, and they sell the synthesizer kit seen on the left. But since it’s an open source project you can follow their design to fabricate your own, which is what [BlinkyBlinky] did with his offering seen to the right.

An ATmega328 drives the device, which is the chip often used in the Arduino Duemilanove. The keyboard is a set of traces hooked to the microcontroller. These are tinned pads on the kit PCB, but the DIY version simply uses some adhesive copper foil with a jumper wire soldered to it. The keys are played with a probe that makes the electrical connection, a common practice on these stylophone type designs. Chances are you have everything on hand to make this happen so keep it in mind for that next cold winter weekend that’s making everyone a bit stir crazy.

Continue reading “Nebulophone Microcontroller Synthesizer Project Sounds Great”

Traffic Light Cufflinks

[Brendan Sleight] has been hard at work on this wearable piece of tech. He doesn’t wear much jewelry, but a wedding ring and some cufflinks are part of his look. To add some geek he designed a set of cufflinks that function like traffic lights. Since he still had some program space left he also rolled in extra features to compliment the traffic light display.

That link goes to his working prototype post, but you’ll want to look around a bit as his posts are peppered with info from every part of the development process. The coin-sized PCB hiding inside the case plays host to a red, amber, and green surface mount LED. To either side of them you’ll find an ATtiny45 and a RV-8564-C2. The latter is a surface mount RTC with integrated crystal oscillator, perfect for a project where space is very tight.

The design uses the case as a touch sensor. Every few seconds the ATtiny wakes up to see if the link is being touched. This ensures that the coin cell isn’t drained by constantly driving the LEDs. The touch-based menu system lets you run the links like a stop light, or display the time, date, or current temperature. See a quick demo clip after the break.

Continue reading “Traffic Light Cufflinks”

Reproduce 3D Printed Models By Making Your Own Molds

Need fifty copies of that 3D printed whirligig you’re so proud of? It might be faster to just cast copies by using the 3D printed model to make a mold. [Micah] found himself in this situation and managed to cast one copy every 10-12 minutes using the mold seen above.

With the object in hand, you need to find a container which will fit the mold without too much waste. The bottom half of the mold is then filled with modeling clay, a few uniquely shaped objects to act as keys, and the model itself. After getting a good coating of release agent the rest of the mold is filled with a silicone rubber product which is sold for mold making. This creates one half of the mold. After it cures the clay and key objects are removed, everything is sprayed with the release agent, and the other half of the mold is poured.

Now your 3D object can be copied by pouring two-part resins in the to shiny new mold.

Moulding New Gears For A Micro Helicopter

heli_09

So you’ve got a broken gear for you model helicopter, and don’t have a 3d printer handy. If you need your little helo flying right away, [James] wrote in to tell us about his solution. As you may have guessed from the title, he made a tiny mould and produced a copy of the gear he needed with it. Given the complications of printing or some tiny subtractive method, this little gear turned out really nicely!

The video after the break shows all the steps for doing this procedure. If you’d rather just skip to the results, check out around 10:00 to see the finished gear, and eventually the little guy in flight. As noted, he did have to drill a hole in the middle of the gear after the mould process, but this was the only machining operation.

The helicopter gears worked out nicely, but be sure to check out some of the other really interesting projects on the [xrobots], some of which we’ve featured here! Continue reading “Moulding New Gears For A Micro Helicopter”