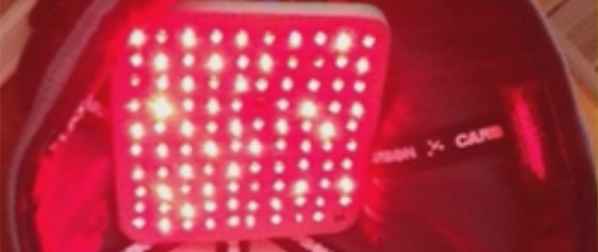
3D Printing Goes Hand In Hand With Iron Man Inspired Prosthetic

It’s exciting how much 3D printing has enabled us to produce pretty much any shape for any purpose on the fly. Among the most thoughtful uses for the technology that we’ve seen are the many functioning and often beautiful prosthetics that not only succeed in restoring the use of a limb, but also deliver an air of style and self-expression to the wearer. The immediate nature of the technology allows for models to be designed and produced rapidly at a low-cost, which works excellently for growing children. [Pat Starace’s] Iron Man inspired 3D printed hand and forearm are a perfect example of such personality and expert engineering… with an added dash of hacker flair.

With over twenty years of experience in animatronics behind him, [Starace] expertly concealed all of the mechanical ligaments within the design of his arm, producing a streamline limb with all the nuance of lifelike gesture. It was important that the piece not only work, but give the wearer that appropriate super hero-like feeling while wearing it. He achieves this with all the bells and whistles hidden within the negative space of the forearm, which give the wearer an armory of tricks up their sleeve. Concealed in the plating, [Starace] uses an Arduino and accelerometer to animate different sets of LEDs as triggered by the hand’s position coupled with specific voice commands. Depending on what angle the wrist is bent at, the fingers will either curl into a fist and reveal hidden ‘lasers’ on the back of the hand, or spread open around a pulsing circle of light on the palm when thrust outward.

The project took [Starace] quite a bit of time to print all the individual parts; around two days worth of time. This however is still considered quick in comparison to the custom outfitting and production of traditional prosthetics… not to mention, the traditional stuff wouldn’t have LEDs. This piece has a noble cause, and is an exciting example of how 3D printing is adding a level of heroism to everyday life.

Thank you Julius for pointing out this awesome project to us!

Continue reading “3D Printing Goes Hand In Hand With Iron Man Inspired Prosthetic”

Introducing The F*Watch, A Fully Open Electronic Watch

As one of their colleagues was retiring, several CERN engineers got together after hours during 4 months to develop his gift: a fully open electronic watch. It is called the F*Watch and is packed with sensors: GPS, barometer, compass, accelerometer and light sensor. The microcontroller used is a 32-bit ARM Cortex-M3 SiLabs Giant Gecko which contains 128KB of RAM and 1MB of Flash. In the above picture you’ll notice a 1.28″ 128×128 pixels Sharp Memory LCD but the main board also contains a micro-USB connector for battery charging and connectivity, a micro-SD card slot, a buzzer and a vibration motor.

The watch is powered by a 500mA LiPo battery. All the tools that were used to build it are open source (FreeCAD, KiCad, GCC, openOCD, GDB) and our readers may make one by downloading all the source files located in their repository. After the break is embedded a video showing their adventure.

Continue reading “Introducing The F*Watch, A Fully Open Electronic Watch”

[Peter] And The Amazing Technicolor Phone Wire Bracelet

When a job left him with some extra phone wire, [Peter] didn’t toss it in the scrap pile. He broke out the casting resin and made an awesome bracelet (Imgur link). [Peter] is becoming quite an accomplished jeweler! When we last checked in on him, he was making rings out of colored pencils.

Casting the wire in resin was as simple as building a square form, placing the wires, then filling the form with appropriate amounts of epoxy and hardener. Once the epoxy cured, [Peter] drilled out the center with a sharp Forstner bit. A band saw brought the corners of the block closer to a cylinder.

From there it was over to the lathe, where [Peter] used a jam chuck to hold the bracelet in place. Once he shaped the bracelet [Peter] started wet sanding. It took Lots and lots of sanding both inside and out to finish the bracelet. The result is a mirror smooth finish, with bits of insulation bright copper just popping out of the resin.

One might think that the bracelet would be rough with all that copper, but [Peter] mentions on his Reddit Thread that it feels like plastic, though the bits of copper were “very pokey” before sanding. We’d recommend tossing on a clear coating to protect the exposed copper. Worn on a wrist, all that exposed metal would start oxidizing in no time.

This hack gives us lots of ideas for casting wearable circuits. Some WS2812’s and a teensy would make for a pretty flashy setup! Got an idea for a project? Tell us about in the comments, or post it up on Hackaday.io!

Continue reading “[Peter] And The Amazing Technicolor Phone Wire Bracelet”

Your Halloween Costume May Be Cool, But It’s Not Laser-Cut Cardboard Vintage Airplane Cool

While others are absorbed in baseball playoffs, [Aidan] has spent his recent Octobers planning incredible Halloween costumes for his son. We don’t know what he did last year, but there’s no way it’s better than this laser-cut cardboard airplane costume.

He had a few specs in mind and started with a model of a Grumman F4F-4 Wildcat from 3D Warehouse. Using SketchUp, he simplified the model and removed the landing gear and the propeller. [Aidan] created a simpler model on top of that, and set to work changing the proportions to make it adorable and toddler-sized.

To build around his son’s proportions, he inserted a 10-inch diameter scaled tube vertically into the model and squished down the fuselage in SketchUp. The plan was to have it laser-cut by Ponoko, which meant turning the design into flat pieces for them to cut. He ended up with 58 parts, many of them mirror images due to the symmetry of his design.

When the box from Ponoko arrived, [Aidan] was giddy. He was astonished at the quality of the pieces and found the plane very satisfying to build. But, he didn’t stop there. Using LayOut, he created a custom instrument cluster with reflections and shadows. The plane also has a Wii steering wheel, a motorized propeller, and of course, decals.

Laser Dog Goggles Make Halloween A Nice Night For A Walk

Sure, you could dress your dog up for Halloween in some pre-fab hot dog costume or a little French maid outfit, but what’s the fun in that? Hilarious as it may be, there’s no hack there. [Becky Stern] will help you out of your pet costume rut with the tutorial for her latest creation, laser dog goggles.

First things first: the laser she uses is fairly benign. You can safely stare it down for just under 30 seconds, so your pet should be okay. [Becky] offers other helpful safety suggestions, like covering the delicate battery pack with fabric to avoid scratching damage, and waiting until the adhesives are completely dry before outfitting Rover. But hey, if your dog isn’t into eye wear, don’t force it.

These are based on Doggles brand dog goggles and the Adafruit Trinket. The laser is mounted on a micro servo so that it pivots back and forth, allowing your dog to scan the ground like RoboCop or Terminator. As you might expect, [Becky]’s tutorial includes a comprehensive list of tools and great documentation. Check out her video overview after the break.

Continue reading “Laser Dog Goggles Make Halloween A Nice Night For A Walk”

Using A Standard Coil For NFC Tag Implant Reading

A few months ago Hackaday covered the xNT crowdfunding campaign which aimed at making an NTAG216 based NFC implant for different purposes. I actually backed it, found that standard NFC readers don’t perform well and therefore decided to try using a standard coil as an antenna for better reading performances.

Most NFC readers typically only have a small sweet spot where implant reading is possible. This is due to what we call coupling factor which depends on the reading distance and reader & NFC tag antenna geometries. Having a smaller antenna diameter increases the coupling factor and makes implant positioning easier.

In my detailed write-up you’ll find a good introduction to impedance matching, a process where a few passive components are added in series/parallel with an antenna to bring its complex impedance close to a RF signal transmitter’s. This usually requires expensive tools but allows optimal power transmission at a given frequency.

You may find our xNT coverage here.

Feed That Shoulder Boom Box With A Wrist Tune Transmitter

Next time you’re strutting down the block with that hi-fi on you shoulder, don’t subject yourself to the limitations of a radio station’s tight playlist or the short run time of a cassette tape. Pack your tunes on your wrist and beam them directly with this wearable FM transmitter. No wires… it’s like the future is now!

The Raspberry Pi has proven itself to be a dependable FM transmitter. This project follows in those footsteps but moves the goal line a few leaps further. The build has a full user interface which will make it easy to adapt to just about any application you can imagine. And the added twist is shown in the latter third of the video after the break. [Navic209] has included a microphone in the design which allows the wearer to transmit voice to an appropriately tuned radio. It gives the device a very Dick Tracey-esque feel.

Continue reading “Feed That Shoulder Boom Box With A Wrist Tune Transmitter”