A Detailed Look At The 7805 Voltage Regulator

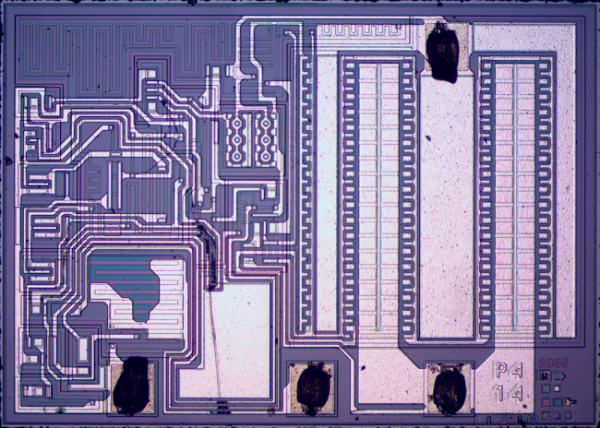
We’re quite sure that all hobbyists have used the 7805 voltage regulator at least once in their lives. They are a simple way to regulate 7V+ voltages to the 5V that some of our low power projects need. [Ken Shirriff] wrote an amazingly detailed article about its theory of operation and implementation in the silicon world.

As you may see in the picture above such a regulator is composed of very different elements: transistors, resistors, capacitors and diodes, all of them integrated in the die. [Ken] provides the necessary clues for us to recognize them and then explains how the 7805 can have a stable output even when its temperature changes. This is done by using a bandgap reference in which the difference between transistor base-emitter voltages for high and low current is used to counter the effects of temperature. As some elements looked a bit odd during [Ken]’s reverse engineering process, he finally concluded that what he purchased on Ebay may be a counterfeit (read this Reddit comment for another opinion).

Unbricking A BluRay Drive

All BluRay player, devices, and drives contain a key that unlocks the encryption and DRM present on BluRay discs. Since 2007, the consortium responsible for this DRM scheme has been pushing updates and revocation lists on individual BluRay releases. Putting one of these discs in your drive will brick the device, and this is the situation [stephen] found himself in when he tried to watch Machete Kills. Not wanting to update his software, he searched for a better solution to unbrick his drive.

Every time [stephen] played or ripped a disc, the software he was using passed a key to the drive. This key was compared to the revocation list present on the drive. When a match was found, the drive bricked itself. Figuring the revocation list must be stored on a chip in the device, [stephen] broke out the screwdriver and started looking around inside the drive.

There aren’t many chips inside a modern BluRay drive, but [stephen] did manage to find a few Flash chips. These Flash chips can be dumped to a computer using a BusPirate, and comparing the dump to a publicly available ‘Host Revocation List Record’, [stephen] was able to find the location on the Flash chip that contained the revocation list.

The next task was to replace the revocation list currently on the drive with an earlier one that wouldn’t brick his drive. [stephen]’s MakeMKV install made this very easy, as it keeps a record of all the revocation lists it runs across. Updating the Flash in the drive with this old list unbricked the drive.

This is only a temporary fix, as [stephen] still can’t put a new disc in the drive. A permanent fix would involve write protecting the Flash and preventing the drive from ever updating the revocation list again. This would be a very complex firmware hack, and [stephen] doesn’t even know what architecture the controller uses. Still, the drive works, saved from terrible DRM.

A Tale Of Two Ring Boxes

This is a tale of two hearts, two engagements, and two ring boxes. About a couple of years ago, [curtisabrina] proposed to his girlfriend. Rather than just hand her the ring, he placed it in a locking ring box [imgur link] he custom-made. The box seems normal at first glance, but lifting up the first drawer reveals a complex and ornate gear system. The gears can only be turned by a pair of interlocking heart-shaped keys – a gift [curtisabrina] had given her months earlier. The mechanism is nothing short of stunning – planetary reductions drive a spring-loaded iris which opens to reveal an engagement ring.

[curtisabrina] built his ring box after hours at his signmaking job. The job gave him access to some incredible tools, such as the MultiCam 3000 series CNC. The box turned out great, and he showed his work off in a Reddit thread.

Fast forward two years. [joetemus] was getting ready to propose to his girlfriend, and wanted to do something similar. He didn’t have access to high-end shop tools, but he did have a Shapeoko 2. Using the original box as inspiration, [joetemus] started designing. Over time, trial, and error, a second ring box emerged [imgur link]. Like the original box, [joetemus] started with a rough cut board. Nearly every part, including the aluminum gears, was cut on the Shapeoko 2. [joetemus] also celebrated his accomplishment with a Reddit thread.

[joetemus’s] ring box isn’t quite as complex or polished as [curtisabrina’s], but he was working with a machine that cost much less than the equipment [curtisabrina] was using. We think both of them are great, and are happy to report that both of their girlfriends said, “Yes!”

Continue reading “A Tale Of Two Ring Boxes”

Upgrading The Battery In A Wrist PDA

No, your eyes do not deceive you. That’s a wrist-mounted PDA. Specifically, a Fossil Wrist PDA, also known as an Abacus, that was sold from 2003 to about 2005. Yep, it’s running PalmOS. [mclien] has had this watch/PDA for a while now, and found the original 180mAh battery wasn’t cutting it anymore. He made a little modification to the watch to get a 650mAh battery in this PDA by molding a new back for it.

The original PDA used a round Lithium cell, but being ten years old, the battery technology in this smart watch is showing its years. [mclien] found two batteries (380mAh and 270mAh) that fit almost perfectly inside the battery.

The new batteries were about 3mm too thick for the existing case back, so [mclien] began by taking the old case, adding a few bits of aluminum and resin, and making a positive for a mold. Two or three layers of glass twill cloth were used to form the mold, resined up, and vacuum bagged.

After many, many attempts, [mclien] just about has the case back for this old smartwatch complete. The project build logs are actually a great read, showing exactly what doesn’t work, and are a great example of using hackaday.io as a build log, instead of just project presentation.

1991

‘We need to move the datacentre to New York by next weekend’

We silently groaned and started working. There were purchases to be made and eventually someone would have to fly out with the tapes.

‘No, we’re not purchasing new equipment. We’re moving the datacentre.’

Ten days. Ten days of crawling under the floor, pulling cables, unbolting, unracking, stuffing U-Hauls to the brim, driving 800 miles, and reversing the whole process. None of us had showered in a week.

When we arrived, there was power. Not much else. We had 63 hours until everything needed to be up. We started stripping RG-58. One guy was wearing this shirt. He was faster.


Continue reading “1991”

kegerator

End Table Kegerator Hides The Tap When You’re Not Looking

What’s better than an ordinary end table? How about an end table that can serve you beer? [Sam] had this exact idea and used his skills to make it a reality. The first step of the build was to acquire an end table that was big enough to hold all of the components for a functional kegerator. This proved to be a bit tricky, but [Sam] got lucky and scored a proper end table from a garage sale for only $5.00.

Next, [Sam] used bathroom sealant to seal up all of the cracks in the end table. This step is important to keep the inside cold. Good insulation will keep the beer colder, while using less electricity. Next, a hole was cut into the top of the table for the draft tower.

The draft tower is mounted to a couple of drawer slides. This allows the tower to raise up and down, keeping it out of sight when you don’t want it. The tower raises and lowers using a simple pulley system. A thin, high strength rope is attached to the tower. The other end is attached to a spool and a small motor. The motor can wind or unwind the spool in order to raise and lower the tower.

The table houses an Arduino, which controls the motor via a homemade H bridge. The Arduino is hooked up to a temperature sensor and a small LCD screen. This way, the users can see how cold their beer will be before they drink it.

To actually keep the beer cold, [Sam] ripped apart a mini fridge. He moved the compressor and condenser coils to the new table. He had to bend the coils to fit, taking care not to kink them. Finally he threw in the small keg, co2 tank and regulator. The final product is a livingroom gem that provides beer on demand.

Demo video (which is going the wrong way) can be found after the break.

Continue reading “End Table Kegerator Hides The Tap When You’re Not Looking”

THP Semifinalist: Stubby, The Adorable Hexapod

After talking with a few of the judges for The Hackaday Prize, documentation will be a large factor in determining who wins and takes a trip to space, and who is left with their feet safely planted on the ground. Stubby the Hexapod is one of the most well documented projects in the running. There are already two hardware revisions for the walking mechanism, several board layouts for the controller, and more project log entries than you can shake a stick at.

Stubby is the brainchild of [The Big One] (a.k.a. [Wyatt] with [Warren], [Princess Sparkle], and [exot] filling out the rest of the team). The project originally began as an educational robotics project meant for teaching [Wyatt]’s kids the ins and outs of robotics and electronics. He’s doing this by developing an open source hexapod robot platform, complete with a frame, electronics board, and a lot of interesting code driving 18 hobby servos.

The frame for Stubby’s first hardware revision is rather interesting; it’s able to be reproduced with nothing more than a scroll saw. The latest revision is a complete rethinking of hexapod locomotion using 2DOF legs and a more mechanical gait.

Being completely open source and very well documented, you can already make your own Stubby hexapod with a scroll saw and the files on [Wyatt]’s site. If 3D printing is more your thing, there’s also a few files to help you with that.

You can check out a few videos of the different Stubby revisions below:


SpaceWrencherThe project featured in this post is a semifinalist in The Hackaday Prize.

Continue reading “THP Semifinalist: Stubby, The Adorable Hexapod”