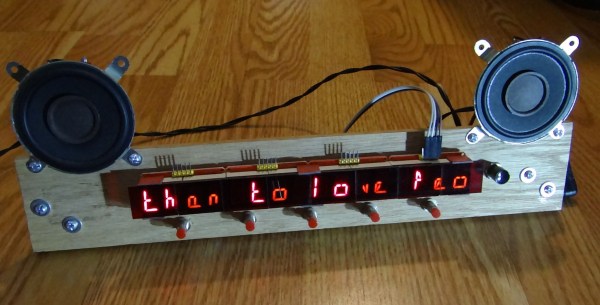
Pico Chording Keyboard Is Simultaneously Vintage And New

On paper, chording — that’s pressing multiple keys to create either a single character or a whole word — looks like one of the best possible input methods. Maybe not the best for speed, at least for a while, but definitely good for conserving the total number of keys. Of course, fewer keys also makes for an easier time when it comes to building keyboards (as long as you don’t have to code the chording software). In fact, we would venture to guess that the hardest part of building your own version of [CrazyRobMiles]’s Pico Chord Keyboard would be teaching your fingers how to work together to chord instead of typing one at a time.

[CrazyRobMiles] took inspiration from the Cykey chording design used for the Microwriter and later, the Microwriter Agenda that also featured a qwerty blister keyboard. Both featured small screens above the six keys — one for each finger, and two for the thumb. While the original Microwriter ran on an 8-bit microprocessor, Pico Chord Keyboard uses — you guessed it — the Raspberry Pi Pico.

We love that [CrazyRobMiles] went with four 14-segment displays, which gives it a nice old school feel, but used transparent keycaps over Kailh switches. This is actually important, because not only do the LEDs show what mode you’re in (alpha vs. numeric vs. symbols), they also teach you how to chord each letter in the special training game mode. Be sure to check it out in the video after the break.

Isn’t it cool that we live in a world of relatively big keyboards with few keys and tiny keyboards with all the keys?

Continue reading “Pico Chording Keyboard Is Simultaneously Vintage And New”

Lego Fourteen-Segment Display Needs Plenty Of Motors

Hackers love 7-segment displays, and will gladly wax lyrical about the silly words you can almost spell on them and so on. Less appreciated are their bigger cousins, the fourteen and sixteen segment displays, which get all alphanumeric about things and are thus much easier for humans to read. You can even build the former out of Lego, as [ord] demonstrates.

A look at the mechanism driving the display.

The “segments” are made up of Lego shafts that are pushed up through a yellow matrix of holes when they are switched “on.” A full seven motors are used to make the single-character display work, each one driving two segments. Two Lego Powered Up controller bricks are required to drive everything going on here, making the final design not just mechanically complicated, but electronically complicated as well.

Amusingly, those don’t come cheap, either; the parts total cost of this build is likely somewhere between $50-100 US. You probably don’t want to build an entire scrolling message board using this design, even if it does look resplendent in black and taxi yellow.

We’ve seen [ord]’s work before, too, in the form of these mechanically magnificent 7-segment Lego displays. Video after the break.

Continue reading “Lego Fourteen-Segment Display Needs Plenty Of Motors”

A wooden device with an LED display and speakers

The Inspirer Keeps Your Mood Up With Inspirational Quotes And Soothing Music

While some people enjoy the cold weather and long, dark nights in the Northern Hemisphere these days, others may find it hard to keep a positive mindset all through the winter. [Michael Wessel] decided he needed to do something about that and came up with The Inspirer, a desktop display that shows inspirational quotes and plays soothing music.

The design is deliberately bare-bones: a strip of wood, standing upright thanks to two metal brackets, onto which a bunch of components have been screwed, glued and taped. The actual display consists of a row of 14-segment LED modules that can show basic alphanumeric characters; these displays emit white light, but [Michael] added a red color filter in front to give them a more “retro” look.

This device is fully off-grid, so no Internet connection issues will disrupt your flow. A huge database of quotes and a selection of music tracks are stored on a pair of micro SD cards; an MP3 player module handles the music while an Arduino picks a quote, drives the display, and reads the buttons. You can select quotes based on a certain theme: examples include friendship, gardening, money, and love. But if you’re open to anything, you can just set it to “random” and get something from any of the 120 categories.

[Michael]’s simple and straightforward design should hopefully prove inspirational to many hardware enthusiasts. But if you’re looking for something more advanced, we featured a neat pomodoro timer that displays quotes a few weeks ago. Of course, this being Hackaday, we’ve also seen a clock based on literary quotes.

Continue reading “The Inspirer Keeps Your Mood Up With Inspirational Quotes And Soothing Music”

Begin Your Day On An Uplifting Note With A Daily Affirmation Mirror

We’ve seen dozens of “Magic Mirror” builds around here, most of which display all sorts of information — calendar, weather, news. They’re great builds, but they tend to be a bit busy and don’t really inspire a calm start to the day. But if you’re good enough and smart enough, you can build this electronic affirmation mirror, and doggone it, people will like you.

[Becky Stern] stripped the magic mirror concept down to a minimum with this build and uses only an array of 14-segment alphanumeric displays to scroll uplifting messages. The glass she used is partially reflective, and when covered with black tape on the backside, with a small portal for the display, it makes a decent mirror. The displays are driven by a Trinket using static affirmations stored in the sketch; a microcontroller with a WiFi connection could also be used to source affirmations on the fly. Or, you know, stock prices and traffic updates, if you’re not into the whole [Stuart Smalley] thing.

So what about those aforementioned magic mirror builds? We’ve got large ones, small ones, retro ones, and even kid-centric ones. Take your pick!

Continue reading “Begin Your Day On An Uplifting Note With A Daily Affirmation Mirror”