Lego Fourteen-Segment Display Needs Plenty Of Motors

Hackers love 7-segment displays, and will gladly wax lyrical about the silly words you can almost spell on them and so on. Less appreciated are their bigger cousins, the fourteen and sixteen segment displays, which get all alphanumeric about things and are thus much easier for humans to read. You can even build the former out of Lego, as [ord] demonstrates.

A look at the mechanism driving the display.

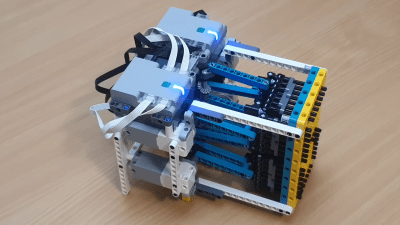
The “segments” are made up of Lego shafts that are pushed up through a yellow matrix of holes when they are switched “on.” A full seven motors are used to make the single-character display work, each one driving two segments. Two Lego Powered Up controller bricks are required to drive everything going on here, making the final design not just mechanically complicated, but electronically complicated as well.

Amusingly, those don’t come cheap, either; the parts total cost of this build is likely somewhere between $50-100 US. You probably don’t want to build an entire scrolling message board using this design, even if it does look resplendent in black and taxi yellow.

We’ve seen [ord]’s work before, too, in the form of these mechanically magnificent 7-segment Lego displays. Video after the break.

Continue reading “Lego Fourteen-Segment Display Needs Plenty Of Motors”

Hacking An Experimental ESA Satellite

Hacking these days means everything from someone guessing your password and spamming your contacts with toxic links, to wide-scale offensive cyberattacks against infrastructure by sophisticated operators backed by nation states. When it comes to hacking satellites, though, [Didelot Maurice-Michel] found himself tangling with some hardware belonging to the European Space Agency. 

As part of an event called HackCYSAT, hackers were invited to attack the ESA’s OPS-SAT, a CubeSat intended to demonstrate improved techniques for mission control and more advanced satellite hardware. The computer hardware on board is ten times more powerful than other existing ESA satellites, and aims to take satellite technology on a new leap forward.

Continue reading “Hacking An Experimental ESA Satellite”

Bungee-Corded Bass Zither Really Slaps

Surely we’ve all played some bass riffs on a stretched-out rubber band before, right? [Nicolas Bras] found that the ultimate musical rubber bands are bungee cords, and used seven of them to build a double-bass zither that can be plucked or struck with drumsticks. Be sure to check it out in the build/demo video after the break.

[Nicolas] is what you might call a hardware store hacker. This is not his first instrumental rodeo by far; in fact, he has spent the last 15 years building instruments from stuff like PVC and other commonly-available items.

One thing in this build that’s not so commonly available is the large sound box [Nicolas] built to strap the bungee cords across. He also made custom bridges for the bungees that are topped with triangular wood, which makes them look like little row houses.

In order to actually play the thing, [Nicolas] arranged the row houses in a 2-point bridge system for dual-note strings, which sound good between the bridges and the bungee hooks, but not so much between the bridges themselves. Overall, the zither has a great, mellow sound no matter how he plays it, and we just might have to string one of these up ourselves.

Not a strings person? Then you might be sated by [Nicolas]’ PVC pipes, which play “Popcorn” perfectly.

Continue reading “Bungee-Corded Bass Zither Really Slaps”

Hall Effect Module Knows Where Your Motor Is

If you have a motor and you’d like to know where the shaft position is, you are likely to turn to an optical encoder scheme. However, as [lingib] points out, you can also use a magnet and a magnetometer. You can see how it works in the video below.

The MLX90393 is a 3-axis hall effect device and, with a magnet on the shaft, the X and Y outputs of the spinning magnet will form a quadrature output that you can easily read.

Continue reading “Hall Effect Module Knows Where Your Motor Is”

Skip The Shipping, Print Your Own Cable Chains

CNC machines and 3D printers tend to have plenty of cabling which must be neatly managed while the machine moves. If not properly taken care of, wires can easily end up tangled in the moving bits leading to a dead machine at best, and some kind of raucous fire at worst. [Nikodem Bartnik] decided to create his own cable chains for his CNC build to keep everything in check.

The benefit of cable chains is that they stop cables splaying everywhere while still allowing them to move as needed with the axes of the machine. [Nikodem] created 20mm and 40mm chains for his build, affixed into the aluminium extrusion with bolts and T-nuts for easy assembly. The chains are assembled by hand, with 3D printed clips that hammer in place to hold the cables inside once inserted.

Of course, there’s nothing stopping you from buying cable chains off the shelf. But if you don’t want to wait for shipping in this era of cursed supply chains, or you want a cable chain you can customize to perfectly suit your machine, making your own could be the way to go. 

Continue reading “Skip The Shipping, Print Your Own Cable Chains”

Ask Hackaday: Is It Time For Waste Heat And Cold Area Heating To Shine?

It’s difficult to escape the topic of energy supply at the moment, with the geopolitical situation surrounding the invasion of Ukraine leaving the natural gas supply to an entire continent in jeopardy. Fortunately we’re watching the green shoots of an early spring here in the Northern hemisphere so the worst of the winter weather is behind us, but industrial customers can take no such solace from the season and will have to weather whatever price hikes are to come. Every alternative idea for energy supply is on the table, and with the parallel imperative of decarbonising the economy this goes beyond the short term into a future without so much need to rely on gas.

The Future is Cloudy

A district heating plant in Vienna, Austria.
A district heating plant in Vienna, Austria. Joadl, CC BY-SA 3.0 AT

A collaboration between a Finnish district heating network and Microsoft caught our eye because the location of a new data centre for the tech giant was chosen specifically to supply waste heat to the network, rather than releasing it to the environment. It’s not uncommon at all for European cities to use district heating networks but they are normally supplied by waste incinerators, boilers, or combined heat and power stations. The use of data centre waste heat is a novelty, as is in particular the siting of the data centre being dictated by the network.
Continue reading “Ask Hackaday: Is It Time For Waste Heat And Cold Area Heating To Shine?”

Mindblowing Graphics From An ATtiny85

[Görg Pflug] wrote in with his really nice graphics library. It’s got multiple layers, two text consoles, greyscale, internal halftoning, and sprites. It can pull off a number of classic graphics tricks and demos. Oh yeah, and did we mention it runs on a freaking ATtiny85 and an I2C OLED screen?!

This is an amazing piece of work — if you’d asked us if this was possible, we would have probably said “no”. And now it’s yours to use in your own projects. The GitHub repo is full of demos showing off everything from switching between multiple layers, extremely rapid text scrolls, animations, boing balls, and even a Wolfenstein-style raycaster. On an ATtiny85.

There’s a demo video, embedded below, that shows it all off, but honestly you have to think about what’s going to to be suitably wowed. The first demo just seems to have a graphic wave over static text, for instance. No big deal? It’s blending the greyscale layers together and dithering them out to black and white for the OLED in real time! On an ATtiny85.

While the library is written in straight C++, there are even a couple examples of how you’d integrate this with Arduino’s Wire library if you so wished. We don’t know about you, but this makes us want to whip together an ATtiny85 and SSD1306 OLED demo board just to start playing around. This isn’t just an amazing hack, but it would also be a useful way to add graphics and a nice console to any project you’re working on.

Did we mention it’s all done on an ATtiny85?  Over I2C? Kudos!

Continue reading “Mindblowing Graphics From An ATtiny85”