Souped-Up Reflective Sensor Uses Itself For Wireless Programming

Proximity sensors are common enough in automation projects that we hardly give them a second thought — pick something with specs that match the job and move on. But they can be fussy to get adjusted just right, a job made more difficult if they’re located in some out-of-the-way corner.

But where lies a challenge, there’s also an opportunity, as [Ido Gendel] shows us with this remote-controlled proximity sensor. The story behind this clever little hack starts with an off-the-shelf sensor, the kind with an IR LED and a phototransistor pointed in the same direction that gives a digital output when the light bouncing back into the phototransistor exceeds a certain threshold. It was setting the threshold that gave [Ido]’s client trouble, so [Ido] decided to build a programmable drop-in replacement to make the job easier.

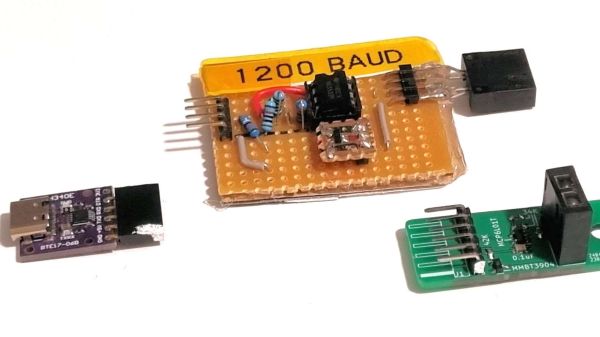
The first try at this used an OBP732 reflective transmitter and an ATtiny202 microcontroller and had three pads on the PCB for programming. This still required physical contact for programming, though, so [Ido] had the idea to use the sensor for wireless IR programming. The microcontroller on version two was switched to an ATtiny212, and a couple of components were added to control the power of the LED so the sensor could do double duty. A programmer using the same sensor and a USB-to-UART adapter completes the system, and allows the sensor threshold to be set just by shining the programmer in its general direction from up to 25 cm away.

We think that getting multiple uses from a single sensor is pretty clever, so hats off for this one. It’s not the first time we’ve featured one of [Ido]’s projects, but it’s been quite a while — this one-clock-cycle-a-day Shabbat clock was the most recent, but you can clearly see the roots of the sensor project in this mouse pointer data encoder that goes all the way back to 2015.

Fixing A Hot Shop, With Science

We know that pretty much everybody in the Northern hemisphere has had a hellish summer, and there’s little room for sympathy when someone busts out with, “Oh yeah? You think THAT’s hot? Well, lemme tell you…” But you’ve got to pity someone who lives in north Texas and has a steel Quonset hut for a shop. That’s got to be just stupidly hot.

But stupid hot can be solved — or at least mitigated — with a little smarts, which is what [Wesley Treat] brought to bear with this cleverly designed shop door heat shield. When it pushes past 42°C — sorry, that sounds nowhere near as apocalyptic as 108°F — the south-facing roll-up door of his shop becomes a giant frying pan, radiating heat into his shop that the air conditioner has trouble handling. His idea was to block that radiant heat with a folding barrier, but to make sure it would be worth the effort, he mocked up a few potential designs and took measurements of the performance of each. His experiments showed him that a layer of extruded polystyrene (XPS) foam insulation covered with reflective Mylar did better than just the foam or Mylar alone.

The finished heat shield is an enormous tri-fold plywood beast that snugs up against the door when things get toasty in the shop. There’s a huge difference in temperature between the metal door and the inside surface of the shield, which will hopefully keep the shop more comfortable. We imagine that the air between the door and the shield will still heat up, and convection could still distribute all that hot air into the shop. But at least he’s giving the AC a fighting chance.

In addition to great shop tips like this and his custom storage bins, [Wesley] is a talented signmaker. He’s pretty funny too — or maybe that’s just the heat talking.

Continue reading “Fixing A Hot Shop, With Science”

Sneeze Into Your Hand, Not Your Elbow With This Nose-Shaped Sanitizer Dispenser

You’ve got to love a language like German, where not only is it possible for a word or two to stand in for a complex concept, but you don’t even need to speak the language to make a good guess at what it all means. Of course when your project is a giant nose that mock-sneezes sanitizer into your hands, it doesn’t really matter that you call it Der niesende Desinfektionsmittelspender. Humor based on bodily functions is, after all, the universal language.

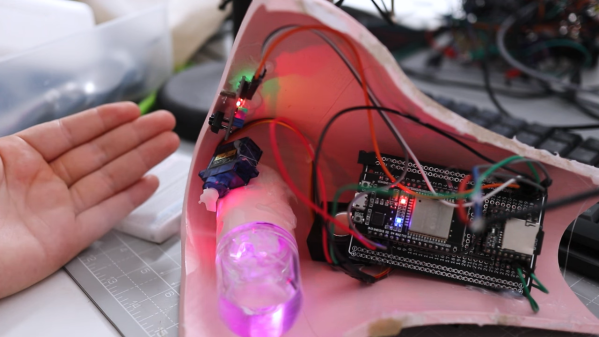
Working knowledge of German or not, figuring out exactly what [Nina] is doing here isn’t too difficult. Judging by the video below and the build log, the idea is to detect the presence of a hand underneath the dispenser with a simple IR reflective sensor hooked to some kind of microcontroller — an ESP32 in this case. Audio clips of sneezes are stored on an SD card and played back through a small speaker, while a hobby servo pushes the button on an atomizer. It seems as if selecting the proper dispenser was the hardest thing about the project; [Nina] finally settled on a battery-operated mister that was just the right size to fit into the nose. Oh, didn’t we mention the giant, pink, 3D-printed nose that houses the whole thing? Sorry about that — it’s quite subtle and easy to miss.

Anyway, the whole project is a lot of fun and brought a genuine laugh when we saw it. It’s a clever way to poke gentle fun at the germaphobes who came up with other, less whimsical methods of dispensing hand sanitizer. But let’s face it, they ended up being proven pretty much on the mark about things.

Continue reading “Sneeze Into Your Hand, Not Your Elbow With This Nose-Shaped Sanitizer Dispenser”

Thin Coatings Require An Impressive Collection Of Equipment And Know-How

Let’s be honest — not too many of us have a need to deposit nanometer-thick films onto substrates in a controlled manner. But if you do find yourself in such a situation, you could do worse than following [Jeroen Vleggaar]’s lead as he builds out a physical vapor deposition apparatus to do just that.

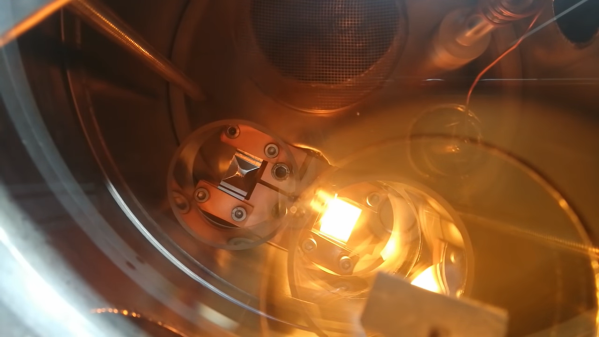
Thankfully, [Jeroen] has particular expertise in this area, and is willing to share it. PVD is used to apply an exceedingly thin layer of metal or organic material to a substrate — think lens coatings or mirror silvering, as well as semiconductor manufacturing. The method involves heating the coating material in a vacuum such that it vaporizes and accumulates on a substrate in a controlled fashion. Sounds simple, but the equipment and know-how needed to actually accomplish it are daunting. [Jeroen]’s shopping list included high-current power supplies to heat the coating material, turbomolecular pumps to evacuate the coating chamber, and instruments to monitor the conditions inside the chamber. Most of the chamber itself was homemade, a gutsy move for a novice TIG welder. Highlights from the build are in the video below, which also shows the PVD setup coating a glass disc with a thin layer of silver.

This build is chock full of nice details; we especially liked the technique of monitoring deposition progress by measuring the frequency change of an oscillator connected to a crystal inside the chamber as it accumulates costing material. We’re not sure where [Jeroen] is going with this, but we suspect it has something to do with some hints he dropped while talking about his experiments with optical logic gates. We’re looking forward to seeing if that’s true.

Continue reading “Thin Coatings Require An Impressive Collection Of Equipment And Know-How”

Begin Your Day On An Uplifting Note With A Daily Affirmation Mirror

We’ve seen dozens of “Magic Mirror” builds around here, most of which display all sorts of information — calendar, weather, news. They’re great builds, but they tend to be a bit busy and don’t really inspire a calm start to the day. But if you’re good enough and smart enough, you can build this electronic affirmation mirror, and doggone it, people will like you.

[Becky Stern] stripped the magic mirror concept down to a minimum with this build and uses only an array of 14-segment alphanumeric displays to scroll uplifting messages. The glass she used is partially reflective, and when covered with black tape on the backside, with a small portal for the display, it makes a decent mirror. The displays are driven by a Trinket using static affirmations stored in the sketch; a microcontroller with a WiFi connection could also be used to source affirmations on the fly. Or, you know, stock prices and traffic updates, if you’re not into the whole [Stuart Smalley] thing.

So what about those aforementioned magic mirror builds? We’ve got large ones, small ones, retro ones, and even kid-centric ones. Take your pick!

Continue reading “Begin Your Day On An Uplifting Note With A Daily Affirmation Mirror”

Color Sensor From An RGB LED And A Photocell

When you need to quantify the color of an object, you’ve got quite a few options. You can throw a Raspberry Pi camera and OpenCV at the problem and approach it through software, or you can buy an off-the-shelf RGB sensor and wire it up to an Arduino. Or you can go back to basics and build this reflective RGB sensor from an LED and a photocell.

The principle behind [TechMartian]’s approach is simplicity itself: shine different colored lights on an object and measure how much light it reflects. If you know the red, green, and blue components of the light that correspond to maximum reflectance, then you know the color of the object. Their sensor uses a four-lead RGB LED, but we suppose a Neopixel could be used as well. The photosensor is a simple cadmium sulfide cell, which measures the intensity of light bouncing back from an object as an Arduino drives the LED through all possible colors with PWM signals. The sensor needs to be white balanced before use but seems to give sensible results in the video below. One imagines that a microcontroller-free design would be possible too, with 555s sweeping the PWN signals and op-amps taking care of detection.

And what’s the natural endpoint for a good RGB sensor? A candy sorter, or course, of which we have many examples, from the sleek and polished to the slightly more hackish.

Continue reading “Color Sensor From An RGB LED And A Photocell”

Sound Card Tachometer Rises From The Junkbox

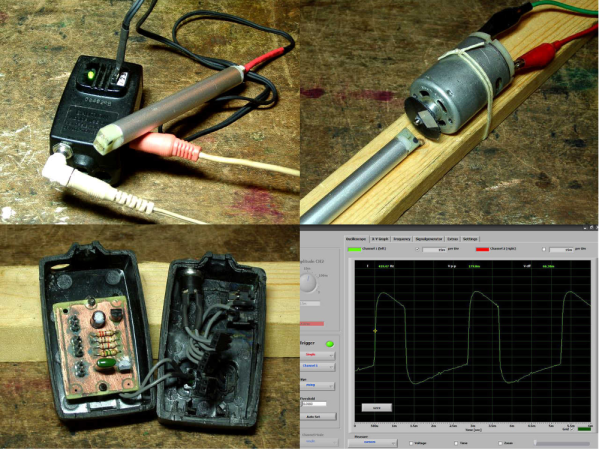
We love writing up projects that re-use lots of old parts. In fact, we save the links and use them as defense when our significant other complains about the “junk” in the basement. No, that tactic hasn’t ever worked, but we’re going to keep trying. Case in point, [Wotboa] needed a non-contact tachometer. There are plenty of commercial products which do just that. After consulting his parts bin, [wotboa] realized he had everything he needed to hack out his own. An IR break beam sensor from an old printer was a perfect fit in an aluminum tube. With the outer shell removed, the emitter and detector were mounted in the nylon shell of an old PC power supply connector, effectively turning them pair into a reflective sensor. To amplify the circuit, [wotboa] used a simple 2n2222 transistor circuit. The key is to keep the voltage seen by the sound card the range of a line level signal. This was accomplished by adding a 2.2 Megohm resistor in line with the output. [wotboa] drew his schematic in eagle, and etched his own PCB for the project. Even the tachometer’s case came from the parts bin. An old wall wart power supply gave up its shell for the cause, though [wotboa] is saving the transformer for another project.

For sensing, [wotba] used [Christian Zeitnitz’s] Soundcard Oscilloscope software.  Measuring the RPM of the device under test is simply a matter of determining the frequency of the signal and multiplying by 60. A 400 Hz signal would correspond to a shaft turning at 24,000 RPM. The circuit performs well in the range of RPM [wotboa] needs, but using a sound card does have its limits. The signals on the scope look a bit distorted from the square waves one would expect. This is due to the AC coupled nature of sound cards. As the signal approaches DC, the waveform will become more distorted. One possible fix for this would be to remove the AC coupling capacitor on the sound card’s input. With the capacitor removed, an op amp buffer would be a good idea to prevent damage to the sound card.

[Via Instructables]