Hackaday Prize Entry: Radio Telescope Interferometer

Radio telescopes are one of the dark arts of science. Not only do you have to deal with RF wizardry, the photons you’re detecting are so far out of the normal human experience that you really don’t know what you’re looking at. It’s hard, but that’s the point — there’s a lot to learn with a radio telescope.

[alfazoOm]’s entry in the 2017 Hackaday Prize seeks to counteract a two-part problem: first, there is a dearth of educational radio interferometers in Latin America. Secondly, in Colombia, there’s only so much clear sky so radio astronomy is the preferred technique. Even though they’re so close to the equator, a lot of the northern stars can be seen as well. His interferometer, IMFR11GHz, answers both of those challenges.

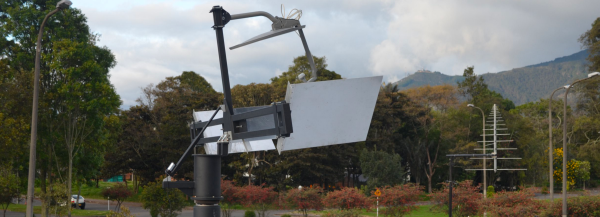
IMFR11GHz is a Michelson interferometer, in which a light source is split into two beams, which are reflected by mirrors back to the detector. [alfazoOm] is basing his telescope off of the Stony Brook radio interferometer, though he is designing custom hardware that can position the dish in whatever direction the operator desires with an Alt-Az mount. The control system consists of an ESP32 microcontroller with an IMU and two stepper motors controlling azimuth and elevation. This is awesome citizen science, and a great entry in the Hackaday Prize.

Hackaday Prize Entry: Arduino Video Display Shield

The Arduino is the standard for any introduction to microcontrollers. When it comes to displaying video, the bone stock Arduino Uno is severely lacking. There’s just not enough memory for a framebuffer, and it’s barely fast enough to race the beam. If you want video from an Arduino, it’s either going to be crappy, or you’re going to need some magic chips to make everything happen.

[MagicWolfi]’s 2017 Hackaday Prize entry consists of an video display shield that would be so easy to use that, according to the project description, it could be a substitute for the classic Blink sketch.

The project centers around the VLSI VS23S010D-L chip, which packs 1 Megabit SPI SRAM with serial and parallel interfaces. An integrated video display  sends the composite video signal to display, with the mode depending on how many colors and what resolution is desired: for instance, at 640×400 you can display 16 colors. As he describes it, not 4K video but definitely Joust. The chip expects 3.3 V logic so he made use of a MC74LVX50 hex buffer to tailor the Arduino’s 5 V. Currently he’s working on revision two of the shield, which will include SPI flash memory.

You can follow along with the project on Hackaday.io or the current shield design can be found in [MagicWolfi]’s GitHub repository.

Hackaday Prize Entry: Global Positioning Clock

How do you get the attention of thousands of Hackaday readers? Build a clock! There are just so many choices to agonize over. Do you go with a crystal as a clock source, a fancy oven controlled crystal oscillator, or just mains voltage? Should you even think about putting a GPS module in a clock? All these are very interesting questions that encourage discussion or learning, and that’s what Hackaday is all about. Clocks are cool, and the engineering behind them is even cooler.

For one of [Nick]’s Hackaday Prize entries, he’s building a minimalist GPS clock. First up, the centerpiece of every clock, the display. There are eight seven-segment displays, two each for the hours, minutes, and seconds, and a smaller digit for tenths of a second. These displays are controlled by an ATXmega32E5, an upgrade on an earlier version of this project that only used an ATtiny and a MAX6951 LED driver.

The GPS wizardry is where this project gets really cool. [Nick] is using a SkyTraq Venus838LPx-T (that’s also available on a breakout board on Tindie). This GPS chip has a handy edge mount SMA connector to receive the signals from a GPS satellite, and has a bidirectional UART to dump the NMEA time codes and a PPS output. By combining the timecode, PPS output, and playing around with the timers on the microcontroller, [Nick] has a fantastically accurate clock that also looks great.

Hackaday Prize Entry: The Minimalist Z80 Computer

The best projects always seem to come from eBay. A few weeks ago, we found a few tiles meant for gigantic LED panel installations, and fifty bucks got you ten tiles. That eBay auction is now sold out. A while ago, [Just4Fun] realized he could build a Z80 microcomputer with $4 worth of parts from everyone’s favorite online auction house. The result is a $4 Z80 home computer, and a great Hackaday Prize entry to boot.

So, what do he need to build a retrocomputer loaded up with Forth, CP/M, and Basic? A CPU is a necessity, and [Just4Fun] found a Z80 (technically a Z84C00) for just a bit more than a dollar. A computer will need some RAM too, and a 128 kiB parallel SRAM was just the ticket for another dollar.

Here’s where things get a bit more interesting. Where the retrocomputers of yore were loaded up with glue logic, PLAs, or other weird chips, modern technology has come a long way. Instead of a massive amount of glue, [Just4Fun] is using an ATmega32A for all the I/O, address decoding, and a serial terminal.

The ATmega thrown into this cornucopia of vintage chips is itself more than a decade old, but it does have 40 pins and 32 kiB of Flash. That’s enough to ‘virtualize’ all the peripherals you’d need on a Z80 bus and provide the clock signal for the rest of the computer.

This home computer was originally designed and laid out on a solderless breadboard, but [WestfW] managed to stuff this all onto a small PCB. That’s a cheap computer that gets you all the retrocomputing goodies, and it’s something that’s just random enough to be a perfect entry for the Anything Goes portion of the Hackaday Prize.

Hackaday Prize Entry: CNC Mill Lets Kids Engrave On The Fly

The manufacturing revolution has already begun, and there are 3D printers, CNC machines, and laser cutters popping up in garages and workspaces all around the world. The trouble with these machines is that they’re fiddly to use, and you don’t want a kid playing around with them.

[moritz.messerschmidt]’s Hackaday Prize entry is a desktop Badgemaker that engraves acrylic name badges for kids. Under the hood, an Arduino with a custom-built shield with 3 SilentStepStick stepper drivers on it operates the three NEMA-11 motors. Meanwhile, the kids interact with a 7” touchscreen powered by a Raspberry Pi.

Once the kid selects what to engrave, motors move the piece of acrylic against a rotary tool’s milling bit, carving the acrylic as instructed. These cards are then equipped with watch batteries and LEDs to light up.

The touch screen is key. Bummed out by basic CNC machines that were difficult to use — like hobbyist 3D printers with a newbie-befuddling interface — [moritz.messerschmidt] went out of his way to make the interface kid-friendly, with just a simple set of choices necessary for creating one’s own name badge.

Is this a feature-packed CNC machine with all the bells and whistles? No, but that’s not the point. The purpose of the Badgemaker is to introduce a new generation to personal fabrication technology. It’s a toy, but that’s the point: a CNC machine that’s so easy to use, even a child can do it.

Hackaday Prize Entry: Thingspeak IoT Heart Rate Monitor

[Naman Chauhan]’s 2017 Hackaday Prize entry consists of a heartbeat detection and monitoring system that centers around everyone’s favorite WiFi board, the ESP8266. The monitor is hooked up to the patient’s finger, keeping track of his or her vitals and publishing the data on the cloud.

By using Thingspeak to manage the data, [Naman] leverages the platform’s data visualization and analytical features. Also, by making the data accessible on the cloud, he offers an intriguing opportunity to help friends and relatives to monitor the data. If you think about it, if you had a loved one in the hospital, wouldn’t having all of his or her chart available on your phone be great?

Hackaday Superconference Kicks Off With A Party

Begin the Hackaday Superconference a day early this year. Supercon is far more than a conference, it’s a Hacker Village that forms when we all get together and that’s happening on Friday, November 10th with early badge hacking, dinner, and a party all included with your Supercon ticket!

In the last year, Supplyframe (Hackaday’s parent company) moved into a new office. It’s a beautiful space with enough square footage to host a conference itself. This year we’ll be capitalizing on that by hosting some of the larger Superconference workshops there. They’ve also opened their doors and are pulling out all the stops for the meet-and-greet pregame on Friday. Just let us know you’ll be there.

Badge pick up and hacking will begin at noon. If you’re itching to get your hands on the amazing Supercon badge, this is where you want to be. As we move into the five o’clock hour we’ll bring in the catering and the bartenders for a bash that welcomes back your extended family of hackers, designers, and engineers. This an amazing community and you’re a part of it so make your plans to get to town early.

Is a day early not good enough for you? You’re in luck! We’ve opened up a chat room on Hackaday.io. Talk to one another about what to bring, how to get there, what to do, and who exactly already has the Gerbers for the Superconference badge. It’s going to be a fantastic conference, and we can’t wait to see you there!