Bonfire – Interactivity Using Pico Projectors And Cameras

[youtube=http://www.youtube.com/watch?v=O3MZYRAZJNk]

This video shows a demonstration of Bonfire, an additional interface for computers. It consists of a pico projector and camera hang on the back of either side of a laptop. The projector displays information on the table top and the camera monitors the area for interaction. It can recognize your hand or objects such as a smartphone or headphones and react accordingly. An accelerometer in the laptop picks up tapping (we’d guess you have to tap pretty hard) and there is also support for gestures. This was presented at 2009 UIST and unfortunately the published article is not available for free [Thanks for the link Ciflet].

We hope to see this kind of thing, as well as skin based input, come to the market some day. Until then, you’ll have to build your own.

[via Procrastineering]

Hackaday Links: April 18, 2010

Remote motion control

This project walks though a method of controlling motors with an accelerometer when the two are physically separated. Two Arduinos are used, with the user interface and the motor control connected via Ethernet. This must be useful for something; maybe it should be the next step once you get your accelerometer up and running.

CNC machine build

[Lucassiglo21] is doing a great job documenting his CNC build. The project has been ongoing for several months. He’s seeing some success with milling simple PCBs along with other millwork projects.

Condom starts a fire

Ever needed to start a fire and had nothing on you but a condom? Yeah, we haven’t either but that doesn’t diminish the fun of this whimsical ‘Condom Hack Pack‘ video. See the uses you never thought of for those rubbery package protectors.

Solderless PCB

Print your component locations on a piece of card stock and populate the board without any soldering? This is quick and convenient for a circuit that doesn’t need to last very long. It uses wire wrapping to connect the components, completing the circuit. [Thanks Frogz]

Beginner Concepts: Using An Accelerometer

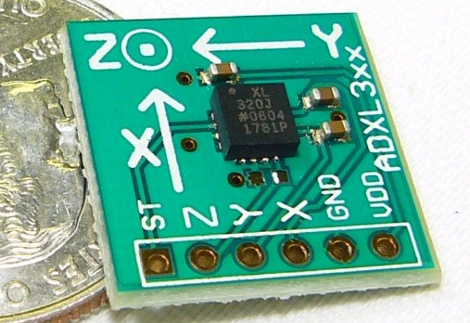
Accelerometers make for nice user interaction, that’s why every Apple product seems to have one included and the Nintendo Wii is still alive despite its underpowered graphics capabilities. Adding one to your project is pretty simple, just a matter of reading in analog data and interpreting it according to the datasheet. If you’re just starting out, here’s a tutorial on how to interface an accelerometer with a PIC microcontroller. They’re using an ADXL320 which can be acquired on a breakout board for about $30. The schematic and code are simple so even if you don’t intend to build the circuit (or want to use a different uC), this is easy to understand as an academic exercise.

[Thanks Skitchin]

[Photo credit: SparkFun]

Punching Accelerometers

Shortly after finishing his Makiwara punching bag, [Abieneman] wired and programmed an Arduino to an accelerometer to find out just how much acceleration (and with some math, force) is behind his punches. The project is simple and would be quick to reproduce for your own measuring and experiments: all that he used included an Arduino, accelerometer (with A/D converter), LED displays (and shift register). We were a little disappointed to learn of how much static the accelerometer produced, so measuring things such as impulse, energy, and pretty much anything not kinematic is nullified. But it makes us wonder, how much static would be in say, a Wii Remote punching bag?

Android Audio-serial Connection

This seems like something of a throwback hack. [WilinNeofoxx] has built an audio modem interface for use with his Android phone. A program running on the Android device takes the accelerometer data and converts it into a 9600bps audio signal, kind of like a dial-up modem. His custom circuit board takes that sound in through the headphone jack and demodulates it for use on the serial port of a PC. This connection to controls a flight simulator using the G1‘s motion sensors. In the video at the bottom of his post he unplugs the audio cable for a few seconds and you can hear the audio datastream coming from the phone. It’s pretty annoying so you might want to turn down those speakers before viewing it.

Max/MSP Accelerometer Beat Control

[vimeo http://vimeo.com/8222312%5D

[Ryan] let us know about his Max/MSP Controller. Inside the device is an ADXL 335 accelerometer and 6 push buttons wired to an Arduino. The input data is sent to Max MSP, a sequencer controlling 5 audio tracks, correlating to 5 of the buttons. The 6th button controls delay. What we really liked was how the accelerometer modified the speed of the beat in the X-axis, and the delay intensity with the Y-axis. Whats next? We think gesture recognition might be something fun to try, but [Ryan] is unsure. We’ll keep you up to date.

RFID Control Concept

That’s not a smoke detector, it’s an RFID detecting puck. [Eric] and [Brent] have been working on this concept to produce a virtual knob. When the device detects an RFID tag it vibrates, then the puck can be turned like a virtual knob, an accelerometer picking up the motion data. The build is rounded out with a XBee module for connectivity and housed in a printed case.

The video after the break shows the device controlling colored lights. There is a different tag for each color and when the reader is over one of them the puck can be rotated to turn brightness up or down. We foresee a lot of great uses for this. Turn it into a thermostat for public places by adding a character display to the mix. A tag can be affixed to a wall, when you want to change the thermostat setting just hold the puck over the tag and turn until the screen displays the desired temperature.

Continue reading “RFID Control Concept”