Animating A Lamp With The Leap Motion

leap

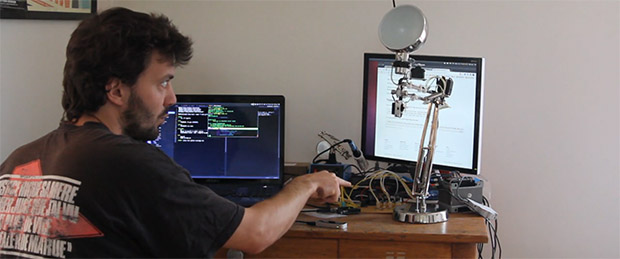
The Leap Motion is a very cool device, but so far we haven’t seen many applications of interacting with physical devices. [Xavier] wanted to control a cute servo animated desk lamp with his hands, and with the help of a Leap and an Arduino he was able to do just that.

The Leap Motion API has a handy feature that will output all its data over a websocket. It’s a very easy way to transfer hand positions with a minimum amount of overhead, and with just a little bit of Node.js, it’s only two lines of code to connect the Leap to a websocket server.

With the Leap data on a web server, the only thing left to do is pulling it down to an Arduino. Again, [Xavier] used Node.js, this time in the form of johnny five, a Javascript-based Arduino framework. After that, it was a simple matter of mapping the data from the Leap to servo movements in [Xavier]’s Pixar-inspired lamp.

Video of the build below.

Continue reading “Animating A Lamp With The Leap Motion”

3D Printed Dispenser Flings Treats At Your Pets

internet-connected-dog-treat-dispenser

If you’re stuck in the virtual world like [Kevin Flynn] you can still make sure your pup is rewarded for good behavior. Just follow [Jwarp’s] design for this Internet connect dog treat dispenser.

We were actually a bit surprised by the demo video. It shows that the compact unit is more than capable of reliably dispensing one treat at a time. It started as a wood prototype which allowed him to tweak how the servo motors worked before laying out all of the 3D parts in Sketch Up. Two motors cooperate to get the job done. The first allows one treat to exit that shoot coming from the center of the hopper. The other stirs the remaining inventory to both position the next treat and loosen any jams.

Continue reading “3D Printed Dispenser Flings Treats At Your Pets”

737 Autopilot, Courtesy Of An Arduino

737

To start this off, no, we’re not looking at a piece of actual flight hardware. This is [Andrea Giudici]’s project to tie real-world hardware into Flight Simulator X. It’s an autopilot for simulated aircraft, so those of you looking at flying a 737 sometime in the near future need not worry about computers flying your plane. Airbus passengers, though…

[Andrea] didn’t want to dig around with the clunky point-and-click interface in FSX, so he created a virtual autopilot with a 2×16 LCD display and an Arduino to interact and set the most common autopilot settings such as altitude, speed, heading, and engagement. The physical interface is just three tact switches and a pot, while the interface to FSX is a custom driver that turns the USB out of the Arduino into actual flight commands.

It’s not a 737 cockpit in a garage, but it’s still a wonderful alternative to poking around in a completely computer-bound interface.

Video of the ‘duino in action after the break.

Continue reading “737 Autopilot, Courtesy Of An Arduino”

Rocketduino, For High-G, High Altitude Logging

rocketduino

Although the thrill of launching rockets is usually found in their safe decent back to Earth, eventually you’re going to want some data from your flight. Everything from barometric pressure, GPS logging, and acceleration data is a useful thing to have, especially if you’re trying to perfect your craft. [zortness] over on reddit created a data logging board created especially for amateur rocketry, a fabulous piece of work that stands up to the rigors of going very fast and very high.

The design of the board is a shield for the Arduino Mega and Due, and comes with enough sensors for over-analyzing any rocket flight. The GPS logs location and altitude at 66Hz, two accelerometers measure up to 55 G. Barometric, temperature, and compass sensors tell the ground station all the data they would need to know over a ZigBee 900MHz radio link.

Because this is an Arduino, setting up flight events such as deploying the main and drogue chutes are as easy as uploading a bit of code. [zortness] built this for a 4″ diameter rocket, but he says it might fit in a 3″ rocket. We just can’t wait to see some videos of it in action.

Turning A Router Into An Arduino Shield

[Dirk] had a problem: while he already had an Arduino with an Ethernet shield, he needed WiFi for an upcoming project. Running a Cat5 cable was out of the question, and a true Arduino WiFi shield is outrageously expensive. He did, however, have a WiFi router lying around, and decided it would make a perfect WiFi shield with just a little bit of cutting.

The router [Dirk] used was a TL-WR702N, a common router found in the parts bins of makers the world over. Inspiringly, the size of the router’s PCB was just larger than the space between the Arduino’s pin headers. Turning the router into a shield is simply a matter of scoring the edge of the board and gluing on a few pins for mechanical strength.

Power and ground lines were soldered between the pin headers and the router, while data is passed to the Arduino and Ethernet shield through a short cable. It may not look pretty, but if it works in a pinch we can’t complain.

LegoDuino For Kid-friendly Microcontrollers

Lego

[J. Benschop] is teaching his nine-year-old son electronics by giving him a few wires, LEDs, and batteries. Eventually, the son looked over at his dad’s workbench and wondered what the little bug-shaped rectangles did. Microcontrollers and embedded programming are just a bit too advanced for someone who hasn’t hit a double-digit age, but [J] figured he could still have his son experience the awesomeness of programming electronics by building a custom electronic Lego microcontroller system.

This isn’t as complex as a Lego Mindstorms system. Really, it’s only an ATMega and a 2.4 GHz wireless transceiver. Still, that’s more than enough to add a few sensors and motor drivers, and an awesome introduction to electronics development. The enclosure for the LegoDuino is, of course, compatible with every Lego brick on the planet. It’s made from a 6×16 plate, three blocks high, with enough room for the electronics, three AA batteries, and the IO headers.

Programming an ATMega, even with the Arduino IDE, is a little beyond the capacity of [J. Benschop]’s nine-year-old son, so he made a few changes to the Minibloq programming environment to support the newly created LegoDuino. It’s a graphical programming language that kids of just about any age can pick up quickly, and with the included RF transceiver inside the ‘Duino, it can even be programmed wirelessly.

It’s an amazing piece of work, and much, much simpler than even the noob-friendly Lego Mindstorms. Not as powerful, though, but when you’re just teaching programming and electronics, you really don’t need much.


Astrosmash Style Video Game As Sony SmartWatch Firmware

sony-smartwatch-native-video-game

Here’s a firmware hack that brings a video game to the Sony SmartWatch. It’s pretty impressive considering the limited screen real estate and the fact that it has to be shared with the touch input. But we find it equally impressive that a game of this quality followed so quickly on the heels of Sony announcing the ability to make your own firmware for the watch. The speedy development is thanks partly to the community driven effort to hack the Arduino IDE to load sketches on the watch.

The advent of this IDE hack means that taking your Arduino sketch writing abilities to this hardware now has a fairly low learning curve. And reading through [Asier Arranz’s] game code will make it even easier. He calls his game Star Wars but it reminds us more of Astrosmash. There’s a little green semicircle which is your ground-based defense vehicle. You need to fire the laser to shoot falling items out of the star-strewn night sky while also collecting power-ups that fall to the ground. Game play video is below.

Just remember, if you come up with a cool firmware app for the SmartWatch we want to hear about it.

Continue reading “Astrosmash Style Video Game As Sony SmartWatch Firmware”