Hackaday Links: June 12, 2012

Amazing 3D rendering in real-time

Ah, the 90s. A much simpler time when the presenters on Bad Influence! were amazed by the 3D rendering capabilities of the SGI Onyx RealityEngine2. This giant machine cost £250,000 back in the day, an amazing sum but then again we’re getting nostalgic for old SGI hardware.

Well, Mega is taken… let’s call it Grande

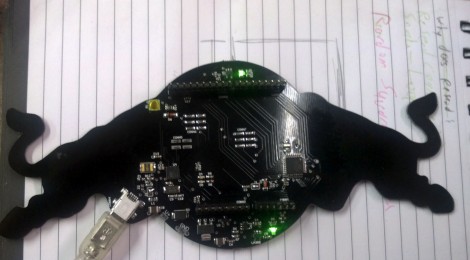
[John Park] needed to put something together for last month’s Maker Faire. A comically large, fully functional Arduino was the obvious choice. If you didn’t catch the demo last month, you can grab all the files over on Thingiverse.

Is that an atomic clock in your pocket or… oh, I see.

Here’s the world’s smallest atomic clock. It’s made for military hardware, so don’t expect this thing to show up at Sparkfun anytime soon; we can’t even fathom how much this thing actually costs. Still, it’ll be awesome when this technology trickles down to consumers in 10 or 20 years.

Converting a TRS-80 keyboard to USB

[Karl] is working on an awesome project – putting a Raspberry Pi inside an old TRS-80. The first part of the project – converting a TRS-80 keyboard to USB – is already complete. We can’t wait to see this build finished.

 A DIY Propeller dev board

Last week we complained about the dearth of builds using the Parallax Propeller. A few noble tinkerers answered our call and sent in a few awesome builds using this really unique micro. [Stefan]’s Propeller One is the latest, and looking at the schematics it should be possible to etch a single-sided board for this project. Awesome work and thanks for giving us a weekend project, [Stefan].

Nah, You Don’t Need An Ethernet Module For Your Arduino

[Andy] needed a cheap Internet connection between a data-gathering Arduino and his home server. An Ethernet shield would suffice, but he couldn’t run CAT5 to the Arduino’s location. Wireless shields are hideously expensive, and after looking over the popular Zigbee modules, [Andy] had a few concerns about range and build complexity.

The obvious solution to this problem was getting a cheap WiFi router, flashing OpenWRT firmware on the device, and piping sensor data through the Arduino’s USB port, through the router, and over a WiFi connection to the server.

[Andy] used a TP-Link TL-WR703N wireless ‘travel router’ available on eBay £15 (~$30 USD when we checked). After flashing the router with OpenWRT, [Andy] had a wireless connection from a remote data-collecting Arduino directly to his server.

Attentive Hack a Day readers will note this is the third ‘wireless router + OpenWRT as a dev board’ build this week (first one, second one) . No, we don’t know what’s going on, or why the collective unconscious of makers around the globe decided to latch onto this type of build so suddenly. OpenWRT is available for hundreds of different routers, and anything that keeps disused routers out of the landfill (with the bonus of doing something useful) is alright in our book, so if you have another similar build, send it in and we’ll get around to it sometime.

Smartphone Controlled RGB Lamp

We keep seeing a lot of RGB lamps, but they’re also constantly increasing in size and complexity. Take this rendition, which uses a lot of RGB LEDs and has smartphone control (translated).

The lamp itself uses 31 RGB LEDs arranged in a sphere that organizes them into three vertical rings. They’re all ganged together (not individually addressable) with one transistor per color. An Arduino board is responsible for control, and the build includes a Bluetooth module for incoming commands.

As you can see above, the Android app driving the device is really quite good. In addition to sliders for color mixing there is a separate window with a color picker. [Remick] included options like favorite color combos, color scrolling, and a timer that will shut the lamp off. We couldn’t embed it here, but you’ll find some demo video at the link above.

Adding Remote Control To Klipsch Surround System

The speaker system [Zurcher] bought was made by Klipsch. It is a surround sound unit but it’s intended to be used with a computer so there’s no wireless remote for it. Instead, a wired unit sits on the desk and lets you select between the speakers or headphones, and has a volume adjustment knob. The thing is he uses them for his home theater system and had to add his own remote control hardware to adjust them from across the room.

He started with some web searches that helped a lot. It seems others have mapped out the hardware in the past and he was able to use that information to find the volume chip inside the controller. A bit of signal sniffing let him work out the control commands coming in over the i2c bus. This was the information he needed to build his own controller. He grabbed his Arduino board, and IR receiver to take commands from just about any remote, and a four-digit 7-segment display to provide settings feedback. You can seen him showing off the final build in the clip after the break.

Continue reading “Adding Remote Control To Klipsch Surround System”

Large-scale Arduino Controlled Greenhouse Does Some Serious Farming

[Instrument Tek] isn’t messing around with a hobby-sized greenhouse. In fact if it were any bigger we’d call it a commercial operation. But what interests us is the professional-quality greenhouse automation he built around and Arduino board.

The greenhouse is about what you’d expect to see at a nursery, except the footprint is somewhere around 10’x10′. It’s a stick-built frame with walls made of poly. Professional greenhouses monitor and regulate temperature and humidity and this one does just that. The video after the break starts off by showing the controller box. It has temperature, humidity, and light sensors that allow the Arduino to judge growing conditions. If it gets too hot, some slats are opened and a fan exhausts air from the structure. If it gets to cold, a series of light fixtures are energized. They contain heat lamps, as this setup is in northern Alberta, Canada and it can get quite cold some nights. The drip system is also automated, with a solenoid to turn water on and off.

In addition to that 3:26 show-and-tell, we’ve embedded a 27-minute video that shows how to build the controller box. So you can start you plants indoors on the rack, then populate the greenhouse when they get large enough.

Continue reading “Large-scale Arduino Controlled Greenhouse Does Some Serious Farming”

Bike Alert Tells Drivers To Back Off

Bicycle commuters are often in a battle with drivers for space on the road. [Hammock Boy] does all of his commuting on two human-powered wheels, and is quite interested in not getting hit by a car. He decided to ply his hobby skills to build a device that helps keep him safe. It’s not just a tail light, it’s a sensor that shines brighter the closer a car is to the back of the bike.

The sensor portion is the ultrasonic range finder seen in the center of the protoboard. Surrounding it is a set of LEDs. Each is individually addressable with the whole package controlled by an Arduino. The sketch measures the distance between the back of the bike and whatever’s behind it. If there’s nothing, one Red led is illuminated. If there is an object, the lights shine brighter, and in different patterns as the distance decreases.

Certainly the next iteration could use a standalone chip without the need for the whole Arduino. This could even work with two battery cells and no voltage regulator. We also think the use of any other color than Red LEDs is suspect but we do love the concept.

Scratch-build Garden Nursery Uses Arduino Monitoring

Starting your garden indoors helps to ensure large yields. This is because the plants get a head start before it’s warm enough for them to be put in the ground. But the process involves a fair amount of labor, ensuring that the lights are turned on and off at the right times each day, and that the temperature for germination and growth, as well as humidity, hit a certain target. It’s obvious that a bit of automation would be nice, and this Arduino-based garden nursery does just that. One of the things that sets this project apart is that it shows you how to go from an empty room to the bounty of plant starters seen here.

For the most part the equipment is what you’d expect, seed trays and covers, tray warming mats, and fluorescent light fixtures. the whole thing is given a small footprint thanks to an adjustable shelving unit. The Arduino is used in conjunction with a Sprout Board to add connectivity for switching the lights and warming mats. This is just a matter of driving a relay to switch mains voltage and can take any number of forms, including this home automation project we saw the other day.

[Thanks Tom]