AlarmLamp

Prefix Your Phone Alarm With A Desk Lamp

If you are like [Gbola], then you have a hard time waking up during the winter months. Something about the fact that it’s still dark outside just makes it that much more difficult to get out of bed. [Gbola] decided to build his own solution to this problem, by gradually waking himself up with an electric light. He was able to do this using all off-the-shelf components and a bit of playing around with the Tasker Android application.

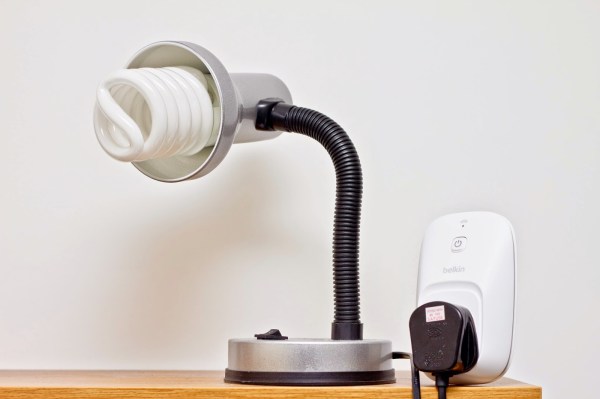
[Gbola] started out with a standard desk lamp. He replaced the light bulb with a larger bulb that simulates the color temperature of natural daylight. He then switched the lamp on and plugged it into a WeMo power switch module. A WeMo is a commercial product that attempts to make home automation accessible for consumers. This particular module allows [Gbola] to control the power to his desk lamp using his smart phone.

[Gbola] mentions that the official WeMo Android application is slow and includes no integration with Tasker. He instead decided to use the third-party WeMoWay application, which does include Tasker support. Tasker is a separate Android application that allows you to configure your device to perform a set task or series of tasks based on a context. For example you might turn your phone to silent mode when your GPS signal shows you are at work. WeMoWay allows [Gbola] to interact with his WeMo device based on any parameter he configures.

On top of all of that, [Gbola] also had to install three Tasker plugins. These were AutoAlarm, Taskkill, and WiFi Connect. He then got to work with Tasker. He configured a custom task to identify when the next alarm was configured on the phone. It then sets two custom variables, one for 20 minutes before the alarm (turn on the lamp) and one for 10 minutes after (turn it off).

[Gbola] then built a second task to actually control the lamp. This task first disconnects and reconnects to the WiFi network. [Gbola] found that the WeMoWay application is buggy and this “WiFi reset” helps to make it more reliable. It then kills the WeMoWay app and restarts it. Finally, it executes the command to toggle the state of the lamp. The project page has detailed instructions in case anyone wants to duplicate this. It seems like a relatively painless way to build your own solution for less than the cost of a specialized alarm clock lamp.

Amazon Echo Becomes A Better Home Automation Appliance

There’s a bright future ahead of us, filled with intelligent computerized assistants that will listen to everything we say and do our bidding. It’ll be like HAL from 2001: A Space Odyssey, but without unverified mission-critical software and a bunch of killing. Until then, we have a few Amazon Echo hacks that tease out a reasonably capable home automation system without a proper API.

This build was inspired by an earlier project that polled the to do list looking for key phrases. Saying, “Alexa, to do, lights on” would turn on an Internet-connected light bulb. Saying, “Alexa, to do, call home” would call a phone number set up with the ‘home’ keyword.

[Glen] has improved that earlier setup somewhat, mostly by getting rid of the requirement to say, ‘to do.’ The Git for the project still shows it’s exploiting the Amazon to do list, but this is a much cleaner build that should end up having a lot more possibilities.

So far, [Glen], or rather, Alexa, can control the temperature of the house through a Nest thermostat, the lighting of a room with a Phillips Hue light bulb, and other random tasks like playing an audio file through the speakers. Not bad, and something that really demonstrates the potential of a smart, connected home.

Hacking A Heating Pad

HeatingPadBreadboardS

[Bob] and his wife use a bed heating pad. In the winter, they typically turn it on about an hour before bedtime so the bed is nice and warm. The problem is, if they accidentally leave it on, they’ll wake up a few hours later: overheated. What they needed was an advanced timer system.

A normal outlet timer wouldn’t fit his needs: most of the year the pad should shut off after a slight delay, but in the winter they prefer to leave the heating pad on at a much lower temperature. [Bob] decided to create a custom timer with a microcontroller to provide adjustable duration and heating levels.

The circuit is simple. It consists of a microcontroller, a 2-digit LED display, two buttons, and two wires that connect to the heating pad’s original controller. The final build allows you to set the time the pad turns on, turns off, and/or down a few levels. It’s a fantastic hack, and you can see how the interface works in the video following the break.

Continue reading “Hacking A Heating Pad”

Arduino Astronomic Clock Automates Lights

ardAst

[Paulo’s] garden lights are probably a bit more accurately automated than anyone else’s on the block, because they use latitude and longitude clock to decide when to flip the switch. [Ed Note from the far future: this page no longer exists, but you can still read it on the Wayback Machine. The TimeLord library has also been superceded, so you’ll have some porting to do.]

Most commercial options (and hobbiest creations) rely on mechanical on/off timers that click on an off every day at the same time, or they use a photosensitive element to decide it’s dark enough. Neither is very accurate. One misplaced leaf obscuring your light-dependent resistor can turn things on unnecessarily, and considering the actual time of sunset fluctuates over the year, mechanical switches require constant adjustment.

[Paulo’s] solution addresses all of these problems by instead relying on an algorithm to calculate both sunrise and sunset times, explained here, combined with swiftek’s Timelord library for the Arduino. The build features 4 7-segment displays that cycle through indicating the current time, time of sunset and of sunrise. Inside is a RTC (real time clock) with battery backup for timekeeping along with an Omron 5V relay to drive the garden lamps themselves. This particular relay comes with a switch that can force the lights on, just in case.

Check out [Paulo’s] project blog for the full write-up, links to code and more details, then take a look at some other home automation projects, like the SMS-based heater controller or occupancy-controlled room lighting.

Raspi Z-Wave Automation Is Automated

raspiAutomationLocksnLights

Home automation keeps popping up here at Hackaday, so [Cristian Zatonyl] decided to share his Raspberry Pi-based system with us. This build takes a firm stance on the “automated” side of the automation vs. control debate we had last week: no user input necessary. Instead, [Cristian] relies on geofencing to detect whether he has driven outside the set radius and automatically turns off the lights and locks his door.

The build takes advantage of Z-Wave products, which are your typical wireless remote-control gadgets, but tacks on a third-party “RaZberry” board to a Raspi to give it control over off-the-shelf Z-wave devices. The final step is the integration of a custom iOS app that keeps tabs on the geofence boundaries and signals the Pi to control the lights and the front door lock.

[Cristian’s] tutorial covers the basics and admits that it’s a proof of concept without any security features. Judging by his other YouTube videos, however, we’re sure more developments are underway. Check out the video below for a demonstration of the system, then feel free to speculate on security concerns in the comments. Our article on Z-wave security from a few years ago might be a good starting point.

Continue reading “Raspi Z-Wave Automation Is Automated”

Ask Hackaday: What Is “Home Automation”?

homeAutomationCollage

We’re not entirely sure what’s become of the term “home automation.” The definition seems to have settled for any user interface in the home—via tablets, phones, handheld remote controls, etc. Some of these devices lack any form of automation and instead require manual input. Even Wikipedia’s home automation article suggests a move toward this trend, offering the following definition (emphasis ours):

It is automation of the home, housework or household activity. Home automation may include centralized control of lighting, HVAC (heating, ventilation and air conditioning), appliances, security locks of gates and doors and other systems, to provide improved convenience, comfort, energy efficiency and security.

Though “automation” is clearly included in the first sentence, one could interpret the bolded potion as meaning either:

  • Truly automated systems may also include centralized control (as a feature).
  • The category of home automation also includes systems that merely provide centralized controls.

So, are automated components optional? Judging by the phrasing of projects submitted to our tips line: yes sir. Truly automated systems exist, but if you browse through any home improvement store’s “home automation” section, you’ll be pummeled by a string of remote-controlled light dimmers and outlets. How many of these are designed to interact with sensors as feedback systems or otherwise function unattended?

Our articles often favor an “automation-optional” categorization. Should we, however, reserve the “automation” label for projects like the light switch based on room occupancy and deny other builds, like the voice-activated lights/outlets system or the RasPi lighting and audio control via web interface? Hit up the comments and help shed some light on how to properly use the terminology.

Fully Automated Watering Robot Takes A Big Leap Forward Toward Greenhouse Automation

aquarius_robot

Greenhouse owners might find [David Dorhout]’s latest invention a groundbreaking green revolution! [David]’s Aquarius robot automates the laborious process of precision watering 90,000 square feet of potted plants. Imagine a recliner sized Roomba with a 30 gallon water tank autonomously roaming around your greenhouse performing 24×7 watering chores with absolute perfection. The Aquarius robot can do it all with three easy setups; add lines up and down the aisles on the floor for the robot to follow, set its dial to the size of your pots and maybe add a few soil moisture sensors if you want the perfect amount of water dispensed in each pot. The options include adding soil moisture sensors only between different sized plants letting Aquarius repeat the dispensing level required by the first plant’s moisture sensor for a given series.

After also digging through a pair of forum posts we learned that the bot is controlled by two Parallax propeller chips and has enough autonomous coding to open and close doors, find charging stations, fill its 30 gal water tank when low, and remember exactly where it left off between pit stops. We think dialing in the pot size could easily be eliminated using RFID pot identification tags similar in fashion to the Science Fair Sorting Project. Adjusting for plant and pot size as well as location might easily be automated using a vision system such as the featured Pixy a few weeks back. Finally, here are some featured hardware hacks for soil moisture sensing that could be incorporated into Aquarius to help remotely monitor and attend to just the plants that need attention: [Andy’s] Garden sensors, [Clover’s] Moisture control for a DIY greenhouse, [Ken_S’s] GardenMon(itoring project)

[David Dorhout] has 14 years experience in the agriculture and biotech industry. He has a unique talent applying his mad scientist technology to save the future of mankind as seen with his earlier Prospero robot farmer. You can learn more about Aquarius’s features on Dorhout R&D website or watch the video embedded below.

Continue reading “Fully Automated Watering Robot Takes A Big Leap Forward Toward Greenhouse Automation”