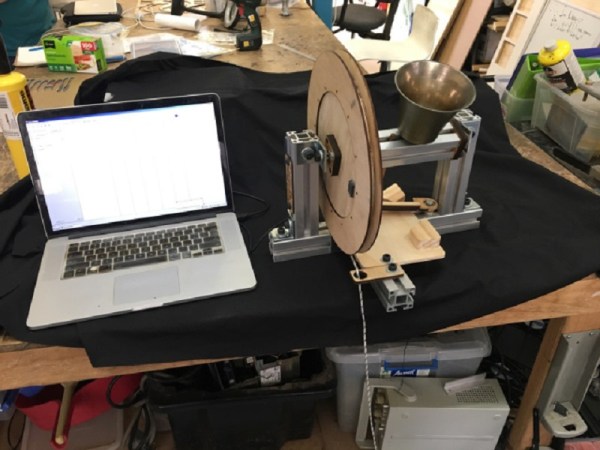
Old-school Rotary Phone Gets GSM Upgrade

Sometimes, the answer to, “Why would you bother with a project like that?” is just as simple as, “Because it’s cool.” We suspect that was the motivation behind [Dirk-Jan]’s project to make portable versions of classic rotary telephones.

On style points alone, [Dirk-Jan] scores big. The mid-1950s vintage Belgian RTT model 56 phone has wonderful lines in its Bakelite case and handset and a really cool flip-up bail to carry it around, making it a great choice for a portable. The guts of the phone were replaced with a SIM900 GSM module coupled with a PIC microcontroller and an H-bridge to drive the ringer solenoids, along with a Li-ion battery and charger to keep it totally wireless – except for the original handset cord, of course. The video after the break show the phone in action both making and receiving calls; there’s something pleasing on a very basic level about the sound of a dial tone and the gentle ringing of the bell. And it may be slow, but a rotary dial has plenty of tactile appeal too.

Rotary-to-cell conversions are a popular “just because” project, like this conversion designed to allow an angry slam-down of the handset. The orange Siemens phone in that project is nice and all, but we really favor the ’50s look for a portable.

Continue reading “Old-school Rotary Phone Gets GSM Upgrade”

Fire Bell Wakes You For Work By Shaving Years Off Your Life

fire-bell-alarm-clock

If you suck at getting up in the morning [Jake Lee] has a solution that will make sure you don’t get fired from your job. Unfortunately it’s going to scare the life out of you — but maybe we’re just not hard enough sleepers to appreciate the value in an alarm clock that’s so horribly loud.

At first we wondered where he got the bell but it looks like you can buy one for about fifteen bucks. We’re not saying you should hide one of these under your best friend’s bed, but the cost of the bell does put it firmly in the worth-it-as-a-prank price range. [Jake] used rigid and flexible conduit to connect the bell to a power source, and the control panel shown on the left. He uses the LED backlight of the bedside alarm clock to drive the base of a transistor, switching a relay to trigger the bell. The big button on the grey box makes the wailing stop (seriously, cut your volume before you hit 0:30 in the clip below).

Continue reading “Fire Bell Wakes You For Work By Shaving Years Off Your Life”

Toothbrush Timer

This toothbrush holder will make sure you’re brushing your pearly whites for an appropriate length of time. The three cups serves as tootbrush storage, and detect when one has been removed. Once you start brushing your teeth the lights on the front and bell in the back count down the process automatically.

The counting sequence starts when a weight sensor in the base detects a change caused by picking up a toothbrush. The ATmega328 — which is programmed with Arduino-style code — then turns on all of the incandescent lamps mounted on the front portion of the base. Each of these are switched with a 2N3904 transistor in order to sink enough current for the bulb. As a two-minute timer decrements, the bulbs are extinguished one by one. But there is also an auditory feedback mechanism. On the back of the base is a small bell. A hammer on a servo strikes the bell every 30 seconds to let you know how you’re doing. The entire thing is driven by an internal Li-ion battery which lasts about three weeks between charges. Don’t miss the demo video found after the break.

Continue reading “Toothbrush Timer”

Scratch-built Railroad Crossing Signal

At first glance you would think this is the real thing, but [Kevin] built this railroad crossing signal from parts you can find at the home store. We keep seeing traffic lights used as web-connected signaling devices. This would be right at home for that type of setup, but [Kevin] built it with railroad enthusiasts in mind.

He used Google SketchUp to design the frame for the signal, then purchased all of the PVC parts to match those specifications. Some grey spray paint goes a long way to making it look like steel tubing. But this is much easier to work with and he should have no trouble internalizing the wiring later on. The lights themselves are tail lights for a trailer with a decorative trim piece added. He designed his own driver board to switch the lights and ring the doorbell which give the signal some sound. His first version used a 555 timer, this one upgrades to microcontroller. We like what he’s doing in the video after the break, but think the bell speed needs to be doubled for it to mimick the real thing just about perfectly.

Continue reading “Scratch-built Railroad Crossing Signal”

Workout Timer Has Its Own Fight Bell

This workout timer turned out great. We think [Douglas] managed to end up with a professional look and a full range of features even though he was doing a lot of learning along the way.

He wanted a clock that was capable of counting up or down to time different segments of his workout. In order to be really useful it needed to have a remote control and a way to signal when time had run out. He grabbed an Arduino and started prototyping with an LED marquee at first, but after adding a second Arduino to deal with the display scanning issues he finally switched over to these LED segment displays.

The timer includes an IR receiver so that it can be controlled with a handheld remote. The large red bell to the side has a heck of a ding and is used to signal the start and end of timing. Perhaps the driver for that bell could be incorporated into the home automation project from Wednesday. Once the hardware decisions were finalized [Douglas] set out to build an enclosure that he could be proud of (mission accomplished!). Don’t miss the video after the break where he walks through all various aspects of the user interface. Continue reading “Workout Timer Has Its Own Fight Bell”