Wico Boss Joystick Modded To Use Cherry MX Keyboard Switches

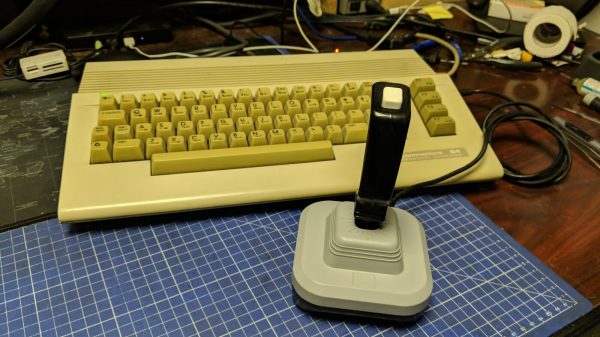
The Wico Boss joystick was one of the better designs of the 1980s. Yours truly had one, and put it through many brutal hours of Amiga-based gameplay. [Drygol] was recently asked if he could alter some of these sticks to be even clickier than stock, and jumped at the change to do some modding.

[Drygol]’s idea was to swap out the original microswitches in the sticks for keyboard switches instead. In particular, the idea was to use the Cherry MX Blues which have a particularly nice click to them. But this wasn’t just going to be a straight swap. Instead, since the hardware was retro and preservation was desired, the modification had to be reversible.

The result was a drop-in 3D-printed bracket that holds four Cherry switches around the joystick’s central bauble. Thus, when the stick is moved, it actuates the keyboard switches with a satisfying click. A 12mm tactile switch was also installed in the base to be activated by the fire button. Then, it was a simple matter of  tidying up some of the sticks during reassembly and wiring up the original cables to the new switches.

It’s a neat way to give an old-fashioned digital joystick a new lease on life. This would be a particularly great mod for tired sticks with worn out microswitches, too. Hilarious archaic marketing video after the break. They really are whacko for Wico.

Continue reading “Wico Boss Joystick Modded To Use Cherry MX Keyboard Switches”

Mix It Up With A Multi-Volume Controller

What’s the use of waiting around for something to break in order to hack into something else? As long as it’s just sitting around not being used, who cares? [OmniSaiRen] had a  Behringer MIDI controller just taking up space. Instead of selling it, they decided to build it into something they would definitely use — a multi-volume controller with mute keys and other useful macros.

After gutting the case, [OmniSaiRen] gave it a couple coats of glossy white paint that looks really nice with the black keycaps and knobs. The plan was to use the original encoders, but [OmniSaiRen] replaced them with potentiometers when they couldn’t get the encoders working with the Arduino Nano. We are sad to report that Cherry Blues only made it to the build because they have all black housings and were also lying around taking up space, but maybe [OmniSaiRen] will grow to love them.

If you’re tired of all the mousing and clicking it takes to turn down this or that volume, you need to build one of these things. It runs on deej, an open source volume mixer that works with Linux and Windows, so what are you waiting for? If you only want a single hardware volume knob, you can’t go wrong dialing it in rotary style.

Via r/duino

DIY Keyboard Backlighting Takes Forever, Worth It

LED Keyboard with Custom Lights

Want a back-lit keyboard? Make one yourself. Though you may not want to after seeing this build by [prodigydoo], who devoted 40 hours to upgrade his mechanical keyboard with a smattering of shiny.

No eye rolling just yet, though, because [prodigydoo’s] work is a monument to meticulous craftsmanship and dedication. So what if he accidentally dropped the keyboard’s PCB and cracked it? He patched that up with a few wires in true hacker-problem-solving fashion and no one will ever know.

With the electronics “safely” removed, [prodigydoo] set about desoldering every single key switch, then carefully detaching and disassembling the Cherry MX Blues. He then inserted an LED into each switch’s backplate, reassembled them, mounted the keys back on the board, then added some current-limiting resistors and heat shrink to the circuit. [prodigydoo] cut a few necessary holes for a power switch, state indicator LEDs (Caps Lock, etc.) and some under-the-board lighting, then rounded off the build by hooking up a power supply capable of running all the lights.

No microcontroller? No RGBLEDs? We like it anyway, and it seems [prodigydoo] is glad he kept it simple. Go check out the gallery for gritty details, an explanation of the circuit, and more pictures than your family vacation album.

Custom Mechanical Keyboards

[Wyager] was shopping around for a mechanical keyboard, and after noticing custom PCB manufacturing had come down in price so much, he decided to build his own. The end result is a keyboard that’s so elegant in its design, that it could, with a little work, become a very interesting Kickstarter project.

The design had three requirements: cheap, mechanical switches, and extremely customizable. The cheap requirement was solved by splitting the keyboard into two parts with a master/slave arrangement. The boards are connected by a 1/8″ TRRS jack conveying an I2C bus. Since both boards are identical except for the code running on the Teensy dev boards, [Wyager] saved a bit of cash by using two of the three PCBs that came with his OSHPark order.

The mechanical switches – Cherry MX Blues – are rather expensive parts for a failed project. For fear of failure, [Wyager] first ordered a PCB containing the footprint of only one key. With the footprint correct, he graduated to a 2×2 matrix. Once that was verified, the 6×5 matrix was ordered. Everything worked perfectly the first time, something we can’t say about many of our projects.

The code, board files, and schematics are available over on the github