A 3D Printed Jet Engine Appears To Function

[amazingdiyprojects] has been working on a 3D printable jet engine. You may remember seeing a 3D printed jet engine grace our front page back in October. That one was beautiful didn’t function. This one flips those values around. [amazingdiyprojects] seems to make a living from selling plans for his projects, so naturally most of the details of the build are hidden from us. But from what we can see in the video clips there are some really interesting solutions here.

Some of the parts appear to be hand-formed sheet metal. Others are vitamins like bearings and an electric starter. We really liked the starter mechanism, pressing in the motor to engage with a spline, or perhaps by friction, to give the starting rotation.

What really caught our attention was casting the hot parts of the printer in refractory cement using a 3D printed mold. It reminds us of the concrete lathes from World War 1. We wonder what other things could be built using this method? Flame nozzles for a foundry? A concrete tea-kettle. It’s pretty cool.

We’re interested to see how the jet engine performs and how others will improve on the concept. Video of it in action after the break.

UPDATE: [amazingdiyprojects] posted a video of the engine being disassembled.

Continue reading “A 3D Printed Jet Engine Appears To Function”

Concrete With A Drinking Problem Could Reduce Flooding

Concrete – it’s all around you. You probably walk on it, drive on it, and maybe even sit on it! From a civil engineering standpoint, concrete really is a miracle material. But, it does have its downsides, especially in heavily developed urban areas. One of the most glaring of those downsides is the tendency for water to pool and flood on concrete. However, a new concrete formula could dramatically improve that by allowing water to drain quickly through the concrete itself.

While all unsealed concrete technically absorbs water, it does so very inefficiently and quickly becomes saturated. Once that happens, water will pool on the surface. This causes obvious problems for cars, as they become susceptible to hydroplaning. It also creates the potential for flooding in heavily paved areas.

This new concrete formula, called Topmix Permeable, is designed to reduce pooling by letting the water flow through at the rate of 600 liters per minute per square meter! It does this by using larger gravel pieces in the mix, which leaves bigger gaps for the water to drain down into. From there, it can be absorbed by the underlying soil, or routed safely away from roadways and parking lots.

Of course, this formula isn’t perfect. Its ability to pass through water also makes it likely to crack and quickly deteriorate in cold climates, as the water freezing and thawing inside the concrete will easily damage it. But, in warmer climates that receive a lot of rainfall in bursts, it could significantly improve safety.

Continue reading “Concrete With A Drinking Problem Could Reduce Flooding”

concrete mixing wheel barrow

DIY Concrete Mixing Wheelbarrow Made From Recycled Parts

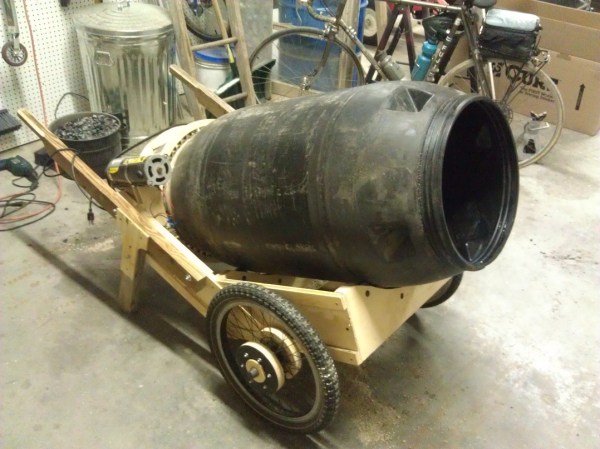
[Dan] had a bunch of concrete mixing to do. Sure, it was possible to stand there and mix concrete and water in a wheelbarrow for hours and hours but that sounds like a tedious task. Instead, [Dan] looked around the shop to see if he had parts available to make a concrete mixer. As you may have guessed, he did. Instead of stopping at just a concrete mixer, he decided to make a concrete mixing wheelbarrow!

The frame is built out of plywood left over from a past canoe project. The frame holds a mixing barrel that was also hanging around the shop. From the photo, the drive system looks simple but it is not. First, the small motor pulley spins a larger pulley that is in-line with the barrel. Gearing down the drive this way increases torque available to spin the barrel, and that gear reduction is necessary to spin the heavy concrete slowly. What you can’t see is a planetary gear system that gears down the drive train again. The gears are cut out of plywood and were designed in this Gear Generator program. The sun (center) gear of the planetary setup is supported by another scavenged part, a wheel bearing from a Chevy minivan.

Now [Dan] can mix all the concrete he wants, wheel it over and dump it wherever he needs it. With the exception of the drive belt and some miscellaneous hardware, all the parts were recycled.

Geopolymer Concrete, Perfecting Roman Technology Today

For all the things Romans got wrong (lead pipes anyone?) did you know we’re still using a less advanced concrete than they did? Consider some of the massive structures in Rome that have passed the test of time, lasting for more than 2000 years. The typical concrete that we use in construction starts to degrade after only 50 years.

Researchers at Berkeley think they’ve finally figured it out with thanks to a sample that was removed from the Pozzuoli Bay near Naples, Italy. This could vastly improve the durability of modern concrete, and even reduce the carbon footprint from making it. The downside is a longer curing time, and resource allocation — it wouldn’t be possible to completely replace modern cement due to the limited supply of fly ash (an industrial waste product produced by burning coal). Their research can be found in a few articles, however they are both behind pay walls.

Lucky for us, and the open source community at large, someone from MIT has also been working on perfecting the formula — and he’s shared his results thus far.

So, who wants to give it a shot? Any material scientists in our midst?

Flaming Jack-o’-lanterns Light Up The Night

[misterdob] wanted to spice up his Halloween decor, so he built these flaming concrete jack -o’-lanterns to decorate his walkway. He started with the classic plastic jack-o’-lanterns that trick-or-treaters have been using to collect candy for years. [misterdob] filled the plastic pumpkins halfway with concrete mix, then dropped in metal coffee cans. He then filled the pumpkins up to the top with concrete, shaking them up a bit to avoid air pockets.

Once the concrete had set, [misterdob] cut away the plastic revealing nearly perfect concrete duplicates. He used acid stain to color his creations – though it looks like he missed a spot or two.

We have to disagree with [misterdob’s] choice of fuels. In fact, we think he was out of his gourd when he picked gasoline for his flaming pumpkins. Seriously though, gasoline is a horrible choice for a fire pot like this for a multitude of reasons. Gas has a particularly foul odor and its fumes are explosive. If a Halloween prankster were to try kicking one of the pumpkins over, not only would they have a broken foot, they’d also be covered in burning gas.

Thankfully, the folks on [misterdob’s] Reddit thread had better fuel suggestions – citronella torch cans with lamp oil and wicks, kerosene, or gel fuel would be better suited for these hot pumpkins.

If you still don’t believe how dangerous gas and its fumes can be, check out this video of a bonfire gone wrong (language warning).

Concrete Castle

Update: 3D Printed Concrete Castle Completed

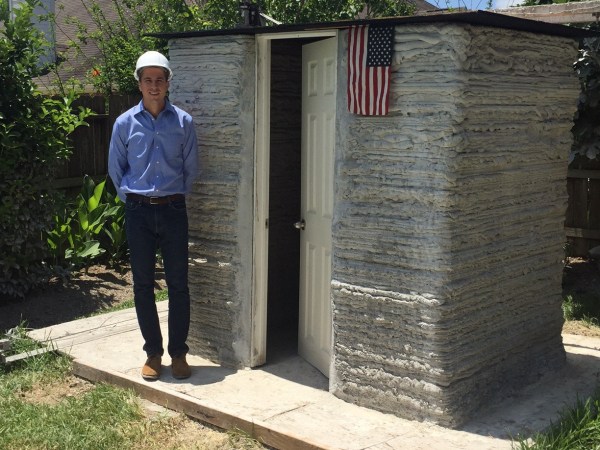
After two years of dreaming, designing, and doing, [Andrey Rudenko] has finally finished 3D printing his concrete castle. We’re sure a few readers will race to the comments to criticize the use of “castle” as an acceptable descriptor, but they’d be missing the point. It’s been only three months since he was testing the thing out in his garage, and now there’s a beautiful, freestanding structure in his yard, custom-printed.

There are no action shots of the printer setup as it lays down fat beads of concrete, only close-ups of the nozzle, but the castle was printed on-site outdoors. It wasn’t, however, printed in one piece. [Andrey] churned out the turrets separately and attached them later. He won’t be doing that again, though, because moving them in place was quite the burden. On his webpage, [Andrey] shares some insight in a wrap-up of the construction process. After much experimentation, he settled on a layer height of 10mm with a 30mm width for best results. He also discovered that he could print much more than his original estimation of 50cm of vertical height a day (fearing the lower layers would buckle).

With the castle a success, [Andrey] plans to expand his website to include a “posting wall for new ideas and findings.” We’re not sure whether that statement suggests that he would provide open-source access to everything or just feature updates of his future projects.

Wooden supports for concrete bridging.
[Andrey] used wooden supports to print concrete bridges.
We hope the former. You can check out its current format as the Architecture Forum, where he explains some of the construction capabilities and tricks used to build the castle.

His next project, a full-scale livable structure, will attempt to print 24/7 (weather permitting) rather than the stop-start routine used for the castle, which turned out to be the culprit behind imperfections in the print. He’ll have to hurry, though. [Andrey] lives in Minnesota, and the climate will soon cause construction to take a 6-month hiatus until warm weather returns. Be sure to check out his website for more photos and a retrospective on the castle project, as well as contact information—[Andrey] is reaching out to interested parties with the appropriate skills (and investors) who may want to help with the new project.

[via 3ders.org]

[Thanks Brian]

The Geek Group Installs Robot, Destroys CRT Monitor

GEEKSMASH

The Geek Group recently documented the process of overhauling part of their workspace to accommodate Project Jeff, a massive KUKA KR-350/1 industrial robot.

We don’t see many behind the scenes industrial-scale projects here at Hackaday, but we’re definitely impressed with the clever techniques employed to pull off this precision install. At around 5 inches deep, the original floor was far too thin to handle the weight and tortional loads imposed by Project Jeff, so The Geek Group carved out a 15′ square space of old concrete and dumped it piece by piece in the rubbish. They then dug a new hole to a depth of 2.5′ and filled it with a fresh pour that amounted to 67,500 pounds of concrete. Sheesh.

That concrete will inevitably expand and move around, which meant installing a pool-noodle-looking slip cover to protect a buried conduit from damage, as well as placing some gaskets around the edges to prevent cracking while maintaining a seal. Around 10 minutes into the video, they tackle the challenge of embedding bolts that connect to the robot’s base; it takes some patience and creative ladder positioning to fit the template in the correct position.

As an added treat, The Geek Group smashed a CRT monitor in our honor, and while they claim software limitations and a steel frame prevented Project Jeff from completely annihilating the monitor, we like to think the skull and cross-wrenches just refused to be destroyed. Because, you know, science. Videos after the break.

Continue reading “The Geek Group Installs Robot, Destroys CRT Monitor”