Hackaday Prize Entry: Junkyard Fuel Cell

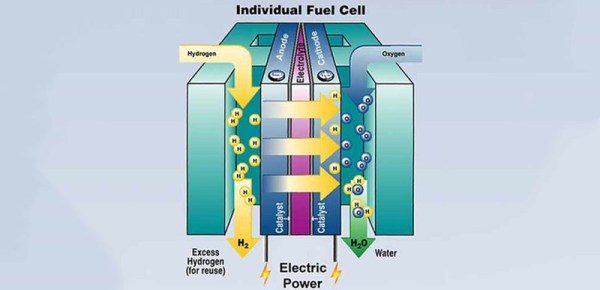
Modern hydrogen fuel cells are incredible pieces of engineering. While a simplistic diagram of a fuel cell is just a stream of hydrogen, an anode, cathode, and a bit of oxygen, this does’t convey the complexity of the most important part of the fuel cell – the proton exchange membrane.

The proton exchange membrane is the part of a fuel cell that takes in hydrogen, spits out electrons, and produces water. They can be made from platinum to expensive DuPont products, and if [Charlie]’s hypothesis is correct, stuff you can pull out of a junkyard.

The goal of [Charlie]’s Prize entry is to create a small, proof of concept fuel cell that’s safe, low cost, and very easy to build. Right now he’s focused on finding a cheap, readily available proton exchange membrane to make this build accessible to everyone.

A hydrogen fuel cell will of course have pressurized hydrogen in it, and [Charlie] is taking some steps to mitigate the risks of having his limbs blown off. His first real project update is about the safety considerations of working with hydrogen. He’ll be using a simple hydrogen gas sensor to measure for leaks and sound an alarm.


The 2015 Hackaday Prize is sponsored by:

Life Sized Lego Spaceship Parts

Ah, 1980s space Lego sets. You may think the pirate ship and castle sets are cooler, but you’re wrong, because spaceship. spaceship. spaceship.

These space Lego sets had some very interesting parts, with tiny two-by sloped pieces printed with Lego analogs of computers, monitors, phones, intercoms, speakers, control panels, and everything else that makes a voxellated spaceship fly to the moon. Now, these pieces are functional, and they’re nearly life-size.

[Love Hultén] took these fantastic parts, modeled them, and scaled them up to six times normal Lego dimensions. These blocks were then fitted with buttons, displays, the guts of an old telephone, and all the other accoutrements to make these bricks functional. Two computer blocks can be connected together, and it will play video games with a Lego-shaped controller. The intercom works, and the buttons on control panels can be used to turn on lights.

It should be noted the Lego family is more than just the small bricks that really hurt when you step on them. Duplo, the blocks made for children who would stuff Lego down their own throats, is twice the size of Lego. Quatro are blocks made for toddlers, and are twice the size of Duplo and four times the size of Lego. Since [Love] made blocks that are six times the size of normal Lego blocks, we’ll leave it up to the comments to determine what this class of blocks should be named.

Video below.

Continue reading “Life Sized Lego Spaceship Parts”

Extracting Lightning Strikes From HD Video

Lightning photography is a fine art. It requires a lot of patience, and until recently required some fancy gear. [Saulius Lukse] has always been fascinated by lightning storms. When he was a kid he used to shoot lightning with his dad’s old Zenit camera — It was rather challenging. Now he’s figured out a way to do it using a GoPro.

He films at 1080@60, which we admit, isn’t the greatest resolution, but we’re sure the next GoPro will be filming 4K60 next. This means you can just set up your GoPro outside during the storm, and let it do it what it does best — film video. Normally, you’d then have to edit the footage and extract each lightning frame. That could be a lot of work.

[Saulius] wrote a Python script using OpenCV instead. Basically, the OpenCV script spots the lightning and saves motion data to a CSV file by detecting fast changes in the image.

graph of lightning

The result? All the lightning frames plucked out from the footage — and it only took an i7 processor about 8 minutes to analyze 15 minutes of HD footage. Not bad.

Now if you feel like this is still cheating, you could build a fancy automatic trigger for your DSLR instead…

Hacking Amazing Soldering Features Into The Already Great Weller WMRP

Weller, the German soldering tools manufacturer, has a nice range of micro soldering irons (pencils) designated as the WMRP series. These are 12V, 40 W or 55W units with a 3 second heat up time, and allow quick tip exchange without needing any tools. [FlyGlas] built a neat soldering station / controller for the WMRP series based around an ATMega microcontroller running Arduino.

It’s packed with most of the features you see in a professional rig.

  • low offset op amp for soldering tip temperature measurement with type c thermocouple
  • cold junction compensation using the PTC (KTY82-210) included in the WMRP soldering pencil
  • input voltage measurement
  • soldering pencil current measurement
  • recognizing if the soldering pencil rests in the stand (–> standby)
  • 3 buttons to save and recall temperature values
  • rotary encoder to set soldering temperature
  • illuminated 16×2 character LCD module
  • USB for debugging and firmware update
  • 4mm safety socket for +12V power input and a protective earth socket for connection to ESD protection

WMRP_controller_02
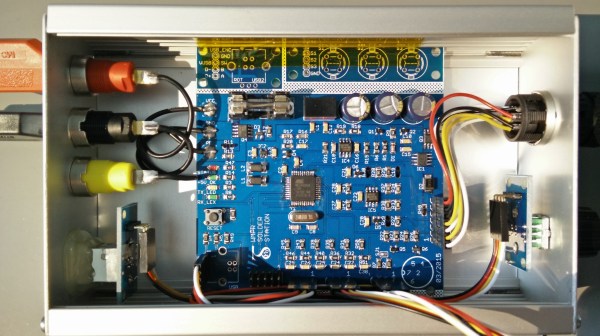
A PWM signal from the microcontroller controls the load current using a MOSFET. Load current is measured using a Hall Effect-Based Linear Current Sensor – ACS712. The corresponding linear output voltage is buffered and slightly amplified using AD8552 zero drift, single supply, RRIO Dual Op Amp before being sent to the microcontroller ADC input. To ensure ADC measurements are accurate and stable, a low noise precision voltage reference – ADR392 is used. Another precision resistive voltage divider allows input voltage measurement. The supply input has over-current and reverse voltage protection. A set of buttons and a rotary encoder are connected to the microcontroller to allow settings and adjustments. An analog section measures the thermocouple voltage from the soldering pencil as well as the stand-by switch status. The handle has an embedded reed switch that is activated by a magnet in the support stand which puts it into stand-by mode. Another analog section performs cold junction compensation using the PTC sensor within the soldering pencil.

The Git repo contains the initial Arduino code which is still a work in progress. While the hardware source files are not available, the repo does have the pdf’s, gerbers and BOM list, if you want to take a shot at building it. Check a demo video after the break. Thanks [Martin] for sending in the tip.

Continue reading “Hacking Amazing Soldering Features Into The Already Great Weller WMRP”

Makey Makey Made Smaller

When it launched in 2012, the Makey Makey was the golden child of the maker movement. It was a simple, easy to use board with holes for alligator clips and a USB socket that would present capacitive touch pads as a USB HID device. Thus, the banana piano was born.

The Makey Makey is a device specifically designed to introduce kids to electronics in a way the Arduino can’t match; even with an Arduino, most of the work is with code. If you’re introducing electronics to a class of 10-year-olds, that might be a bit too much.

Now there’s a new Makey Makey on the block. It’s the Makey Makey Go, and it’s the same user experience as the Makey Makey classic made cheaper and much more rugged.

The Makey Makey Go features a single touch pad to clamp an alligator clip to. That’s enough to send any keypress or a mouse click over USB, where a wide variety of apps and games can make this tiny thumb drive-sized board useful. Banana pianos are out, and plant harps and Jello Flappy Bird are in.

There aren’t many details about the internals of the Makey Makey Go, but [Jay] from Makey Makey says the prototypes are based on the ATMega32u4, while the production units will use cheaper chips. Video below.

Continue reading “Makey Makey Made Smaller”

Hanging Out With Someone Who Walked On The Moon

Lunar dune buggy rides, piloting the most powerful machine made by humankind, stuck thrusters, landing, eating, sleeping, and working on the moon. It does not get any more exciting than the Apollo program! I was recently given the opportunity to sit in on the MIT course, Engineering Apollo: the Moon Project as a Complex System where I met David Scott who landed on the moon as commander of Apollo 15. I not only sat in on a long Q and A session I also was able to spend time with David after class. It is not every day you that you meet someone who has landed on the moon, below are my notes from this experience.

Continue reading “Hanging Out With Someone Who Walked On The Moon”

concrete mixing wheel barrow

DIY Concrete Mixing Wheelbarrow Made From Recycled Parts

[Dan] had a bunch of concrete mixing to do. Sure, it was possible to stand there and mix concrete and water in a wheelbarrow for hours and hours but that sounds like a tedious task. Instead, [Dan] looked around the shop to see if he had parts available to make a concrete mixer. As you may have guessed, he did. Instead of stopping at just a concrete mixer, he decided to make a concrete mixing wheelbarrow!

The frame is built out of plywood left over from a past canoe project. The frame holds a mixing barrel that was also hanging around the shop. From the photo, the drive system looks simple but it is not. First, the small motor pulley spins a larger pulley that is in-line with the barrel. Gearing down the drive this way increases torque available to spin the barrel, and that gear reduction is necessary to spin the heavy concrete slowly. What you can’t see is a planetary gear system that gears down the drive train again. The gears are cut out of plywood and were designed in this Gear Generator program. The sun (center) gear of the planetary setup is supported by another scavenged part, a wheel bearing from a Chevy minivan.

Now [Dan] can mix all the concrete he wants, wheel it over and dump it wherever he needs it. With the exception of the drive belt and some miscellaneous hardware, all the parts were recycled.