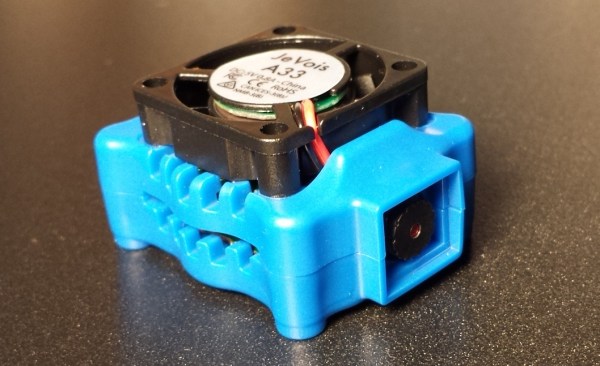
JeVois is a small, open-source, smart machine vision camera that was funded on Kickstarter in early 2017. I backed it because cameras that embed machine vision elements are steadily growing more capable, and JeVois boasts an impressive range of features. It runs embedded Linux and can process video at high frame rates using OpenCV algorithms. It can run standalone, or as a USB camera streaming raw or pre-processed video to a host computer for further action. In either case it can communicate to (and be controlled by) other devices via serial port.
But none of that is what really struck me about the camera when I received my unit. What really stood out was the demo mode. The team behind JeVois nailed an effective demo mode for a complex device. That didn’t happen by accident, and the results are worth sharing.
[Films By Kris Hardware] has started quite an interesting YouTube series on hacking and owning a PogoPlug Mobile v4. While this has been done many times in the past, he gives a great step by step tutorial. The series so far is quite impressive, going into great detail on how to gain root access to the device through serial a serial connection.
PogoPlugs are remote-access devices sporting ARM processor running at 800 MHz, which is supported by the Linux Kernel. The version in question (PogoPlug Mobile v4) have been re-purposed in the past for things like an inexpensive PBX, an OpenWrt router and even a squeezebox replacement. Even if you don’t have a PogoPlug, this could be a great introduction to hacking any Linux-based consumer device.
So far, we’re at part three of what will be an eight-part series, so there’s going to be more to learn if you follow along. His videos have already covered how to connect via a serial port to the device, how to send commands, set the device up, and stop it calling home. This will enable the budding hacker to make the PogoPlug do their bidding. In this age of the cheap single-board Linux computer, hacking this type of device may be going out of style, but the skills you learn here probably won’t any time soon.
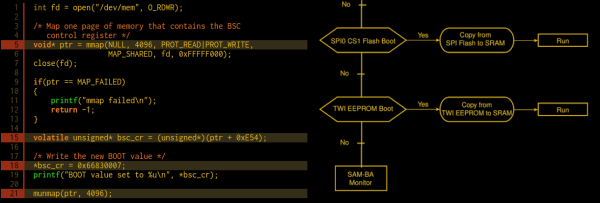
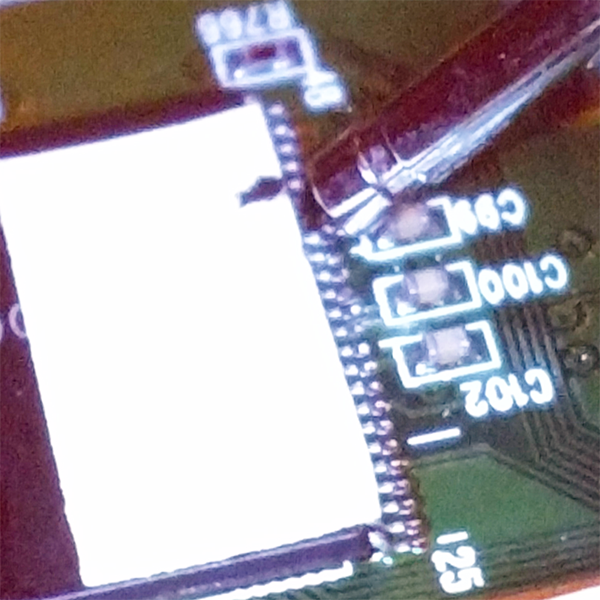
[Sami Pietikäinen] was working on an embedded Linux device based on an Atmel SAMA5D3x ARM-A5 processor. Normally, embedded Linux boxes will boot up off of flash memory or an SD card. But if you’re messing around, or just want to sidestep normal operation for any reason, you could conceivably want to bypass the normal boot procedure. Digging around in the chip’s datasheet, there’s a way to enter boot mode by soldering a wire to pull the BMS pin. As [Sami] demonstrates, there’s also a software way in, and it makes use of mmap, a ridiculously powerful Linux function that you should know about.
Are you already comfortable working with Serial Peripheral Interface (SPI) parts and looking for a challenge? We suspect many of you have cut your teeth on 8-bit through 32-bit microcontrollers but how much time have you spent playing with hardware interfaces on embedded Linux? Here a new quest, should you choose to accept it. [Matt Porter] spoke in detail about the Linux SPI Subsystem during his presentation at FOSDEM 2017. Why not grab an embedded Linux board and try your hand at connecting some extra hardware to one of the SPI buses?
The hardware side of this is exactly what you’d expect from any embedded SPI you’ve worked on: MOSI, MISO, a clock, and a slave select. [Matt] gives a succinct overview of SPI and reading datasheets. Our own [Elliot Williams] has done an excellent job of digging through the basics and most common gotchas if you need to get up to speed on all the SPI basics.
The fun details in the talk start at about 18:30 into the video when [Matt] jumps into the Linux side of SPI. You need a controller driver and a protocol driver. The controller driver is responsible for dealing with the pins (actual hardware) and the protocol driver handles the job of making sense of the SPI packets (messages containing any number of transfers) going in or out. In other words, the controller drive just want bits and pushes them in or out on hardware, the protocol driver makes those bits meaningful to the Linux system.
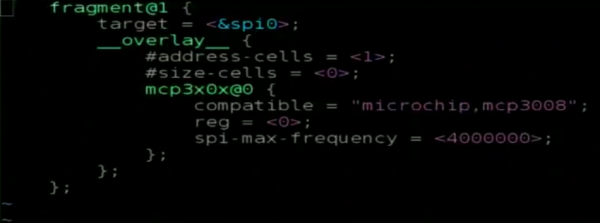
Adding SPI devices (think devices like LCDs and sensors) to your own embedded systems means telling the OS the particulars about that hardware, like max speed and SPI mode. There are three ways to handle this but the Device Tree is the preferred method for modern systems. This paves the way for the controller driver which implements an API set that the Linux SPI subsystem will use to work with your new hardware.
Protocol drivers follow the standard Linux driver model and are pretty straight forward. With these two drivers in place the new device is hooked into the OS and opens up common SPI API calls: spi_async(), spi_sync(), spi_write(), and spi_read(), and a few others.
If you don’t have root, you don’t own a device, despite what hundreds of Internet of Things manufacturers would tell you. Being able to access and write to that embedded Linux system in your new flashy gadget is what you need to truly own a device, and unfortunately this is a relatively uncommon feature. At this year’s DEF CON, [Brad Dixon] unveiled a technique that pwns a device using only a sewing needle, multimeter probe, or a paperclip. No, it won’t work on every device, and the devices this technique will work with are poorly designed. That doesn’t mean it doesn’t work, and that doesn’t mean the Pin2Pwn technique isn’t useful, though.
The attack relies on how an embedded Linux device boots. All the software needed to load Linux and the rest of the peripheral magic is usually stored on a bit of Flash somewhere on the board. By using a pin, probe, or paperclip to short two data pins, or two of the latch pins on this memory chip, the bootloader will fail, and when that happens, it may fall back to a uboot prompt. This pwns the device.
There are a few qualifications for this Pwn using a pin. If the device has JTAG, it doesn’t matter – you can already own the device. If, however, a device has a locked-down JTAG, unresponsive serial ports, or even their own secure boot solution, this technique might work.
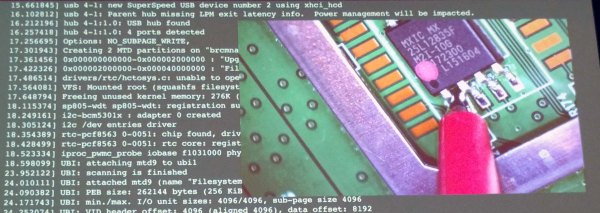
Two data pins on a TSSOP Flash shorted by a multimeter probe
This exploit works on the property of the bootloader. This bit of code first looks at a piece of Flash or other memory separate from the CPU and loads whatever is there. [Brad] found a few devices (mostly LTE routers) that would try to load Linux from the Flash, fail, try to load Linux again, fail, and finally drop to a uboot prompt.
As with any successful exploit, an equally effective mitigation strategy must be devised. There are two ways to go about this, and in this case, the software side is much better at getting rid of this attack than the hardware side.
Since this attack relies on the software falling back to uboot after an unsuccessful attempt at whatever it should be booting, the simplest and most effective mitigation technique is simply rebooting the device if the proper firmware can’t be found. Having a silent serial console is great, but if the attack relies on falling back to uboot, simply not doing that will effectively prevent this attack.
The hardware side is a little simpler than writing good firmware. Instead of using TSSOP and SOIC packages for storing the device firmware, use BGAs. Hide the pins and traces on an inner layer of the board. While this isn’t a foolproof way of preventing the attack – there will always be someone with a hot air gun, magnet wire, and a steadier hand than you – it’s hard to glitch a data line with a sewing needle if you can’t see the data line.
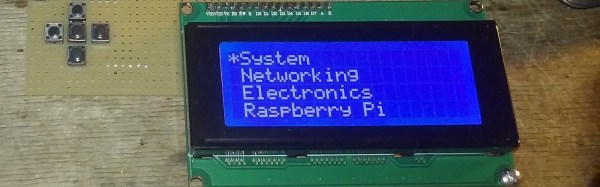
Connecting a headless Raspberry Pi to a wireless network can be quite a paradoxical situation. To connect it to the network, you need to open an SSH connection to configure the wireless port. But to do so, you need a network connection in the first place. Of course, you can still get command-line access using a USB-to-UART adapter or the Pi’s ethernet port – if present – but [Arsenijs] worked out a much more convenient solution for his Hackaday Prize entry: The pyLCI Linux Control Interface.
His solution is a software framework written in Python that uses a character display and buttons to make a simple hardware interface. This allows you to configure all important aspects of a Raspberry Pi – or any other Linux SBC – from a tidily organized click-and-scroll menu. [Arsenijs] implemented a whole bunch of useful tools: There’s a network tool to scan and connect to WiFi networks. A systemctl tool that lets you manage the services running on the system, which is especially helpful when you need to restart a stuck service. A partition tool helps with viewing and unmounting mass storage devices. He’s even planning to add a filesystem browser.
With his Open Source project, [Arsenjs] aims to shorten the development time for embedded projects by taking out the efforts of implementing the basic interface functions from scratch. Indeed, there are countless scenarios, where a basic display interface can be of great value. Given the great project documentation and the fact that this can work with virtually any Arduino or Raspberry Pi LCD-pushbutton-hat or shield, we’re sure this is going to be used a lot. Enjoy the video!
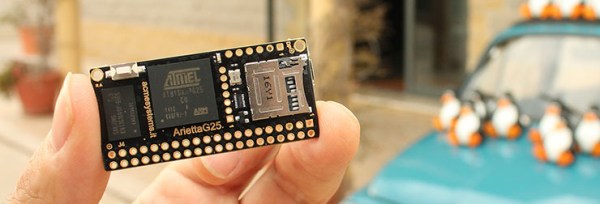
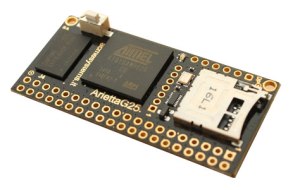
This tidy little ARM board is the Arietta G25. It’s based around an AT91SAM9G25 which is an ARM9 chip running at 400MHz. Paired with the DDR2 RAM (in 128 or 256 meg options) to the left, the board runs Linux and runs it well. After the break you can see the obligatory running of Doom. But in this case it doesn’t just run a demo, but is playable from momentary push buttons on a breadboard (props to the Arietta team for using wire wrap for that setup).
See the vertical row of pads between the processor and the SD card slot? That’s a breakout header designed to accept a WiFi module. In at €20-30 based on your RAM choice and just €7 for the WiFi module this board is certainly a contender for any embedded Linux projects. But it does have us wondering, should be thinking of these as ARM boards, or forget the low-level development and just think of them as a Linux machines with plenty of GPIO available?
The 20×2 pin header breaks out a lot of the SAM9’s features. We really like the interactive pinout posted for this device. For instance, there are three sets of USB host lines available. But you’ll want to click on each to see that one set is in use for the SD card, and another is used by the WiFi module. The documentation that has been posted for the Arietta G25 is one of its strongest point. Nice work there!