Building A Dead-On-Accurate Model Ford Pickup From Scratch

In a world filled with 3D printed this and CNC machined that, it’s always nice to see someone who still does things the old-fashioned way. [Headquake137] built a radio controlled truck body (YouTube link) from wood and polystyrene using just a saw, a Dremel, a hobby knife, and a lot of patience. This is one of those builds that blurs the lines between scale model and sculpture. There aren’t too many pickup trucks one might call “iconic” but if we were to compile a list, the 6th generation Ford F-series would be on it. [Headquake137’s] model is based on a 1977 F100.

ford-thumb2
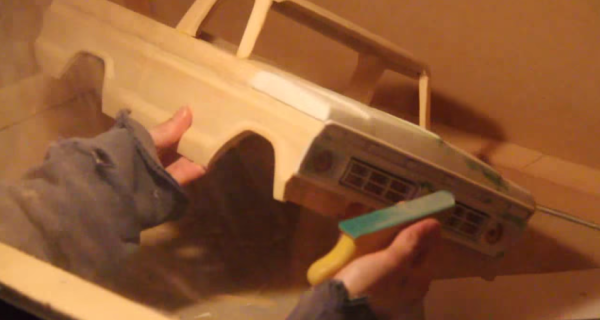
The build starts with the slab sides of the truck. The basic outline is cut into a piece of lumber which is then split with a handsaw to create a left and a right side. From there, [Headquake137’s] uses a Dremel to carve away anything that doesn’t look like a 1977 F100. He adds pieces of wood for the roof, hood, tailgate, and the rest of the major body panels. Small details like the grille and instrument panel are created with white polystyrene sheet, an easy to cut material often used by train and car modelers.

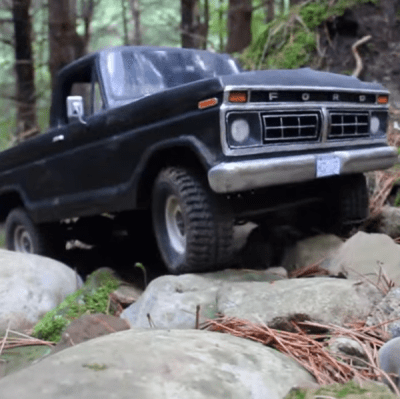
When the paint starts going on, the model really comes to life. [Headquake137] weathers the model to look like it’s seen a long life on the farm. The final part of the video covers the test drive of the truck, now mounted to a custom chassis. The chassis is designed for trails and rock crawling, so it’s no speed demon, but it sure does look the part riding trails out in the woods!

[Headquake137] managed to condense what must have been a 60 or 70 hour build down to a 14 minute video found below.

Continue reading “Building A Dead-On-Accurate Model Ford Pickup From Scratch”

Castrol Virtual Drift: Hacking Code At 80MPH With A Driver In A VR Helmet

Driving a brand new 670 horsepower Roucsh stage 3 Mustang while wearing virtual reality goggles. Sounds nuts right? That’s exactly what Castrol Oil’s advertising agency came up with though. They didn’t want to just make a commercial though – they wanted to do the real thing. Enter [Adam and Glenn], the engineers who were tasked with getting data from the car into a high end gaming PC. The computer was running a custom simulation under the Unreal Engine. El Toro field provided a vast expanse of empty tarmac to drive the car without worry of hitting any real world obstacles.

The Oculus Rift was never designed to be operated inside a moving vehicle, so it presented a unique challenge for [Adam and Glenn]. Every time the car turned or spun, the Oculus’ on-board Inertial Measurement Unit (IMU) would think driver [Matt Powers] was turning his head. At one point [Matt] was trying to drive while the game engine had him sitting in the passenger seat turned sideways. The solution was to install a 9 degree of freedom IMU in the car, then subtract the movements of that IMU from the one in the Rift.

GPS data came from a Real Time Kinematic (RTK) GPS unit. Unfortunately, the GPS had a 5Hz update rate – not nearly fast enough for a car moving close to 100 MPH. The GPS was relegated to aligning the virtual and real worlds at the start of the simulation. The rest of the data came from the IMUs and the car’s own CAN bus. [Adam and Glenn] used an Arduino with a Microchip mcp2515 can bus interface  to read values such as steering angle, throttle position, brake pressure, and wheel spin. The data was then passed on to the Unreal engine. The Arduino code is up on Github, though the team had to sanitize some of Ford’s proprietary CAN message data to avoid a lawsuit. It’s worth noting that [Adam and Glenn] didn’t have any support from Ford on this, they just sniffed the CAN network to determine each message ID.

The final video has the Hollywood treatment. “In game” footage has been replaced with pre-rendered sequences, which look so good we’d think the whole thing was fake, that is if we didn’t know better.

Click past the break for the final commercial and some behind the scenes footage.

Continue reading “Castrol Virtual Drift: Hacking Code At 80MPH With A Driver In A VR Helmet”

CAN Hacking: Protocols

We’ve gone over the basics of CAN and looked into how CAN databases work. Now we will look at a few protocols that are commonly used over CAN.

In the last article we looked at CAN databases, where each bit of a message is mapped to a specific meaning. For example, bit 1 of a CAN message with ID 0x400 might represent whether the engine is currently running or not.

However, for more complex communications we need to use protocols. These can map many meanings to a single CAN ID by agreeing on a structure for sending and receiving data.

Continue reading “CAN Hacking: Protocols”

Smart Brake Lights And More With OpenXC

smart-brake-light

At a recent hack-a-thon event, [Al Linke] tapped into a vehicle’s OBD port with an OpenXC vehicle interface and hacked an LED screen in the rear window to display data based on events. If you haven’t heard of OpenXC, you can expect to read more about it here at Hackaday in the near future. For now, all you need to know is that OpenXC is Ford’s open source API for real-time data from your vehicle: specifically 2010 and newer model Ford vehicles (for now).

[Al] connected the OpenXC interface to his Android phone over Bluetooth, transmitting data from the OBD port to the phone in real time. From here, the Android can do some really cool stuff. It can use text to speech to announce how much your lead foot cost you, add sound effects for different car events, and even interact with additional devices. Although he managed all of those features, [Al’s] primary goal was to add an LED screen that displayed messages on the vehicle’s back window.

When the phone detected a braking event from the car, it directed the LEDs to light up with a “braking” image, adding some flavor to the process of stopping. He could also change the image to a “Thank You” sign with a waving hand, or—for less courteous drivers—an “F U” image with a slightly different hand gesture. You’ll want to check your local and/or national laws before attempting to strap any additional lighting to your vehicle, but you can watch [Al’s] car light up in the video below. For a more detailed look under the hood, he’s also provided an Instructables page.  If OpenXC catches on, the number of vehicle hacks such as the Remote Controlled Car may skyrocket.

Continue reading “Smart Brake Lights And More With OpenXC”

A Very Dash-ing IPad Mini

iPad-mini-dash-install

The work which [Mark] did to mount this iPad mini in the dashboard of his Ford truck is commendable. It looks like it came from the factory this way, and the functionality matches that illusion.

He actually started the project before he had the iPad mini on hand. A PDF that mapped out the exact dimensions was used as a template for the layout and alteration. He took the stereo controls out of the original faceplate. That opening was made to fit the screen by cutting, adding putty, then sanding and finishing.

Since the bezel won’t let [Mark] get at any of the buttons on the iPad itself he picked up an external home button on eBay and mounted it just to the left of the screen. Inside the dashboard a docking connector is responsible for powering the tablet and connecting it to the sound system. There’s even a WiFi connection thanks to the MiFi system he mounted in the overhead console.

Hacking The Computer Interface Of A Ford Focus Mk2

You can do some neat stuff to the way your Ford Focus Mk2 works, but first you have to gain access to the data system. If you know some Russian, and don’t mind a bit of dongle rewiring, this guide will have you hacking the car’s CAN bus in no time. It was written by [Preee] and he has already added Radio RDS and CD Track information to the speedometer display panel, implemented hands free control for his cellphone, disabled the sounds the car makes when he goes into reverse, changed the door locking speed from 5mph to 10mph, and much more.

To gain access to the system you need hardware to bridge from a computer to the CAN bus. He hit eBay and bought an ELM327 cable which plugs into the On-Board Diagnostics port (ODBII). There are two different ways these dongles can be configured and since this isn’t the right one for the Focus he had to alter it. His hardware changes are illustrated in the second post of the forum thread. Instead of just switching over to the other configuration, he wired up a toggle switch to select between the two.

With hardware in place he grabbed some software and started hacking away. But as we hinted above, it’s not as simple as you might think. The software is in Russian. [Preee] did his best to add translations to a few screenshots, but it’s still going to be a bit of a bother trying to find your way around the GUI.

[Thanks Fred]

Simple Machining Process Repairs Broken Control Knob

[Francisco] is helping his mother with a repair to the headlight knob on her Ford Ranger. Above you can see the broken knob on the left, and what it is supposed to look like on the right (taken from [Francisco’s] own vehicle for reference). We’ve encountered split shafts on plastic knobs before and decided it was not something that could be fixed. But he didn’t give up so easily. He mentions that you can purchase a replacement for a few bucks, but he has the means to repair the knob by machining a metal bushing.

The idea is that you mill a metal ring whose inner diameter matches what the outer diameter of the plastic shaft should be. By inserting the broken knob in the ring, the plastic is held tightly together as if it had never broken. In the video after the break [Francisco] uses a metal pencil body from his junk box and a mini-lathe to cut the bushing to length, and mill the inner diameter to his specifications.

He talks about the difficulty of getting replacement parts in Chile, where he lives. But we think this kind of thrift is a great example for all hackers. If you’ve got the tools why not use them? And if you don’t have them, here’s a great excuse to procure them!

Continue reading “Simple Machining Process Repairs Broken Control Knob”