Hackaday Prize Entry: A Reagent Robot

If you’re testing the amount of ammonia, nitrates, or just the pH of a pond, pool, or aquaculture setup, there’s two ways to do it. The first is with test tubes and chemicals: put some water in the test tube, add some chemicals, and match it to a color card. The second option is with expensive sensors.

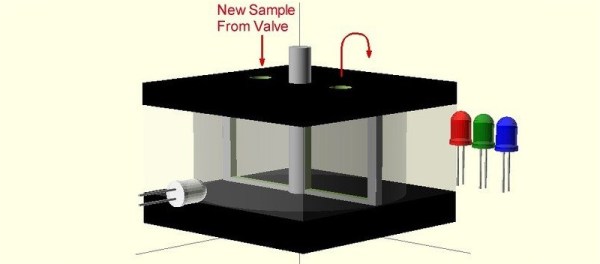
[James] has a better idea. Since pumps, RGB LEDs, and light sensors exist, he’s building a reagent robot that will be able to measure ammonia, chlorine, nitrates, and pH without purely electronic sensors. The idea is to fill a clear container with water, add those fancy chemicals that come from aquarium supply stores, and measure the color of the water.

Right now, [James] has a bunch of stepper motors, valves, and solenoids all working together to pump water into his clear container. The next step will be to mount some RGB LEDs, a light sensor, and calibrate everything so colors can be measured.

It’s a great idea for electronic monitoring of aquaponics, ponds, and aquariums; those indicator chemicals are pretty inexpensive compared to electronic sensors, and once [James] has one measurement/reagent working, adding another is just a matter of putting in a few more tubes and pumps. You can check out a video of the progress so far below.


The 2015 Hackaday Prize is sponsored by:

Continue reading “Hackaday Prize Entry: A Reagent Robot”

Castrol Virtual Drift: Hacking Code At 80MPH With A Driver In A VR Helmet

Driving a brand new 670 horsepower Roucsh stage 3 Mustang while wearing virtual reality goggles. Sounds nuts right? That’s exactly what Castrol Oil’s advertising agency came up with though. They didn’t want to just make a commercial though – they wanted to do the real thing. Enter [Adam and Glenn], the engineers who were tasked with getting data from the car into a high end gaming PC. The computer was running a custom simulation under the Unreal Engine. El Toro field provided a vast expanse of empty tarmac to drive the car without worry of hitting any real world obstacles.

The Oculus Rift was never designed to be operated inside a moving vehicle, so it presented a unique challenge for [Adam and Glenn]. Every time the car turned or spun, the Oculus’ on-board Inertial Measurement Unit (IMU) would think driver [Matt Powers] was turning his head. At one point [Matt] was trying to drive while the game engine had him sitting in the passenger seat turned sideways. The solution was to install a 9 degree of freedom IMU in the car, then subtract the movements of that IMU from the one in the Rift.

GPS data came from a Real Time Kinematic (RTK) GPS unit. Unfortunately, the GPS had a 5Hz update rate – not nearly fast enough for a car moving close to 100 MPH. The GPS was relegated to aligning the virtual and real worlds at the start of the simulation. The rest of the data came from the IMUs and the car’s own CAN bus. [Adam and Glenn] used an Arduino with a Microchip mcp2515 can bus interface  to read values such as steering angle, throttle position, brake pressure, and wheel spin. The data was then passed on to the Unreal engine. The Arduino code is up on Github, though the team had to sanitize some of Ford’s proprietary CAN message data to avoid a lawsuit. It’s worth noting that [Adam and Glenn] didn’t have any support from Ford on this, they just sniffed the CAN network to determine each message ID.

The final video has the Hollywood treatment. “In game” footage has been replaced with pre-rendered sequences, which look so good we’d think the whole thing was fake, that is if we didn’t know better.

Click past the break for the final commercial and some behind the scenes footage.

Continue reading “Castrol Virtual Drift: Hacking Code At 80MPH With A Driver In A VR Helmet”

Imaging And Emulating An HP-IB Disk Drive

If you look on the back of old, old test equipment, you’ll find a weird-looking connector that’s either labeled IEEE-488, GPIB, or HP-IB. It’s a very old interface designed by HP for their test equipment, and it was licensed to other manufacturers for everything from power supplies to logic analyzers. Hewlett-Packard also made computers and workstations once upon a time, and it’s no surprise this interface also made it into these boxes. They even had external hard drives that operated over the HP-IB interface.

[Chris] has a few of these old computers, and wanted to see if he could emulate one of these HP-IB hard drives. There is a project to emulate these hard drives, but the electrical connection is a bit tricky; you need an IEEE-488 card, and those really aren’t made anymore.

Nevertheless, [Chris] found an old ISA IEEE-488 last year, and installed it in the PC system he’s using for all his retro explorations. After getting the card and cable to fit in the case of his PC, [Chris] connected a real HP-IB disk to his modern computer running HPDrive, made an image, and connected an old HP 150 computer. The image was read by the HP 150, and [Chris] had a vintage computer running off an emulated drive.

An Electronic Woodwind With An Onboard Synthesizer

About a year ago, we saw a project on Hackaday.io for a MIDI wind controller. Keyboard MIDI controllers are a dime a dozen, but if you want something that actually sounds like a brass or woodwind instrument, you need something that’s controlled by a breath sensor. Since then, this project has been updated with an onboard synthesizer. It sounds great, and thanks to some interesting components, the part count is actually really low.

The synthesizer used for this project is just a single chip – the DSP-G1 from [Jan Ostman]. This isn’t a custom ASIC or anything fancy; it’s just an 8-pin ARM microcontroller in DIP format, the LPC810.

The rest of the instrument is just a series of pressure sensors along the body, and a breath sensor. The plan is to stuff all the electronics – a microcontroller to read the touch and breath sensors, the DSP-G1 chip, and the battery  – inside the body of the instrument. That’s something that would be incredibly cool, and much more capable than the wind controllers that are available today.

You can see a few videos of the wind controller below.

Continue reading “An Electronic Woodwind With An Onboard Synthesizer”

DIY BobbleHead

Making A Bobblehead Of You

Bobbleheads, you remember them, small figures with a spring-mounted comically large head. They brought joy to millions of car drivers every day as at least 97.5% of all registered cars in the 1960’s had bobbleheads mounted to the dash. Years later bobblehead popularity has waned but [Luis] is trying to bring them back, this time not as your iconic sports hero but as YOU!

[Luis] uses software called Skanect along with his Kinect to scan a persons geometry. There is a free version of Skanect but it is limited to exporting STL files no larger than 5,000 faces. That means that 3d printed bobblehead
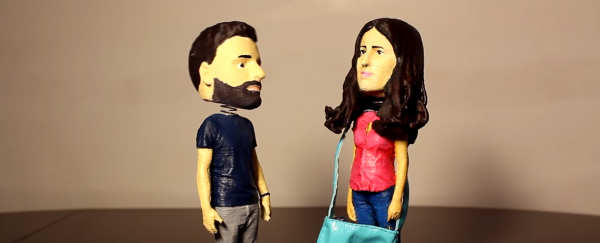
scans of large objects (including people) come out looking noticeably faceted. [Luis] came up with a work-around that results in a much finer detailed scan. Instead of scanning an entire person with one scan, he would do 4 separate scans. Since each individual scan can support 5,000 faces, the resulting merged model can be up to 20,000 faces. Check out the comparison, the difference between the two scanning methods is quite noticeable. MeshMixer is the software used to merge the STL files of the 4 separate scans.

Once the full body is assembled in MeshMixer, it is time to separate the head from the body. A cylindrical hole is then made in the bottom of the head and the top of the body. This hole is just slightly larger than the spring used to support the head. The parts are then printed, painted and assembled. We have to say that the end result looks pretty darn good.

The First PipBoy We’ll See This Year

You heard that we’re shutting down Hackaday on November 11, 2015, right? That’s the release of Fallout 4, and trust me: I’m not getting anything done that day.  A new game in the Fallout series means more power armor cosplay builds, and hundreds of different wearable electronics from the friendly folks at Vault-Tec. I speak of the PipBoy, the wrist-mounted computer of the Fallout series, and [THEMCV] built the first one we’ll see this year. It won’t be the last.

The PipBoy [THEMCV] created is the 3000a model, the same one found in Fallout 3 and New Vegas. We’ve seen a few real-live versions of the PipBoy before; this one used the PipBoy prop that came with the Amazon exclusive special edition of Fallout 3. Things have changed in the years since the release of Fallout 3, and  to build his PipBoy, [THEMCV] just bought one from Shapeways.

The electronics consist of a Raspberry Pi Model A, 3.5″ LCD, a battery pack, and a great piece of software to emulate the software of the PipBoy 3000. It looks great, but [THEMCV] still needs to find a few retrofuturistic buttons and dials to complete the PipBoy experience.

Video below.

Continue reading “The First PipBoy We’ll See This Year”

Altium Gives Away The Farm With New Circuit Maker Software

Things are about to get interesting in the world of PCB design software for the open source hardware community. This week, Altium launched the open public beta for its new Circuit Maker software, and it’s a major change from what we looked at previously. Everything is free.

You heard that right, free. Unlimited board size, and unlimited layers – all free. And this isn’t some stripped-down, bare-bones software here. They’ve thrown in almost everything under the sun; a 3D viewer, team project collaboration, EagleCAD and DFX import, integrated Octopart supplier and pricing information, no commercial usage limits, and project sharing. And if that isn’t enough, the “engine” seems to be the exact same back-end that is used in the full $10,000 Altium Designer as well(with a bit easier to use user interface on top). This is a major departure from the pre-beta we covered back in September. Altium was going have board size and layer limits, with the ability to “upgrade” at a cost. So by now you’re thinking to yourself “OK, what’s the catch?” Well there are a few gotchas – but only a few.

The software uses cloud based storage for your project files, and is community based. It won’t work without an Internet connection, there is no local storage, and it forces you to share your projects with the world. You do get two “Sandbox” designs that you can hide from the world before you generate your gerber files, but after that, your project is online for the whole world to see. Will that be a deal killer for the OSHW community? We’ll find out soon enough.

One thing is for sure, anyone with a doggy Internet connection is not going to enjoy using Circuit Maker (we’re hoping they remove that limitation in the final product). And as with any cloud based service, we wonder how many people will be willing to trust their designs to a free service that could be turned off on a whim? Or will the unlimited board size and layers, combined with Altium’s name and robust software win people over in the end?

If you want to see in-depth review of Circuit Maker, we highly recommend you watch the video after the break.  [Dave Jones] of the eevblog, gives you a full rundown on the beta version. Dave’s in a unique place to review this software, not only has he been using Altium since the mid-80’s as a professional engineer, he’s also a former Altium employee.

Continue reading “Altium Gives Away The Farm With New Circuit Maker Software”