Hacklet 34 – Satellite Projects

Space. The final frontier. Every tinkerer, hacker, and maker has dreamed of flying out of Earth’s atmosphere and into the heavens. Last year one hard-working team got a chance to fly a member to space by winning the Hackaday prize. For the rest of us, we can still experience some of that excitement by contacting satellites in orbit, or even sending a bit of our own hardware into space. This week’s Hacklet focuses on the best satellite projects on Hackaday.io!
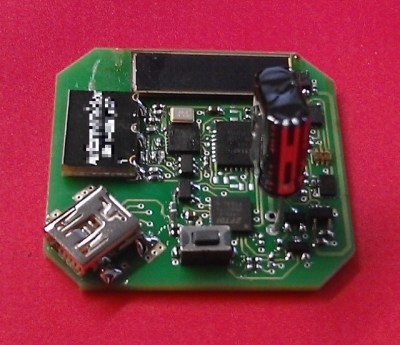
basicSatWe start with [movax] and Your satellite devkit and launch. Chipsat is a tiny satellite which runs BASIC code. Yes, BASIC in space! Chipsats will be stacked into a launcher and sent off into space in groups. The idea is to eventually have them launched from the International Space Station. Power is provided by a small solar cell which charges up a pair of super capacitors. When the capacitors are charged, the satellite will run for a few seconds. Connectivity with the ground is via a 433 MHz link. Chipsat doesn’t just float in space, three coils give it the ability to control its attitude and rotation. Chipsat will sense the space around it with a magnetometer and a light sensor.


satnogsv2

No satellite-themed Hacklet would be complete without [Pierros Papadeas] and his team’s work on SatNOGS – Global Network of Ground Stations. SatNOGS aims to create a global network of connected satellite ground stations. Think of it as a grass-roots version of NASA’s deep space network for satellites in earth orbit. This is more than just a great idea, as SatNOGS won the 2014 Hackaday Prize. You can check out our coverage of the project back in November, 2014. Since then, the SatNOGS team has been busy! They’ve just deployed the first SatNOGS V2 system above their hackerspace in Athens, Greece.
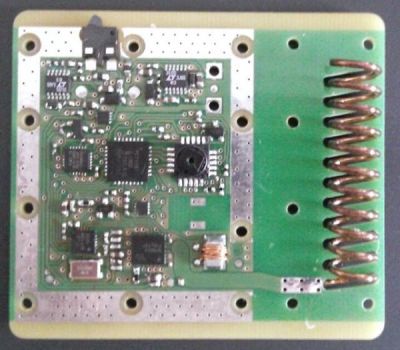
trsiNext up is TRSI PocketQub Satellite, another project by [movax]. TRSI is a satellite that sends data via images which can be viewed with a simple RTL-SDR stick using Hellschreiber mode. Hell mode means that images can be directly viewed in the waterfall display of whichever SDR application is running the receiver. Numbers or entire images snapped with TRSI’s cell phone style camera module can be encoded and displayed. Power is of course provided by solar cells, and the communications link will be on the coordinated 433 MHz band. The original TRSI hardware has actually morphed into a deployment machine for ChipSat, [morvax’s] other satellite project. He’s put the main TRSI program on hold until after the ChipSat campaign is complete.
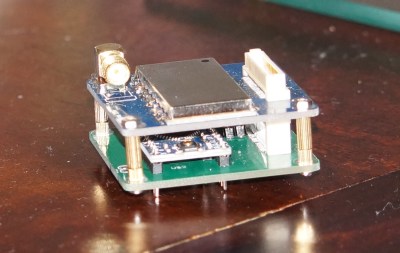
pocketquRounding out our satellite special is [OzQube] with his project QubeCast Max. QubeCast is the first Australian version of the PocketQube PQ60 satellite form factor. After watching the success of $50Sat project, [OzQube] wanted to design a satellite of his own. Since he wanted to add sensors and send more data back to Earth than previous efforts, he needed a higher data rate than the current crop of satellites. This meant going to a high-powered radio. To achieve this, he’s using a  NiceRF RF4463F30 radio module. The module is based upon a Silicon Labs Si4463 RF ISM band chip, coupled with a power amplifier. The module outputs 1 watt, which is quite a bit of power for a tiny satellite!

Want more satellite goodness? Check out Hackaday.io’s freshly minted Satellite List.

The countdown is almost at 0, so that’s just about all the time we have for this episode of the Hacklet. See you next week.  Same hack time, same hack channel, bringing you the best of Hackaday.io!

The Modular Bench Power Supply To Rule Them All

Right now, [The Big One] is using an ATX power supply as a bench power supply for all his electronics projects. It works, but it’s not ideal. The next step up from a power supply from an old computer is, in order, one of those Chinese deals on Amazon, a used HP supply, or for the very cool people among us, building your own. [The Big One] is very, very cool and he’s building the modular bench supply to rule them all.

This is not your $100 china special power supply that [The Big One] would have to buy again in a few months. Inside this massive power supply is a massive transformer and rectifier that fans out to multiple power supply modules. The modules themselves will be based on an OPA548 that will be able to supply up to 3A with current limiting.

Each of these channels will be controlled by an ATMega32u4, with all the fancy stuff you’d expect from the ultimate supply; USB for setting voltage, current, and logging data, a nice LCD character display, and it’s surprisingly cheap; just about $100 for the transformer, and about $50 for each module.

It’s shaping up to be a great build, and with all the features, a power supply that would also make a great kit. If you have any input you’d like [The Big One] to hear, let him know on the project page.

Hackaday.io Reaches 50,000 Registered Users

Hackaday.io, our neat project hosting site, has been around for a little more than a year. It’s been public for juuussst over 11 months, and today we’ve hit a milestone: we have over 50,000 hackers on board, documenting their builds and giving skulls for the cool projects they find. The lucky 50,000th hacker? This guy.

Over the past year, we’ve seen a ton of cool projects that have included a $300 pick and place machine, a very inexpensive machine vision camera system that’s also a very successful Kickstarter, the closest Hackaday ever get to a MOOC from a Cornell professor, and something that would be called the decapitron if it weren’t built by a NASA engineer.

All of this wouldn’t be possible without those 50,000 people on Hackaday.io. This one is for everybody out there who’s already registered. We have to give a shoutout to [Dave Darko], by far the most helpful guy on the entire site.  He has been a thorn in the side of the devs, giving us an amazing amount of feedback.

Speaking of devs, we’re going to be giving out a t-shirt and a few goodies for the 65,536th hacker to sign on (yes, an off-by-one error), for being the person who forced us to refactor everything. Considering the backroom planning, that shouldn’t be long. If you’re one of the nearly 200,000 unregistered users who visited over the last 30 days, there’s a tiny incentive to sign up.

Hacklet 33 – Minecraft Projects

Minecraft hit the PC gaming scene as an alpha release on May 17, 2009. Something about the open world, the crafting system, and the various modes of gameplay made it an instant hit. Since then Minecraft become one of the best selling video games of all time, inspiring thousands of hacks, mods, and projects. This week’s Hacklet highlights some of the best Minecraft projects on Hackaday.io!

clawWe start with [Toulon] and his MineCraft Sidecar Keypad. The Mystify Claw was originally designed as an alternative input device for First Person Shooter (FPS) games. It may look like a mouse, but the claw has no balls or lasers. It provides a 10 button “cradle” for the left hand. Some folks liked the claw, but for many it quickly became a dust collector. [Toulon] resurrected this old input device as an awesome Minecraft controller. He started by yanking all the old electronics, replacing the claw’s brain with the Teensy 2.0, a favorite of keyboard hackers everywhere. New buttons and a slew of new Teensy code made things perfect for mining.

rappiNext up is [Thomas] and his Raspberry Minecraft Server. The Raspberry Pi has long been a hacking platform for Minecraft. The official Raspberry Pi edition of Minecraft is easy to get running, and great for hours of fun. You can also run a Minecraft server on the Pi, which is exactly what [Thomas] is doing. He’s set his Raspberry Pi up with a WiFi dongle and a battery pack. With a bit of configuration, this allows the Pi to become the center of a wireless Lan party. On batteries, the Pi will run for about five hours of continuous gaming. Details for [Thomas’] project are a bit light right now, but that’s only because he just literally started documenting and uploading his project as we’re going to press. Give him a few days and he’ll have everything filled in!

gppk[GPPK] brings a bit of Minecraft into the real world with Full Size Wireless Redstone Lamp. Inspired by smaller models of the Minecraft redstone lamp, [GPPK] decided to build a life-sized version. “Life-sized” in this case is about 1 cubic meter. That’s a BIG lamp! [GPPK] designed the shell of the lamp in Sketchup, and cut the sides out using a gantry style CNC machine. The structure will be held together with 3D printed connectors, while a Raspberry Pi will provide the brains. Turning the lamp on will be as simple as turning on a switch in-game in Minecraft. [GPPK] has been a bit slow lately with updates on the project. If you know [GPPK] let ’em know that we’re anxiously awaiting some info!

pipyFinally, we have [Simon] and Raspberry Pi Python Controller. One of the best ways to get kids hooked on hacking and electronics is to show them how simple circuits can lead to big changes. What better way to do that than wiring up a simple push button controller for Minecraft? [Simon] used an Arduino paired to a Raspberry Pi with a serial over USB connection. Buttons wired to the Arduino are sent through the serial link to the Pi, where a python script fires off actions based on the serial data. [Simon] has tested his script with Mincraft Pi Edition, and is happy to report back that it works great.

Do you know what’s missing from this Hacklet? Your Minecraft project! It’s not too late though – upload your info to Hackaday.io, and we might just add it to our brand new Minecraft Projects List!

Well, it’s just about quitting time here in the Hackaday Mine. As long as the creepers don’t get us, we’ll be back next week. Same hack time, same hack channel, bringing you the best of Hackaday.io!

Trinket Uses RF To Track You Through The House

If you carry a cell phone with GPS, you always know where you are on the planet. But what about inside buildings or even your own home? Knowing if you’re in the kitchen or the living room would be a great feature for home automation systems. Lights could come on as you enter the room and your music could follow you on the home audio system. This is exactly the what [Eric] is working on with his Radiolocation using a Pocket Size Transceiver project. [Eric] started this project as an entry in the Trinket Everyday Carry Contest. He didn’t make the top 3, but was one of the fierce competitors who made the competition very hard to judge!

The heart of the project is determining Time Of Flight (TOF) for a radio signal. Since radio waves move at the speed of light, this is no small feat for an Arduino based design! [Eric] isn’t re-inventing the wheel though – he’s basing his design on several research papers, which he’s linked to his project description. Time of flight calculations get easier to handle when calculating round trip times rather than one way. To handle this, one or more base stations send out pings, which are received and returned by small transponders worn by a user. By averaging over many round trip transmissions, a distance estimation can be calculated.

[Eric] used a Pro Trinket as his mobile transponder, while an Arduino Micro with it’s 16 bit counter acted as the base station. For RF, he used the popular  Nordic nRF24L01+ 2.4 GHz transceiver modules. Even with this simple hardware, he’s achieved great results. So far he can display distance between base and transponder on a graph. Not bad for a DIY transponder so small if fits in a 2xAAA battery case! [Eric’s] next task is working through multipath issues, and testing out multiple base stations.

Click past the break to see [Eric’s] project in action!

Continue reading “Trinket Uses RF To Track You Through The House”

Hackaday.io Land Rush: Vanity URLs

Hurry! Carve out your Hackaday.io homestead with a vanity URL. You can see I’ve already secured hackaday.io/mike, but get in before the rest of Hackaday finds out and you can you have ‘/tom’, ‘/jane’, or ‘/zerocool’. (Don’t do it… you can be more creative than zerocool!)

Whether you already have an account, or if you want to create one right now, the next time you log into Hackaday.io the interface will give you the opportunity to choose your vanity address. Like the Oklahoma land rush, we’re sure there will be a swell of folks looking to squat on the most pristine land. So if your first name is already taken, now is the perfect time to re-invent your perfect username.

For those that need a jump start picking their slug, we want to hear your favorite screen name/handle/user alias of all time in the comments. At the risk of embarassing [Jeff Keyzer], I have to say his alias (and company name) Mighty Ohm is pretty spectacular. Can anyone beat it?

Hacklet 27 – Holiday Hacks

It’s beginning to look a lot like the holidays around here. That means it’s time for holiday hacks here on The Hacklet! This week we’re looking at the coolest festive hacks created by YOU on Hackaday.io!

xmashdrWe start with [charliex] and Cypress PSOC 4 + ESP8266 WS2812 RGB XMAS Lights. The name might be a mouthful, but the goal of the project is a simple one: Awesome Christmas lights! [Charliex] has created WiFi controllable Christmas lights. To do this, he’s utilized ARM core based PSOC4 chips from Cypress. WiFi duty is handled by the popular ESP8266 module, and the lights themselves are WS2812 addressable strips.

[charliex] really outdid himself this time, creating a complete solution from the ground up. He started with a Cypress dev board, but quickly moved to a board of his own design. The PCBs  first were milled at home, then sent out for manufacturing.
Control of the strip is via UDP through a WiFi network. [Charliex] found the strips have plenty of WiFi range to place outside his home.  The last part of the puzzle was control – which [charliex] handled in style by creating his own GUI to handle synchronizing several strips to music played on a central computer.

snowflakeNext up is [nsted] with another LED hack, Glowing Xmas Snowflake Sculpture. [Nsted] was contracted to add some extra LED bling to a sculpture. The problem was that these LEDs would be filling in gaps left in the primary interactive lighting system which ran the entire sculpture. Any time you have to meld two systems, things can get crazy. [Nsted] found this out as he added WS2812B Adafruit NeoPixel strips to the Sensacell modules already designed into the sculpture. Communications happen via RS485, with Arduino Due and Megas handling the processing. Power was a concern with this sculpture, as it was pulling over 100 amps at low voltage. Like many art installations, this was a “work down to the wire” event. Everything came together at the last-minute though, and the project was a success!

musicNext up is [Jeremy Weatherford] with Christmas Orchestra.  [Jeremy] has taken on the task of making the most epic retro electronics orchestra ever created. He’s playing Trans-Siberian Orchestra’s Wizards in Winter on four floppies, three scanners, and an ancient inkjet printer. LED strips on the moving elements add lights to the sound. An Arduino Mega with a RAMPS board controls the show. [Jeremy] had his orchestra professionally recorded both on audio and in video. We’re anxiously awaiting the final video upload so we can rock out to some old hardware!

xmaslightsFinally, we’ve got [crenn6977] with his Solar powered Christmas Light Controller. This was [crenn6977’s] entry in the The Hackaday Prize. While it didn’t take him to space, we’re sure it will bring Santa to his door. Rather than run lots of tiny solar cells for his Sun powered Christmas lights, [crenn6977] is going for a single large panel and wireless control. The nRF24L01+ is handling the wireless connectivity, while a STM32F042 ARM cortex M0 processor is the brains of the operation. Solar power demands efficient design, so [crenn6977] is digging deep into op-amp circuits to keep those LEDs running through the night, and the batteries charging through the day.

It’s just about time for us to settle our brains for a long winter’s nap, so we’ll close this edition of The Hacklet here.  As always, see you next week. Same hack time, same hack channel, bringing you the best of Hackaday.io!