Ridiculously Complicated Home Automation Made Simple

[Eric T] wrote up his insanely-comprehensive home automation setup. What started out as a method to notify him when his dog barked grew into a whole-house, Arduino-powered sensor extravaganza. We’ve previously looked at two different steps from this mammoth article. One automated his dog, the other focused on the Wink hub to bridge with commercial hardware like smart lightbulbs. Now let’s look at the project as a whole.

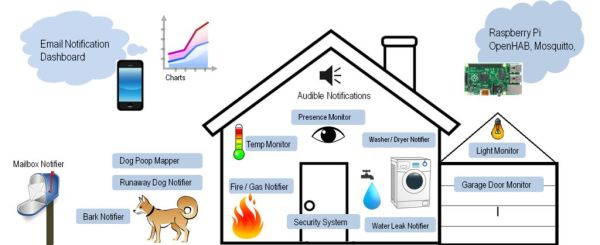
The basic backbone of the project is actually quite straightforward. He made a radio gateway base station out of an Arduino, a RFM69 radio unit, and an Ethernet shield that connects to a Raspberry Pi to serve up a GUI interface. The open-source home automation project OpenHAB makes it all available through browser or smartphone.

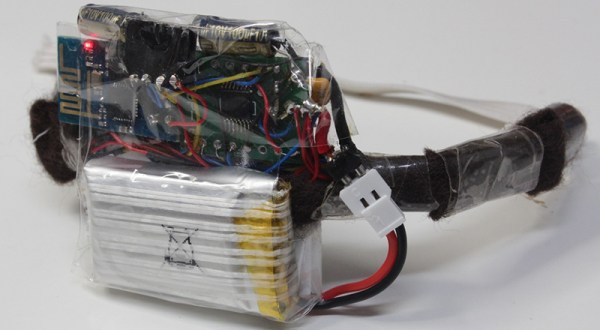
Next, he made additional sensor nodes from Arduino and RMF69 radios. These sensor nodes can all be separate from each other, which has enabled [Eric] to expand his system incrementally over time.

Modules of particular interest are the Uber Sensor and the Washer-Dryer module. For the Uber Sensor, [Eric] basically threw every sensor he could at an Arduino; it sends noise levels, light levels, motion, temperature, humidity, and presence of smoke, flame, or flammable gas. Some of these conditions trigger e-mail alerts, while others are simply stored for future perusal.

On the simpler end of the spectrum, he uses a noise-level detector to detect the end of a laundry cycle and then trigger a notification. The clever bit is that the message is automatically cleared when an attached motion detector triggers, presumably because someone’s gone to the basement to empty the dryer. Very neat.

16All of this is basically made practical and affordable by the presence of simple Arduino libraries and cheap hardware modules purchasable over Ebay. If you’re at all interested in a DIY home automation project, this offering is worth a look for inspiration and a great overview.

A Haptic Bracelet For Physical Computing

[Tinkermax] has been reading about the Internet of Things and wearable computing and decided it was time for him to have a go at building a device that turned computing physical. The result is a vibrating wristband that connects his sense of touch to the Internet.

The electronics for this haptic wristband are a mix of old and new technology. The radio and microcontroller come from an ESP-8266 module that was programmed with [Mikhail Grigorev]’s unofficial SDK. The mechanics for the wrist-mounted computer consist of six pager motors mounted around the wrist. These are driven somewhat ingeniously by a TLC5917 LED driver chip. This meant the ESP would only need to use two of its GPIOs to control six motors.

Right now the software is simple enough; just a web page, a few buttons, and the ability to buzz any of the pager motors on the wrist band over the Internet. Now it’s just a question of making this wearable useful, but connecting each pager motor to different notifications – a new email, a new SMS, or some emergency on the Internet – should be pretty easy.

Video below.

Continue reading “A Haptic Bracelet For Physical Computing”

Slick Bathroom Mirror Is All Tricked Out

A Mirror surrounded by a string of brightly lit lamps is something you usually get to see in a Movie Star’s dressing room. [pickandplace] was inspired by the Movies, and a dark bathroom, to come up with a Bathroom Mirror equipped with some bells and whistles. To start with, his planning was quite detailed, sketching out the features and constraints for his design. He chose to use a round mirror with 12 LED bulbs (which are safer than 220V bulbs) so it can work as a clock. User input is handled by a motion sensor to automatically switch it on/off and a capacitive touch dimmer. Under the hood there’s an RTC (for clock and brightness adjustment based on time of day), simple boost PWM LED driver, thermal management for the LEDs which are 10W, temperature sensor to pipe down the current if the LEDs get too hot, and even an anti-fogging heater strip – phew!

His execution is no less brilliant. Starting with building the wooden frame and ending with the code for driving all the electronics. Along the way, you will find detailed notes on the LED’s, PWM Driver, Heat sinking, and capacitive Touch dimmer using Atmel’s AT42QT2160 Qslide – Matrix Sensor IC. He had some trouble with the Motion Sensor PIR module, and hasn’t yet written the code to implement it. His first version used a PIC18F87J50, and the next iteration had an ATXmega256A3BU – but he asks us not to get into the Microchip vs. Amtel debate. We have to agree on that. Sharp readers will point out that neither of the two micro’s can provide 12 PWM channels. Well, worry not, he has it all figured out. He also coded up a simple control interface which is handy when the unit is hooked up over USB to a computer. To top it off, he built a miniature LED ring to use as a “Simulator” while working on the code so he didn’t have to lug the heavy Mirror in and out of the bathroom. How’s that for doing a good job better! Source files are on his Github repo, and links to the hardware schematics are peppered throughout his blog.

If you don’t want to build something so fancy, look up the Bathroom Mirror with HUD which displays Time and Weather

Continue reading “Slick Bathroom Mirror Is All Tricked Out”

LeanPipe

Building Things With Lean Pipe

Sometimes you just want to build something quickly and easily. Maybe you just need a basic structure for your actual project, or perhaps you want to be able to easily modify the design. Maybe you don’t have access to many fancy tools to build a solid, lightweight structure. Another possibility is that you want to be able to break down your structure and move it at a later date. In cases like these, you might want to consider using lean pipe.

Lean pipe is kind of like K’NEX for adults. It’s made up of metal pipe and specialized fittings. If you’ve ever worked with PVC pipe before then this may sound familiar. The difference is lean pipe is stronger and designed specifically for building sturdy structures. The fixtures designed for use with lean pipe are much easier to work with than PVC pipe. With PVC pipe, it seems like you never have the exact right fitting and you have to build your own adapters, quickly increasing the cost of the design.

A typical lean pipe fitting will either slide over the end of a section of pipe, or wrap around it somewhere in the middle. An adjustment screw can then be tightened to clamp the fitting in place around the sections of pipe. The video below does a good job demonstrating the different possibilities with fittings. The primary issue with this material is that you might not be able to find it at your local hardware store. Luckily, a quick Internet search will turn up a number of online purchasing options.

So what can you build with this stuff? Cody has been building himself computer desks with an industrial look. He first starts out with the frame design. This is the part that’s made from the lean pipe. Once the frame is completed he just needs to work on the wood surfaces. All he really needs to do is cut the wood to shape and then finish it to look nice. It then lays in place and can be bolted down for extra security. Continue reading “Building Things With Lean Pipe”

How To Weigh An Eyelash

So you’re a boxer, and you’re weighing in just 80 micrograms too much for your usual weight class. How many eyelashes do you need to pluck out to get back in the ring? Or maybe you’re following the newest diet fad, “microcooking”, and a recipe calls for 750 micrograms of sugar, and you need to know how many grains that is. You need a microgram scale.

OK, we can’t really come up with a good reason to weigh an eyelash, except to say that you did. Anyway, not one but two separate YouTube videos show you how to build a microgram balance out of the mechanism in a panel meter. You know, the kind with the swinging pointer that they used to use before digital?

Panel meters are essentially an electromagnet on a spring in the field of a permanent magnet (a galvanometer). When no current flows through the electromagnet, the spring pulls the needle far left. As you push current through the electromagnet, it is attracted to the fixed permanent magnet, fighting the spring, and tugs the pointer over to the right. More current equals more pull.

Continue reading “How To Weigh An Eyelash”

The Modular Bench Power Supply To Rule Them All

Right now, [The Big One] is using an ATX power supply as a bench power supply for all his electronics projects. It works, but it’s not ideal. The next step up from a power supply from an old computer is, in order, one of those Chinese deals on Amazon, a used HP supply, or for the very cool people among us, building your own. [The Big One] is very, very cool and he’s building the modular bench supply to rule them all.

This is not your $100 china special power supply that [The Big One] would have to buy again in a few months. Inside this massive power supply is a massive transformer and rectifier that fans out to multiple power supply modules. The modules themselves will be based on an OPA548 that will be able to supply up to 3A with current limiting.

Each of these channels will be controlled by an ATMega32u4, with all the fancy stuff you’d expect from the ultimate supply; USB for setting voltage, current, and logging data, a nice LCD character display, and it’s surprisingly cheap; just about $100 for the transformer, and about $50 for each module.

It’s shaping up to be a great build, and with all the features, a power supply that would also make a great kit. If you have any input you’d like [The Big One] to hear, let him know on the project page.

Why You Should Care About Software Defined Radio

It hasn’t become a household term yet, but Software-Defined Radio (SDR) is a major player on the developing technology front. Whether you’re building products for mass consumption, or just playing around for fun, SDR is worth knowing something about and I’ll prove it to you.

Continue reading “Why You Should Care About Software Defined Radio”