A Portable KIM-1

The KIM-1 was the first computer to use the 6502, a CPU that would later be found in the Apple, Ataris, Commodores, and the Nintendo Entertainment System. Being the first, the KIM-1 didn’t actually do a whole lot with only 1k of ROM and a bit more than 1k of RAM. This is great news for anyone with an Arduino; you can easily replicate an entire KIM-1, with a keypad and 7-segment display. That’s what [Scott] did, and he put it in an enclosure that would look right at home in a late 70s engineering lab.

The impetus for this build was [Scott]’s discovery of the KIM-Uno, a kit clone of the KIM-1 using an Arduino Pro Mini. The kit should arrive in a few weeks, so until then he decided to see if he could cobble one together with parts he had sitting around.

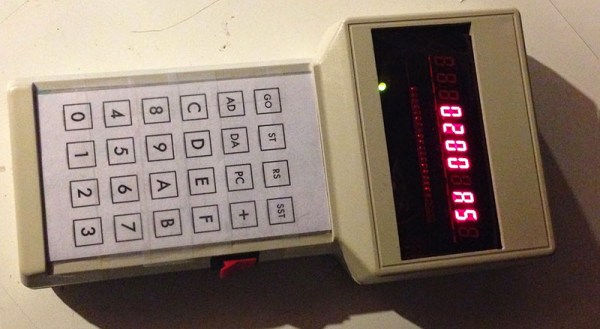
Inside a handheld industrial enclosure is an Arduino Uno, with a protoshield connecting the keypad and display. The display is an 11-digit, seven-segment display [Scott] picked up at a surplus shop, and the metal dome keypad came from a hamfest.

Getting the software working took a bit of work, but the most important parts are just modifications to the standard Arduino libraries.

Now that [Scott] has a KIM-1 replica, he can program this virtual 6502 one hex digit at a time, run Microchess, or use the entire thing as a programmable calculator.

LED Matrix Infinity Mirror

[Evan] wrote in to let us know about the LED matrix infinity mirror he’s been working on. [Evan] built a sizable LED matrix out of WS2812B LEDs and mounted them to a semi-reflective acrylic sheet, which makes a pretty awesome infinity mirror effect.

Instead of buying pre-wired strands of serial LEDs like we’ve seen in some other projects, [Evan] purchased individual WS2812 LEDs in bulk. Since the LEDs just had bare leads, [Evan] had to solder wires between each of his 169 LEDs (with some help from a few friends). After soldering up hundreds of wires, [Evan] drilled out holes for each LED in a piece of semi-reflective acrylic and inserted an LED into each hole.

To create the infinity mirror effect, [Evan] mounted the LED matrix behind a window. [Evan] put some one-way mirror film on the outside of the window, which works with the semi-reflective acrylic to create the infinity mirror effect. The LEDs are driven by an Arduino, which is controlled by a couple of free programs to show a live EQ of [Evan]’s music along with patterns and other effects.

Learning Python With Tron Radio

[5 Volt Junkie] has built his share of Arduino projects, but never anything with Python, and certainly never anything with a GUI. After listening to Internet radio one day, a new idea for a project was born: a Raspberry Pi with a small touchscreen display for a UI and displaying soma.fm tracks. It’s finally finished, and it’s a great introduction to Python, Pygame, and driving tiny little displays with the Pi.

Playing soma.fm streams was handled by mpd and mpc, while the task of driving a 2.8″ TFT LCD was handled by the fbtft Linux framebuffer driver. This left [5 Volt Junkie] with the task of creating a GUI, some buttons, and working out how to play a few streams. This meant drawing some buttons in Inkscape, but these were admittedly terrible, so [5 Volt Junkie] gave up and turned on the TV. Tron Legacy was playing, giving him the inspiration to complete his Tron-themed music player.

The result of [5 Volt Junkie]’s work is a few hundred lines of Python with Pygame and a few multicolor skins all wrapped up in a Tron theme. It looks great, it works great, and it’s a great introduction to Python and Pygame.

Continue reading “Learning Python With Tron Radio”

Closed Loop Control For 3D Printers

One of the bigger problems with any CNC machine or 3D printer is the issue of missed steps when moving the toolhead. If a stepper motor misses a step, the entire layer of the print – and every layer thereafter – will be off by just a tiny bit. Miss a few more steps, and that print will eventually make its way into the garbage. [Misan] has the solution to this: closed loop control of DC motors for a 3D printer.

Most printer firmwares use an open loop control system for moving their motors around. Step a few times in one direction, and you know where the nozzle of a 3D printer will be. Missed steps confound the problem, and there’s no way for the firmware to know if the nozzle is where it should be at any one time.

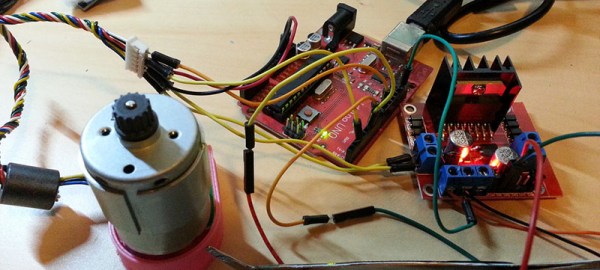
[Misan]’s solution to this was a DC motor coupled to an optical encoder. Both the motor and the encoder are connected to an Arduino Pro Mini which receives step and direction commands from the printer controller. The controller takes care of telling the motor where to go, the Arduino takes care of making sure it gets there.

The entire build is heavily derived from ServoStrap, but [Misan] has a very cool demo of his hardware: during a print, he can force the X and Y axes to either side, and the Arduino in each motor will move the print head back to where it needs to be. You can check that out below.

Continue reading “Closed Loop Control For 3D Printers”

Retrotechtacular: The Sylvania Tube Crusher

This week, we’re switching off the ‘Tube and taking a field trip to Emporium, Pennsylvania, home of the Sylvania vacuum tube manufacturing plant. Now, a lot of companies will tell you that they test every single one of their products, ensuring that only the best product makes it into the hands of John Q. Public. We suspect that few of them actually do this, especially these days. After all, the more reliable the product, the longer it will be before they can sell you a new one.

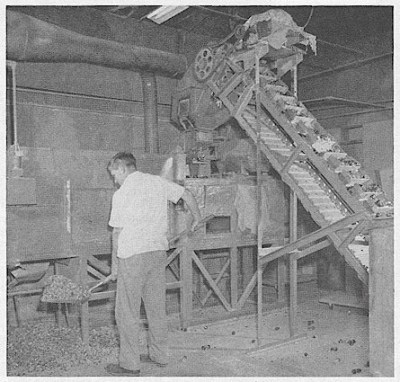
sylvania-tube-crusher-thumbFor Sylvania, one of the largest tube manufacturers of the golden age, this meant producing a lot of duds. A mountain of them, in fact, as you can see in the picture above. This article from the January 1957 issue of Popular Electronics vilifies forgers who used all kinds of methods to obtain defective tubes. They would then re-brand them and pass them off as new, which was damaging to Sylvania’s good name and reputation.

In addition to offering a reward for turning in known tube forgers, Sylvania did the most reasonable thing they could think of to quash the gray market, which was building a tube-crushing machine. Pulverizing the substandard tubes made sure that there were no “factory seconds” available to those fraudsters. After crushing shovelful after shovelful of tubes, the glass splinters were removed through a flotation separation process, and the heavy metals were recovered.

Did we get you all hot about tubes? Here’s how Mullard made their EF80 model.

[Thanks for the tip, Fran!]

Retrotechtacular is a weekly column featuring hacks, technology, and kitsch from ages of yore. Help keep it fresh by sending in your ideas for future installments.

Hackaday.io Land Rush: Vanity URLs

Hurry! Carve out your Hackaday.io homestead with a vanity URL. You can see I’ve already secured hackaday.io/mike, but get in before the rest of Hackaday finds out and you can you have ‘/tom’, ‘/jane’, or ‘/zerocool’. (Don’t do it… you can be more creative than zerocool!)

Whether you already have an account, or if you want to create one right now, the next time you log into Hackaday.io the interface will give you the opportunity to choose your vanity address. Like the Oklahoma land rush, we’re sure there will be a swell of folks looking to squat on the most pristine land. So if your first name is already taken, now is the perfect time to re-invent your perfect username.

For those that need a jump start picking their slug, we want to hear your favorite screen name/handle/user alias of all time in the comments. At the risk of embarassing [Jeff Keyzer], I have to say his alias (and company name) Mighty Ohm is pretty spectacular. Can anyone beat it?

Dreamcast Controller

A SEGA Dreamcast Controller With A Built-in Screen

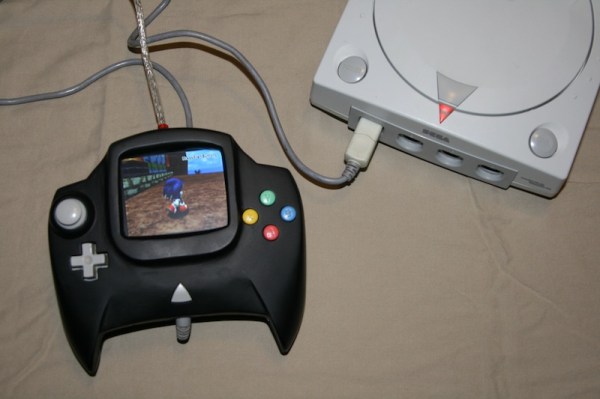
[Fibbef] was hard at work on a project for a build-off competition when he accidentally fried the circuit board. Not one to give up easily, he opted to start a new project with only two days left in the competition. He managed to modify a SEGA Dreamcast controller to hold a color screen in that short amount of time.

The Dreamcast controller’s shape is somewhat conducive to this type of mod. It already has a small window to ensure the view of the visual memory card is not obstructed. Unfortunately [Fibbef’s] screen was a bit too large for this window. That meant he would have to expand the controller and the circuit board.

After taking the controller apart, he desoldered the memory card connectors. He then cut the circuit board cleanly in half vertically. He had to re-wire all of the traces back together by hand. It turned out initially that he had messed something up and accidentally fried the right half of the controller. To fix it, he cut a second controller in half and soldered the two boards together.

With some more horizontal space to work with on the PCB side of things, [Fibbef] now needed to expand the controller’s housing. He cut the controller into several pieces, making sure to keep the start button centered for aesthetics. He then used duct tape to hold popsicle sticks in place to make up for the missing pieces of the case. All of the sticks were then covered with a thick layer of ABS cement to make for a more rigid enclosure. All of this ended up being covered in Bondo, a common trick in video game console mods. It was then sanded smooth and painted with black primer to make for a surprisingly nice finish.

The screen itself still needed a way to get power and a video signal. [Fibbef] built an adapter box to take both of these signals and pass them to the controller via a single cable. The box as a USB-A connector for power input, and a composite connector for video. There’s also a USB-B connector for the output signals. [Fibbef] uses a standard printer USB cable to send power and video signals to the controller. The end result looks great and serves to make the Dreamcast slightly more portable. Check out the demo video below to see it in action. Continue reading “A SEGA Dreamcast Controller With A Built-in Screen”