Open Source Software Defined Radio Transceiver

SDR

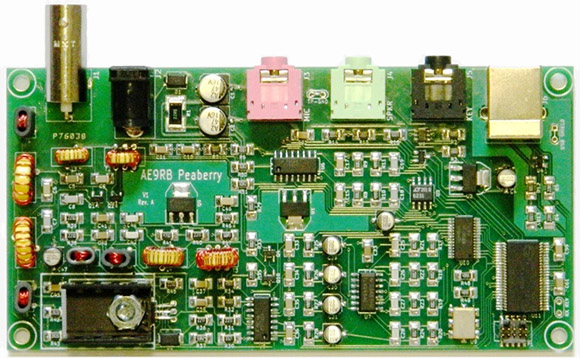
As the year draws to a close, we must look back and look at the advances in amateur radio this year. The RTL-SDR tuner hack, a USB TV Tuner to create a software defined radio receiver, is one of the greatest hacks of the last 12 months and a great justification for 2012 being the year of software defined radio receivers. 2013 is shaping up to have even more advances in the state of software defined radio. This time we’ll be transmitting as well, possibly with [AE9RB]’s Peaberry SDR transceiver.

The Peaberry SDR transceiver is a kit to both transmit and receive on every HAM band between 160 meters (1.8 MHz) to 17 meters (18 MHz). It does this through a USB interface and a 48kHz, 24-bit interface that is (or will shortly be) compatible with all the major SDR interfaces.

While the Peaberry SDR requires an amateur radio license to operate, we can’t wait to see what else will be coming to the software defined radio scene in the next year.

Thanks [Zach] for sending this one in.

Ancient Radio Repair

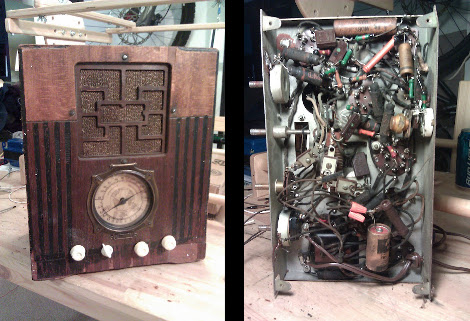
They sure don’t build them like that anymore. [J.W. Koebel] managed to take this 1934 Simplex Model P radio and bring it back to life.

So where do you start with a repair job like this one? Being a ham radio guy he has a good idea of what he’s doing, and started by replacing the AC capacitor with one which will provide quality noise filtering. He tried to make fixes throughout that would improve functionality and declutter the wire mess. This led him to find a snapped solder connection on the volume knob. Next he tested out the speaker and found that the primary transformer needed replacing. After as replacing the A67 converter (we’ve got no idea what that is) he swapped out the rest of the original capacitors, most of the resistors, and fixed the mechanical problems with the tuning dial. The result is a working radio that looks fantastic!

[via Reddit]

Working Software-defined Radio With A TV Tuner Card.

[Balint Seeber] just sent in a small yet timely project he’s been working on: a software radio source block for the Realtek RTL2832U. Now with a cheap USB TV tuner card, you can jump right into the world of software-defined radio.

[Balint]’s code comes just a week after hackaday and other outlets posted stories about using a $20 USB TV capture dongle for software defined radio. At the time, these capture cards could only write data directly to a file. With [Balint]’s work, anyone can use a cheap tv tuner dongle with HDSDR, Winrad, or GNU Radio. If you’ve ever thought about trying out software-defined radio, now might be the time.

Elsewhere on the Internet, a surprisingly active RTL-SDR subreddit popped up dedicated to using the Realtek RTL2832U tuner for software defined radio. There’s an awesome compatibility chart listing compatible USB dongles. The cheapest (so far, and subject to change) is the Unikoo UK001T available for $11 on eBay.

With his source block, [Balint] can listen to anything on the radio between 64-1700 MHz. The sample depth is 8 bits and the sample rate can be anything up to 3.2 MHz. You can watch [Balint] testing out his $20 GNU Radio rig after the break.

Continue reading “Working Software-defined Radio With A TV Tuner Card.”

Software Defined Radio From A USB TV Capture Card

With a simple digital TV USB capture card, you can build your own software defined radio or spectrum analyzer. While it may not be as cool as [Jeri Ellsworth]’s SDR, it’s still very useful and only requires $20 in hardware.

The only piece of hardware required for this build is a USB FM/DTV capture device with the Realtek RTL2832U chipset. So far, two USB sticks have been tested and the unit with the largest frequency range (64 – 1700 MHz) is available direct from China for $20.

Turning these cheap capture cards into software defined radios and spectrum analyzers was discovered by [Antti Palosaari] after sniffing the device. These cards demodulate the frequency and send all the data to the computer and is decoded via software. If you have one of these capture cards lying around, you can grab the software and load it up on your *nix box. Right now, the software only writes directly to a file, and may drop a few samples if writing to a hard disk instead of ram. Small problems, but we’re sure this project will pick up steam in the very near future.

via reddit

AVR Chiptune Project Turns This Simple Code Into Music

[Mark] had seen a few examples of algorithmic music generation that takes some simple code and produces complex-sounding results. Apparently it’s possible to pipe the output of code like this directly to audio devices on a Linux box, but [Mark] decided to go a different direction. His project lets you play simple algorithms as audio using AVR microcontrollers.

Now the code work for this is very simple, but he hardware implementation is where things get interesting. Ostensibly, [Mark] didn’t have the components available to build a filter to use PWM as an audio signal. Being that he’s a ham operator, he grabbed some radio equipment he had on hand and whipped up an alternative. He’s feeding the PWM from an Arduino into the voltage controlled oscillator on a board meant for high-altitude balloon telemetry. The signal broadcast by this board is then picked up by his radio receiver, and played on some speakers.

Rube-Goldberg contraptions aside, the effect is pretty interesting, as you can hear in the latter half of the video clip which we’ve embedded after the jump.

Continue reading “AVR Chiptune Project Turns This Simple Code Into Music”

Waterfall Signal Visualizer From Arduino And Cellphone LCD

[Leigh] is a HAM operator (you may know him as wa5znu). He is familiar with a signal visualization tool called a waterfall which plots signal strength and frequency over time. He wanted to build his own waterfall and ended up with this Arduino-based version which he calls Cascata. Cascata means waterfall in Italian which meshes nicely with Arduino’s country of origin

The display he chose is a Nokia LCD shield from SparkFun. It’s easy to plug in and there were already libraries available to drive the display. The audio input just connects to a headphone plug (you can just make it out at the bottom right in the image above) using some electrical tape. A free-formed resistor divider ensures that the signal is within a measurable range. [Leigh] found that signal noise was a bit of a problem but was able to improve his results by adding a capacitor to the Arduino headers between the VREF and GND pins.

See it in action after the break.

Continue reading “Waterfall Signal Visualizer From Arduino And Cellphone LCD”

Adjustable Voltage And Polarity Tester

polarity_tester

Instructables user [Rudolf] wrote in to share a handy little tool he created with ham radio operators in mind. Now and again, he found himself connecting to an unknown power supply, and rather than blow out all his expensive radio gear, he decided to put together a simple polarity and voltage tester that can be easily carried out in the field.

The tester features a pair of powerpole connectors, which are used quite often for connecting HAM gear. A PIC12F675 runs the show, acting as an adjustable comparator for detecting voltage levels. By default, his probe glows amber when the supply voltage is below 11.5V, turning green when the supply is between 11.5V and 15V. When the detected voltage is too high, the built-in LED glows a bright red. When the polarity is reversed, the LED flashes red regardless of the supply voltage.

All of these trigger levels can be set in the PIC’s code, which [Rudolf] is kind enough to include on his page, along with schematics for making your own.