Tube Headphones Rock Out While Keeping The Family Peace

tubeHeadphones

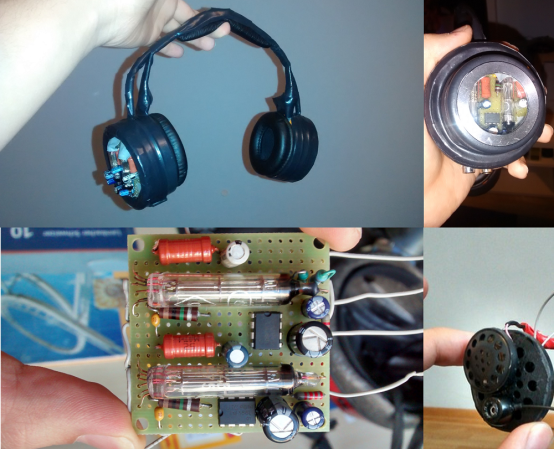
It’s hard being a kid sometimes. [Young] likes his music, but his dad is an overnight trucker. With his dad sleeping during the day, [Young] has to keep the volume down to a reasonable level. He could have bought some commercial headphones, but he wanted something a bit more customized. Rather than give up on his tunes, he built a pair of headphones with an internal tube preamp amplifier. [German language link — Google translate doesn’t want to work with this one but Chrome’s translate feature works].

Two 1SH24B preamp tubes feed two LM386 amplifier chips, creating a hybrid amplifier. The 1SH24B tubes are designed to work on battery voltage, so a step up circuit wasn’t necessary. However, [Young] still needed to provide an 8 cell battery pack to run his amp. Speakers were a 3 way coaxial of [Young’s] own design. He built the headphone frame using candy tins and cups from commercial headphones. A final touch was a window so everyone can see all that vacuum state goodness.  Considering that [Young] is only 16, we’re looking for some great things from him in the future.

If you don’t want to strap the tubes to your skull there are other options. But you have to admit it makes for a cool look. Starbucks here we come.

[Thanks Patrick]

Repairing Bose Active Noise Cancelling Headphones

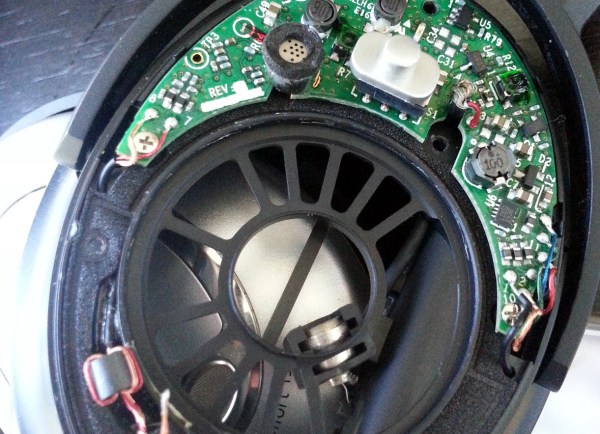
[Mansour] was disappointed to find out that his Bose QC15 headphones had a dead right channel. These headphones have active noise cancelling, which uses a microphone to capture ambient noise and digital signal processing to insert an out of phase signal. Since they’re quite expensive, [Mansour] was determined to resurrect them.

First, he determined that the right speaker had died, so he found a replacement on eBay. These were designed for a different set of headphones, but matched the impedance of the original Bose part. After replacing the driver, it seemed that the repair was a failure. The sound cancelling wasn’t working, and a the playback was high-pitched. As a last attempt, he potted the speaker with glue, to match the original construction. Much to his surprise, this worked.

The problem was that the new driver didn’t have sufficient sound isolation from the microphone, which is meant to pick up passive noise. This feedback likely caused issues with the noise cancelling DSP. A little glue meant a $20 fix for a $400 pair of headphones.

Custom Wireless Headphone Charging Station

wirelessHeadphoneChargingStation

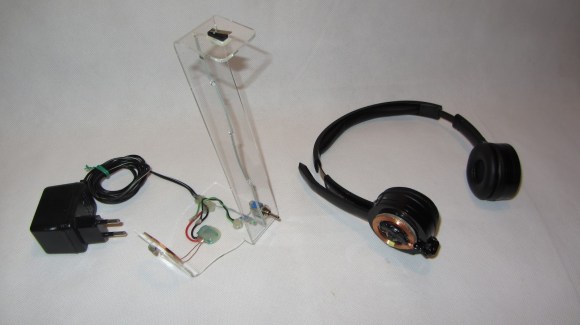
We’ve come to expect quite a lot of convenience from our technology, to the point where repeatedly plugging in a device for recharging can seem tedious. Hackaday regular [Valentin Ameres] decided to ditch the plugs and built his own wireless headphone charger. We’ve seen [Valentin’s] work before, and one thing’s for certain: this guy loves his laser cutter. And he should, considering it’s churned out key components for a gorgeous Arc Reactor replica and his Airsoft Turret. [Valentin] fired it up yet again to carve the charging stand out of acrylic, then used a small torch and the edge of a table to bend the stand into shape.

He sourced the needed coils online and soldered the receiving coil to a spare miniUSB plug. These components are glued onto a laser-cut acrylic attachment, which fits against the side of the headphone and is held in place by plugging directly into the earpiece’s miniUSB jack. The headphones rest on the laser-cut charging stand, which has an extrusion of acrylic on one side that holds the emitter coil in position against the receiver coil. [Valentin] also added a simple momentary switch at the top of the stand to activate both the emitter coil and a status LED when pressed by the headphones.

Stick around for a video of the build below, and check out some other headphone hacks, like adding a Bluetooth upgrade or making a custom pair out of construction earmuffs.

Continue reading “Custom Wireless Headphone Charging Station”

Use Your Ears As An Oscilloscope

image

When work on an engine control circuit [Scott] found himself in need of a way to compare the performance of two control circuits at once. The hobby quality oscilloscope he owns wasn’t up to the task. After thinking about it for a bit he ended up using his ears as the oscilloscope.

The signals he was measuring are well suited for the challenge as they fell within the human range of hearing. He used some wire wrapped around each of the three conductors on the jack of his headphones in order to connect them to a breadboard. Then he simply connected each channel to one of the motor driver circuits, and connected the common ground. Listening to the intonation of the pitches in each ear he was literally able to tune them up.

If he had been looking for a specific frequency he could have used his sound card to take and analyze a sample. But balance was what he needed here and you must admit that this was an easy and clever way to get it!

SNES Headphones Scream Out For Bluetooth Control

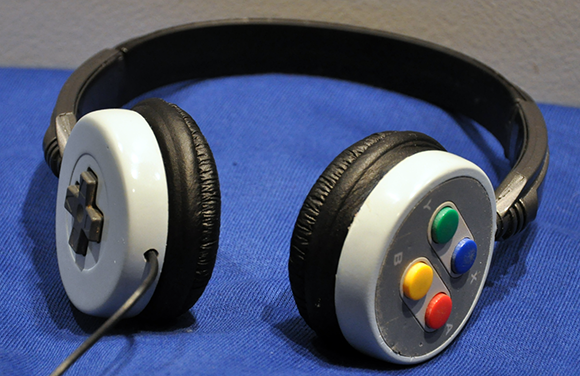
Here’s a build that just exudes nerd cred. It’s an SNES controller modified into a pair of headphones, straight from the workshop of [lyberty5].

The build began by stealing a controller from a PAL SNES and carefully dremeling the buttons and d-pad loose from their plastic frame. The PCB was cut in half, and the remaining plastic was carefully crafted into round speaker enclosures with the help of some epoxy. hot glue, and possibly a few pieces of styrene.

The result is a perfectly formed pair of SNES headphones, with a build quality right up there with the best case mods we’ve seen. Unfortunately, while the buttons are still attached to the PCB, they don’t do anything. We’re thinking a small Bluetooth adapter – or even repurposing a set of Bluetooth headphones with volume and play controls – would be a wonderful use for the 20-year-old, candy-like buttons.

Still, an awesome build, and [lyberty5] really shows off his craft by constructing these wonderful headphones. You can see the time-lapse of the build after the break.

Continue reading “SNES Headphones Scream Out For Bluetooth Control”

Headphone Light Show

Seriously, nothing says ‘Look at me!’ like these headphones. [Yardley Dobon] added a rainbow of colored electroluminescent wire to his headphones and made them pulse to the music. The video after the break shows the headphones bumping to the tunes. This is one of two versions of the project, the other runs the EL wire along the headphone wire itself. We’re a bit surprised that the high frequency from that parallel run doesn’t inject noise into the signal. We do enjoy seeing these in action, but in practice observers unfortunately won’t be able to hear the tunes to which the lights are pulsing.

It took us a little while to figure out that [Yardley] didn’t roll his own VU hardware. The inverter driving the EL wire is designed to bump to the music. But he did hack it to use an audio line rather than a microphone. He mentions that this has other uses, like allowing carefully crafted sound clips to precisely control the inverter.

Continue reading “Headphone Light Show”

Hackaday Links July 18, 2012

Apollo 13 DJ controller Follow Up

apollo13 DJ controller

[Adam] had a really impressive DJ controller build featured here recently. Many of you had more questions about the internals and such, so this post should clarify a few things. He’s still got a few more updates to make, but promises to reveal all if given enough time!

Noise Absorbing Headphones from Shooting Earmuffs

earmuffs-ipod

If the circuitry on your microphone-enabled shooting earmuffs has gone bad, the actual speakers may still be good. Why not convert them into some noise-blocking headphones? For that matter, if you’ve broken a pivot, there’s a simple solution for that too!

Help Choosing your CNC Router

cnc-kits

If you’re in the market for a CNC router, but aren’t sure where to start, Ponoko has put together a handy pricing guide to several of the more popular DIY routers available.

DIY AC Unit

ac-unit

It’s very hot out, so what is one to do when your shop or garage is burning up?  Why not build your own “AC unit?” Sure you have to supply your own ice, but at under $20 for this cooler-based unit, maybe it’s worth it. Here’s the Reddit thread explaining it as well as a picture of the finished product.

3D Topo Map on a CNC Router

3d-topo-map

Once you’ve purchased your CNC router using the above guide, why not make your own 3D top map? This tutorial features a map of Ross Island off of Antarctica. Why Ross Island? It was the first vector-format topo map found off of Wikimedia.