Temperature Controller Gets Open Source Firmware Upgrade

stc1000

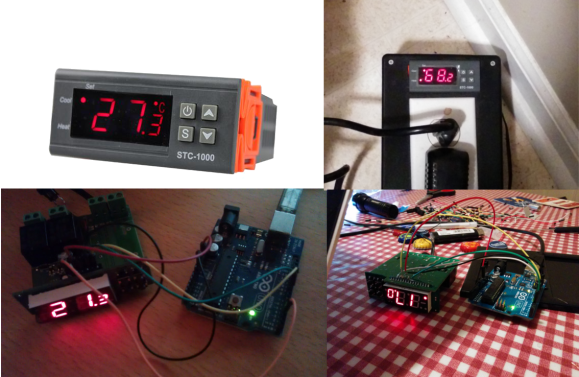
Beer lovers rejoice! [Mats] has reverse engineered a temperature controller and written new open source firmware for it. This effectively gives all us homebrewers a low cost, open source software driven controller. The STC-1000 is a cheap (under $20 USD) temperature controller mass-produced in the far east. The controllers do work, but have several limitations. The programming options are somewhat limited to basic set points for heat and cool. The controller also is only programmed for temperature display in Celsius, which is a bit of an annoyance for those of us who think in Fahrenheit. Under the hood, the STC-1000 utilizes a Microchip PIC16F1828 microcontroller. Unfortunately the PIC’s protection bits were set, so the original code would have been extremely difficult to extract. Not a problem, as [Mats] reverse engineered the hardware and wrote his own firmware. A 10k NTC thermister acts as the temperature probe. The probe is read by the PIC’s ADC. These probes are not very linear, so a look up table is used to convert from volts to degrees Celsius or Fahrenheit.

[Mats] new firmware allows for up to 6 profiles. Each profile has up to 10 set points and a time duration to hold each of the set points. Hysteresis and temperature offset values are also programmable via the front panel. PIC software is often written in C using Microchip’s MPLAB tool chain, and programmed with the PICkit 3 In Circuit Serial Programming (ICSP) tool. [Mats] decided to buck the system and wrote his C code using Small Device C Compiler. To keep things simple for homebrewers who may not have Microchip tools, [Mats] used an Arduino Uno for flashing duties. Thankfully the unholy matrimony of a PIC and an AVR has not yet caused a rift in time and space. The firmware is still very much in the beta stage, so if you want to help out, join the discussion on the homebrew talk forum. If you see [Mats] tell him we owe him a Haduino which he can use to almost open his beer.

[Thanks for the tip Parker!]

Fetching Etchings For Stainless Steel

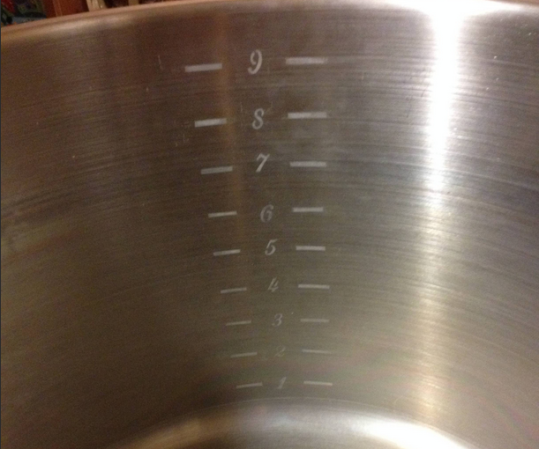
What do you do when you have a 10-gallon brew kettle (or any other stainless steel or aluminium thing) with no volume markings (or Hack a Day logos)? If you’re [Itsgus], you use science to etch some markings with a few household items and a 9V and you call it a day.

[Itsgus] used 1/4c vinegar and 1/4tsp of salt to form an electro-etchant and applied it with a Q-tip connected to the negative terminal of a 9V. He used tape to connect a wire between the positive terminal and the kettle. The vinegar dissolves the salt, creating negatively charged ions. Connected correctly to a 9V, the process removes metal where the current flows. If you were to connect it in reverse,  you would add a small amount of metal.

The process only takes a few seconds. When the etchant starts to sizzle and bubble, Bob’s your uncle. Even though the stainless steel’s natural coat re-oxidizes over the etches, you should probably wash that thing before you brew. If you prefer adding metal to removing it, try electroplating copper on the cheap.

DUO Portable: A Homebrew Computer With Keyboard And Display

duo

[Jack] is famous ’round these parts for his modern reinterpretations of very early computers. He’s created a computer entirely out of logic chips, a microcontroller-powered multicore box, and even a very odd one-instruction computer. For his latest project, he’s stepped up his game and made something that’s actually fairly useful: a microcontroller-powered system with an integrated keyboard and display.

The DUO Portable, as [Jack] calls his new toy, is built around an ATMega1284P microcontroller. Also on this board is a serial EEPROM that acts as a very small drive, a 102×64 pixel graphic display, and enough tact switches to create a QWERTY keyboard.

The DUO Portable boots to a primitive operating system where files can be created, edited, and saved. The programming language for this computer  is called DCPL – the DUO Portable Command Language – and can be used to create anything from a simple ‘Hello World’ program to a block-building game.

Like all of [Jack]’s homebrew computer projects, he’s written an emulator that can be run in a browser. There’s also video of [Jack] playing around with the DUO Portable available below.

Continue reading “DUO Portable: A Homebrew Computer With Keyboard And Display”

Testing The Limits Of Home PCB Etching

[Quinn Dunki]’s Veronica, a homebrew computer based on the 6502 CPU, is coming along quite nicely. She’s just finished the input board that gives Veronica inputs for a keyboard and two old Nintendo gamepads. [Quinn] is building this computer all by her lonesome, including etching all the PCBs. She’s gotten very, very good at etching her own boards, but this input board did inspire a few facepalming moments.

In an earlier post, [Quinn] went over her PCB etching capabilities. As demonstrated by the pic above, she’s able to print 16 mil traces with 5 mil separation. This is just about as good as you can get with homebrew PCBs, but it’s not without its problems.

[Quinn] is using a photographic process for her boards where two copies of a mask is printed on an acetate sheet, doubled up, and laid down on a pre-sensitized copper board. The requirement for two layers of toner was found by experience – with only one layer of toner blocking UV light, [Quinn] got some terrible pitting on her traces and ground planes.

Two photographic masks means the masks must be precisely aligned. This example shows what happens when the acetate sheets are ever so slightly misaligned. With a 5 mil gap between traces, [Quinn] needs to align the masks to within ±2.5 mils; difficult to do by eye, and very hard once you factor in flexing and clamping them down to the copper board.

Even when this process goes perfectly, [Quinn] is pushing the limits of a laser printer. When printing at 600 dpi, the pixels of the print are about 1.5 mils. While GIMP, printer drivers, and the printer itself have some fancy software to help with the interpolation, [Quinn] is still seeing ‘bumps’ on the edges of perfectly aligned parts. This is one of those things that really makes you step back and realize how amazing fabbing PCBs at home actually is.

With most of the hardware for Veronica out of the way, it’s just about time for [Quinn] to start programming her baby. We’re not expecting a full-blown operating system and compiler, but those NES gamepads are probably crying out for some use.

Fubarino Contest: Splash Screen On System Reset

logo

Here’s a Fubarino contest entry for all those homebrew computer nuts out there. [Danjovic] modified an NTSC/PAL display adapter to show an ASCII version of the Hackaday logo when his board first boots up.

The build is based on [Daryl Rictor]’s Video Display Adapter intended for use with homebrew computers, microprocessor projects, and any other minimalist digital setup that needs an NTSC or PAL video display. It’s a surprisingly simple circuit, made of a few logic ICs and an ATmega8.

[Danjovic] modified this video display adapter with an easter egg: if one pin on the ATmega8 is shorted when the board is powered on, a neat Hackaday splash screen is displayed for several seconds before falling back to the stock display of a blinking cursor. [Dnajovic] converted the ASCII Hackaday logo with the help of a short Python script and loaded it onto the AVR with a small firmware change.

Video of the boot screen in action below.


This is an entry in the Fubarino Contest for a chance at one of the 20 Fubarino SD boards which Microchip has put up as prizes!

Continue reading “Fubarino Contest: Splash Screen On System Reset”

Arduino Controlled Beer Brewing Machine!

[the_meatloaf] just put the final touches on his fully automated beer brewing machine using an Arduino.

The project was part of his computer engineering degree, and it took [the_meatloaf] and two mechanical engineer friends a year to design and build the entire system from scratch. An Arduino Mega with a 4-button interface allows you to program, save, load, rename, and run up to 26 different recipes saved to the EEPROM.

An automated system like this removes most of the guesswork from an otherwise complex brewing process. The machine starts by heating the water in the first keg using a 2000W heating element, after which the water transfers into the mash vessel via servo valves, where it’s stirred by a mixing motor. The machine then drains the wort (the resulting liquid after mashing) and sparges (adds more water to the mash tun) the grains as programmed: thanks, [Chris,] for clarification! The wort is brought to a boil for the programmed amount of time, while a servo-controlled “hopper” automatically adds the hops.  Finally, a counter-flow heat exchanger rapidly cools the solution to room temperature using ice water, then dispenses the solution for fermentation.

Though [the_meatloaf’s] biggest project to date was quite the accomplishment, he unfortunately won’t get to enjoy it. The sponsors who covered the $1000 budget reclaimed the machine. Drat.

[via Reddit]

Veronica Gets A Pair Of Gamepads And A Bugged Chip

veronica

[Quinn Dunki]’s awesome 6502-based computer is coming right along, and she decided it’s time to add one of the most important features found in the 80s microcomputers she’s inspired by – gamepads.

There were two ways of implementing gamepads back in the 80s. The Apple II analog joysticks used a potentiometer for each joystick axis along with a 556 timer chip to convert the resistance of a pot into a digital value. Analog controls are awesome, but a lot of hardware is required. The other option is the Atari/Commodore joystick that uses buttons for each direction. Surprisingly, these joysticks are inordinately expensive on the vintage market but a similar hardware setup – NES gamepads – are common, dirt cheap, and extremely well documented.

[Quinn] wrote a few bits of 6502 assembly to read these Nintendo controllers with Veronica’s 6522 VIA with the help of an ATMega168, and then everything went to crap.

In testing her setup, she found that sometimes the data line from the controller would be out of sync with the clock line. For four months, [Quinn] struggled with this problem and came up with one of two possible problems: either her circuit was bad, or the 6522 chip in Veronica was bad. You can guess which option is correct, but you’ll probably be wrong.

The problem turned out to be the 6522. It turns out this chip has a bug when it’s used with an external clock. In 40 years of production this hasn’t been fixed, but luckily 6502 wizard [Garth Wilson] has a solution for this problem: just add a flip-flop and everything’s kosher. If only this bug were mentioned in the current datasheets…

Now Veronica has two NES controller inputs and the requisite circuitry to make everything work. Video evidence below.

Continue reading “Veronica Gets A Pair Of Gamepads And A Bugged Chip”