The Most Beautiful Floppy Disk Jukebox Ever

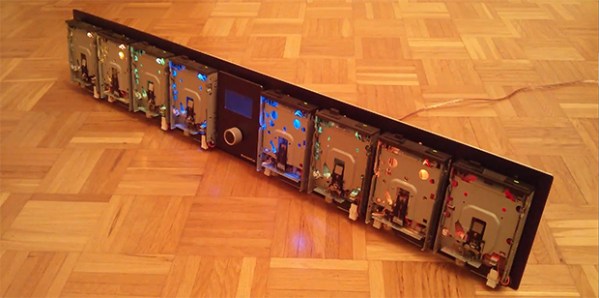
Playing music on floppy drives is something that has been done to death. [kiu]’s RumbleRail is something else entirely. Yes, it’s still a collection of floppy drives playing MIDI files, but the engineering and build quality that went into this build puts it in a class by itself.

Instead of the usual assemblage of wires, power cords, and circuits that accompany most musical floppy drive builds, [kiu]’s is an exercise in precision and modularity. Each of the eight floppy drives are connected to its own driver with an ATMega16 microcontroller on board. The microcontrollers in these driver boards receive orders from the command board over an I2C bus. Since everything on the RumbleRail is modular, and the fact [kiu] is using DIP switches to set the I2C address of each board, this build could theoretically be expanded to 127 voices, or 127 individual floppy drives each playing their part of a MIDI file.

The RumbleRail can also operate in a standalone mode without the need for a separate computer feeding it data. MIDI files can be loaded off an SD card by the main controller board, and decode them for the floppy drivers.

If you’d like to build your own RumbleRail, all the board files, schematics, and firmware are up on [kiu]’s git. There are, of course, a few videos below of the floppy jukebox in action.

Continue reading “The Most Beautiful Floppy Disk Jukebox Ever”

Wireless Thermostat

thermostat0104

The thermostat in [Tom’s] 100-year-old house is two floors up from where the furnace is located, so a broken wire in the wall was just the catalyst needed to design a wireless thermostat.

The system is based on a customized PCB [Tom] designed called the Magic Mote. The board contains an MSP430 microcontroller, a low power NRF24l01+ wireless transceiver, and various sensor interfaces. The wireless thermostat project uses two of these boards; one monitors the temperature on the second floor and the other controls the furnace in the basement.

The temperature sensing is done using a DHT22/AM2303 temperature and humidity sensor, which is a convenient choice, since the part is calibrated and handles the analog digital conversion; you just need one digital pin to retrieve the temp/humidity data. To control the furnace, [Tom] used the local 24VAC and a latching relay to drive the heater signal. The 24VAC also powers the board, so a door-bell transformer steps the voltage down to something more usable; about 11VAC or so, which is then rectified, filtered, and regulated down to what the control electronics like to see (3.3V/5V).

This project is actually still in the early stages of what [Tom] has planned; a network of sensors and appliances with a beagle bone base station. We can’t wait to see what’s next for this project; maybe we’ll even see some voice control, like in this epic Siri controlled home automation project.

[via Dangerous Prototypes]

Hackaday Links: January 5, 2014

hackaday-links-chain

While we can’t condone the actual use of this device, [Husam]’s portable WiFi jammer is actually pretty cool. It uses a Raspberry Pi and an Aircrack-ng compatible dongle to spam the airwaves with deauth packets. The entire device is packaged in a neat box with an Arduino-controlled LCD and RGB LEDs. Check out an imgur gallery here.

You can pick up a wireless phone charger real cheap from any of the usual internet outlets, but try finding one that’s also a phone stand. [Malcolm] created his own. He used a Qi charger from DealExtreme and attached it to a 3D printed phone stand.

A while back, [John] noticed an old tube radio in an antique store. No, he didn’t replace the guts with a Raspberry Pi and an SD card full of MP3s. He just brought it back to working condition. After fixing the wiring (no ground cord on these old things), repairing the speaker cone, putting some new twine on the tuner and replacing the caps, [John] has himself a new old radio. Here’s a video of the complete refurbishment.

Here’s a Sega Master System (pretty much a Game Gear) running on an STM32 dev board. Also included are some ROMs for some classic games – Sonic the Hedgehog, Castle of Illusion, and The Lion King. If you have this STM Discovery board you can grab the emulator right here.

[Spencer] wanted a longer battery life in his iPhone, so he did what any engineering student would do: he put another battery in parallel.

Breadboarding something with an AVR or MAX232? Print out some of these stickers and make sure you get the pinouts right. Thanks, [Marius].

Mustachioed Rover Simultaneously Manly, Adorable

[Rick], an Adafruit learning system contributor, is excited by the implications of STEM’s reach into K-12 education. He was inspired to design Red Rover, a low-cost robot that can be easily replicated by anyone with access to a 3-D printer.

This adorable autonomous rover is based on the adafruit Trinket microcontroller, but will also rove under the power of an Arduino micro. It really is quite simple—the Trinket drives two continuous rotation micro servos and pretty much any flavor of rangefinder you like. [Rick] tested it with Parallax PING))), Maxbotix, and Grove sensors, and they all worked just fine.

What’s truly awesome about Red Rover are the track treads. [Rick] initially experimented with flexible filament. While he had good results, it was not a cost-effective solution. What you see in the picture and the short video after the break are actually rubber bracelets from Oriental Trading.

The plastic part count comes in at seven, all of which can be printed together at once. [Rick]’s gallery includes both small and large chassis and three different servo mounts. The Red Rover guide builds on other adafruit guides for Trinket general use, servo modification, and Trinket-specific servo control.

Update: Added [Rick]’s demo video after the break!

Continue reading “Mustachioed Rover Simultaneously Manly, Adorable”

Image Sensor For Filling Wine Bottles

wine

A wine bottling company in New Zealand got in touch with [Boz] to solve a problem. They needed a way to automatically determine if a wine bottle was filled or not. What he came up with is a very simple yet very effective fill level sensor that can scan thousands of bottles an hour.

There were a few design decisions that went into the construction of this wine bottle sensor. [Boz] could have used a VGA camera sensor, but given the speed of the bottling line (half a meter per second), pushing all those pixels to a computer and doing real-time image analysis would be difficult. [Boz] settled on a much simpler solution – a 1×128 linear CCD analog image sensor. With a PIC microcontroller, this allows the device to check multiple bottles per second, calculate if the bottle is full or not (or overfilled), and send a ‘pass’ or ‘reject’ signal to the rest of the line.

The rest of the assembly is fairly straightforward with an LED backlight providing the illumination for the CCD and a Bluetooth transmitter for checking out the machine’s settings. On the bottling line, the device has 99% accuracy for both red wines in dark bottles and whites in green bottles. You can take a gander of this device in action on a New Zealand bottling line below.

Continue reading “Image Sensor For Filling Wine Bottles”

Retro Chaser Sign Lights Up Your Life

lighted-sign

[Gnsart] builds props often used in the film industry. He’s created an amazing retro Vegas style light chaser sign. The sign was started as a job a few years ago. While [Gnsart] could handle the physical assembly, the cost of a mechanical light chaser pushed the project over budget. The sign project was cancelled back then, but he never forgot it.

Fast forward to a few weeks ago. [Gnsart] happened upon the Arduino community. He realized that with an Arduino Uno and a commonly available relay board, he could finally build the sign. He started with some leftover cedar fence pickets. The pickets were glued up and then cut into an arrow shape. The holes for the lights were then laid out and drilled with a paddle bit. [Gnsart] wanted the wood to look a bit aged, so he created an ebonizing stain. 0000 steel wool, submerged and allowed to rust in vinegar for a few days, created a liquid which was perfect for the task. The solution is brushed on and removed just like stain, resulting in an aged wood. We’ve seen this technique used before with tea, stain, and other materials to achieve the desired effect.

[Gnsart] then built his edging. 22 gauge steel sheet metal was bent to fit the outline in a bending brake. The steel sheet was stapled to the wood, then spot welded to create one continuous piece. Finally, the light sockets were installed and wired up to the Arduino. [Gnsart] first experimented with mechanical relays, and while we love the sound, we’re not sure how long they’d last. He wisely decided to go with solid state relays for the final implementation. The result speaks for itself. LEDs are great – but there is just something about the warm glow of low-wattage incandescent lights.

Continue reading “Retro Chaser Sign Lights Up Your Life”

The Berkeley Tricorder Is Now Open Source!

[Reza Naima] has just released the designs for his Berkeley Tricorder for the public to use. He’s been designing it since 2007 as his thesis work for his PhD, and since he’s done now (Congrats!), he decided to let it grow by making it open source!

We covered it almost 7 years ago now when it was in its first prototype form, and it has come a long way since then. The latest version features an electromyogram (EMG), an electrocardiograph (ECG), a bioimpedance spectrometer, a pulse oximeter, an accelerometer, and all the data is recorded to a micro SD card or sent via bluetooth to a tablet or smart phone for data visualization.

He’s released it in hopes that other researchers can utilize the hardware in their own research, hopefully springing up a community of people interested in non-invasive health monitoring. With any luck, the development of the Berkeley Tricorder will continue, and maybe some day, can truly live up to its name!

Unfortunately there’s no new video showing off the latest iteration, but we’ve attached the original video after the break, which gives a good narrative on the device by [Reza] himself.

Continue reading “The Berkeley Tricorder Is Now Open Source!”