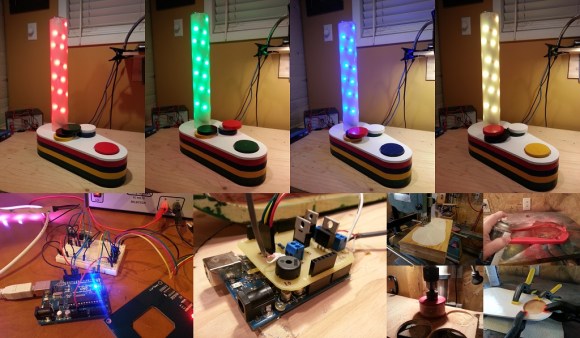
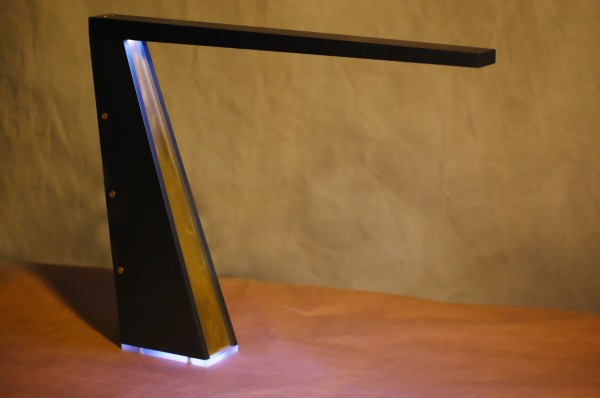
Web Based Automation Courtesy Of Raspberry Pi

web-based-automation-via-rpi

This project is a great example of the Raspberry Pi’s ability to eclipse Arduino when it comes to interaction. [Fall Deaf] mentions that he used to use an Arduino board with an Ethernet shield to add extensible interactivity to his project. But this one, which is a home automation lamp project, uses a Raspberry Pi instead. The concepts end up being very similar. But the cost of the hardware is less and the coding work is arguably orders of magnitude easier.

Don’t get us wrong, the hardware is fundamentally different. When you move from Arduino to RPi you lose some I/O pins and the low level control of them isn’t quite as straight-forward. But you also don’t have to program the thing in C. The Linux kernel handles the low level control which means you can write your scripts using Python. Because Python is an interpreted language the testing and debugging is much faster — no need to flash new code, just run the script again.

This project used the RPi GPIO to drive a strip of LEDs which use the WS2801 protocol. The board includes a NIC which makes it a snap to use as a web server. The smart phone controls seen above are served up from the Pi using jQuery. Right now there’s a cord running out of the lamp. But there should be plenty of room to use a screw-in outlet adapter and to hide the RPi and its PSU inside.

The board still has enough juice to drive other automation features too, like acting as a web radio server.

Continue reading “Web Based Automation Courtesy Of Raspberry Pi”

Trimethyl Borate Lantern Built From Garbage

scratch-build-lantern

This lantern was built from recyclable goods. It’s a bit dangerous when used like the image above, but [The Green Gentleman] does give you a few other options in his build instructions which make for much safer operation.

The lantern enclosure is made from old cans and a glass jar. He screwed a couple of boards together at a right angle to act as a jig for cutting the glass. The V-shape created by the boards holds the jar on its side, giving his glass cutting tool something to rest upon. He then turns the jar to score it around the top, and then bottom. He alternated pouring boiling and chilled water on the score mark to shock the glass into breaking along the line.

This makes up the clear part of the enclosure which is later mated with metal top and bottom pieces. From there he adds either an LED, an alcohol lamp, or the Trimethyl Borate lamp seen above. The first two are relatively safe, but the latter burns at around 1500 degrees F. We have reservations about using a plain old glass jar as the enclosure for something burning this hot. It really should be heat resistant glass.

Just Put Your Lips Together To Turn On A Lamp

whistler-lamp-control

The inlaid image is a controller board which [Limpkin] developed to add whistle control as a home automation option. It has an effective range of around fifteen feet and does a good job of detecting whistles from many different people. Here is one of the test subjects (captured with a hidden camera) whistling to the white LED lamp in order to switch it on.

The board is quite small. [Limpkin] holds it up in the beginning of his test video, which gives a good sense of scale. One end has a barrel jack through which the board gets power. The other end has a two conductor screw terminal which is used for switch your devices. An N-channel MOSFET protects the circuit when a heavy external load is connected. It is capable of driving a respectable 90 watts. If you’re looking to switch mains rated devices you’ll need to bring your own relay to the party.

Audio processing is handled by the Freescale ARM Cortex M4 chip at the center of the board. The Serial Wire Debug (SWD) clock and data pins are both broken out to solder pads so the thing is hackable. [Limpkin] posted the schematic, gerbers, and a code template. But he didn’t release the algorithms he uses for processing so if you want to make this at home you’ll need to figure that out for yourself. If you need help you should check out this whistle-based remote control.

http://www.youtube.com/watch?v=1eIxAMKNphw

SenseLamp Automates Rooms By Replacing Light Fixtures

senselamp

Would you believe that this beautiful light fixture is actually a hacked together home automation project? Okay, so this wire mess is the second of three versions that [Christian] built. It replaces a light fixture in the room, but if you look closely you’ll see that there is a compact fluorescent bulb included in the build. The laser-cut frame acts as a bit of a lamp shade, while providing a place to mount the rest of the hardware.

The final version cleans things up a bit, and adds a footprint for the PIR motion sensor that he forgot to design into this version. The idea is that each lamp monitors motion in the room, switching the light on and off again as necessary. A light-dependent resistor ensures that the bulb is only powered up if the room is dark so as not to waste electricity during the day.

The build includes a sensor package that reports back temperature and humidity data. Communications are provided by a WR703N router rolled into each of the four units installed in his house. With this kind of hardware at his disposal it should be a snap to control every IR remote control device in his house via the network by adding an IR LED and some code to the lamps.

Installing GLaDOS In The Ceiling Of Your House

glados-ceiling-light

Install this light fixture in your bedroom and you might kiss your nights of peaceful sleep goodbye. Fans of the Portal game franchise will recognize it as a smaller version of the megalomaniacal artificial intelligence character from the game. This particular rendition is how she looked in the second installment of the series. The lamp is the creation of [Dragonator]. It was entirely 3D printed before being outfitted with LEDs to actually function as a light.

Our first thought is that this project is all about 3D design to get the final product t0 look so fantastic. But if you dig a little deeper you’ll see that it’s so much more than that. To get pieces that look this fantastic you must have a well tuned printer and be willing to let it run for 40-60 hours as it burns through 2 kg of filament. At that point you’re still far from the finish line as the [Dragonator] then set to work sanding and painting all of the pieces. From there he lovingly assembled everything, including gears and motors to give it motion.

In the end the electronics did not work as he envisioned. But maybe after a bit of time off from all that work he’ll revisit the project and make a bit more progress. For us, the aesthetic already makes the hack. Making it move and sound like the character would be over the top.

If you liked this you can’t miss the GLaDOS potato.

Cardboard Lampshade Makes Ordinary Recycling A Centerpiece Of Your Room

This cube lamp was assembled using common cardboard. Not only does it look interesting, but it’s basically free with every Ikea purchase since all you need is a source of cardboard, cutting implements, and glue.

[Lindarose92] fabricated the shade out of narrow strips of corrugated cardboard. This particular lamp also has a cardboard base but we’re sure you could use it for just about any light source with doesn’t generate enough heat to cause problems. The build starts out with the tedious process of cutting 5mm by 8cm strips, and you’re going to need a lot of them. Each strip is cut perpendicular to the corrugation, which allows the light to shine through the wave pattern. The strips are then glued into 8cm x 8cm squares, which are in turn glued together into the four by four panels that make up each side of the cube.

Boom, you’re done. And if you get tired of it, just toss the thing in your recycling bin.

[via Hacked Gadgets]

Diamond Ore Wall Lamp Brings Minecraft Into Your Home

diamond-ore-lamp

We were surprised to see all of the Christmas gifts that revolved around Minecraft. Seems like there’s a lot of stuff for sale, but we still like the DIY spirit that comes with making your own. [Thacrudd] recently finished this project. It’s a wall lamp that looks like Minecraft’s diamond ore.

The enclosure is a wood box that used to contain chocolates. After studying the pixel art texture for the game’s diamond ore blocks he marked out the pattern and headed over to the scroll to rough them out before finishing with files and a rasp. Next came paint, which was sourced as a sample from the home store. This left him with one shade of gray, but the variations were easy to add by mixing it with white or black.

A strip of white LEDs gives the lamp its inner glow. The openings have been covered with blue acrylic which keep the dust out while providing the appropriate hue.

[via Reddit]