Back Up The Band With Some RGB Stage Lights

Fresh off the 72-hour madness of the Red Bull Creation contest some of the folks a North Street Labs took on a stage lighting project. It’s for a local performing venue that just opened up, and despite the time crunch the team pulled off another great build.

Sixteen meters of LED strip make the electronics for the project a whole lot easier. The strips run up the center of a cabinets built as stand-alone columns which will end up at the back of the stage. Each cabinet has its own 5V 4A power supply (note the burnout issues they mention when using cheap eBay PSUs). Each column has its own Arduino Uno driving the LEDs, with an RS485 shield to connect back to a main Arduino Mega 2560 controller. It uses a PSX controller to switch between different lighting modes.

The seven towers boasting 688 LEDs isn’t all that’s shedding light on the show. There’s also about 300 feet of EL wire at work.

Continue reading “Back Up The Band With Some RGB Stage Lights”

RGB Chandelier May Not Fly With The Wife

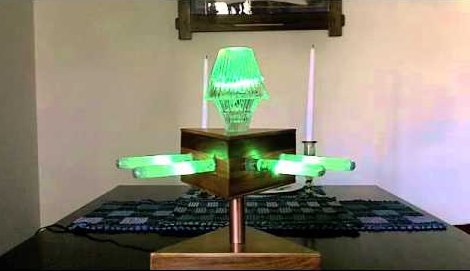
We understand where [Craig] is coming from, leaving no stone unturned when looking for new electronic projects to occupy his time. He tried to convince his wife that they needed a light show to accompany dinner, and while she was skeptical he went ahead and built this remote control RGB chandelier anyway.

He recently purchased fifteen feet of RGB LED strip and has since been trying to use it in his projects. What’s interesting is that he didn’t make direct use of the strip. Just 10 of the LED packages were used. He desoldered and extended each wire leads and used one of the driver chips to address them all. The main body of the light fixture is a triangle, and out of each side two test tubes host one LED each. To diffuse the light [Craig] mixed up some resin and laced it with glitter. Once hardened the resin holds the LEDs firmly in place. The glass shade in the center of the fixture hides four more LEDs.

[Craig] uses a remote control from a Roku box to control the chandelier. An IR receiver is monitored by an Arduino which drives the LEDs accordingly. After the break you can see a demonstration of the completed project. Unfortunately it doesn’t provide as much light as they need. We’d suggest an upgrade along these lines.

Continue reading “RGB Chandelier May Not Fly With The Wife”

Simple Light Painting Bar Build

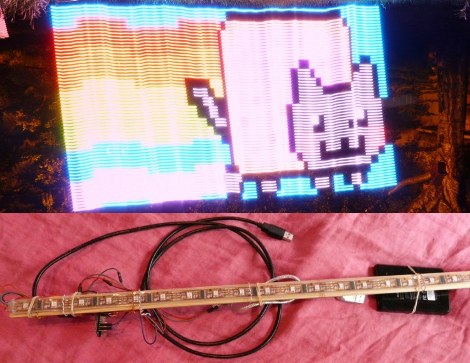
[SkyWodd] took the easy route when it came time to build this light painting bar. But he was still met with great success. Thanks to his well-documented work you should be able to throw this together for yourself in about an hour.

The idea here is to build a full-color display that will draw a picture in a long-exposure photograph. We’ve seen the concept used with 64 discrete RGB LEDs, but there’s almost no soldering to be done with this project. Instead, [SkyWodd] used an addressable RGB LED strip. It has 64 pixels, all taking commands via the SPI protocol. This helps keep the number of microcontroller connections to a minimum. He lashed the entire system onto a long hunk of wooden dowel and grabbed a camera.

You’ll need a DSLR as each image needs to have an exposure time approaching 10 seconds. One thing to note is that it may be best to leave the LED bar stationary and move the camera. If you use a tripod it should help keep the vibrations to a minimum.

DIY GLOBARS For Nighttime Bike Visibility

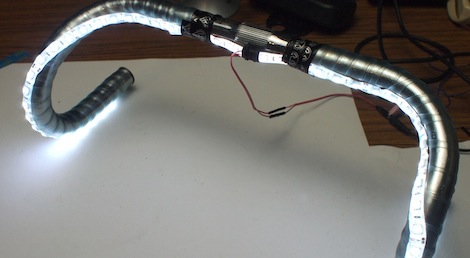
Inspired by a non-existant yet still cool illuminated bicycle handlebar project, [Becky] over at Adafruit came up with her own version of light up  handlebars. Not only is her project actually real, they’re also a pretty cool build that brings a little lightcycle ambiance to twilight bicycling.

[Becky]’s light up handlebars are inspired by the GLOBARS concept design that made the blog rounds earlier this year. Instead of custom machined aluminum tubing, [Becky] used an Adafruit LED strip neatly assembled with heat shrink tubing and waterproof tape, along with an 8 AA-cell battery holder in a fabric and velcro pouch suspended from the top tube on her bike.

After wrapping the LEDs around the handlebars, [Becky] wrapped them in clear handlebar tape she sourced from Amazon. From the video after the break, the 2 meter LED strip on [Becky]’s handlebars verge on lightcycle territory, but sourcing a 6 AA-cell battery holder over an 8-cell will bring the brightness down to a reasonable but still safe level.

You can check out [Becky]’s build video after the break.

Continue reading “DIY GLOBARS For Nighttime Bike Visibility”

LED Bicycle Hack Makes Sure You’re Seen At Night

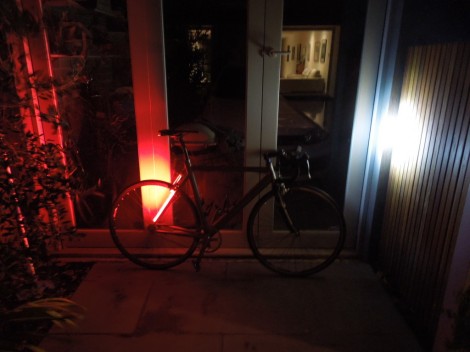
The bicycle tail and head lights that we’re accustomed to are small add-on modules. This take on the idea uses strips of LEDs to protect you from behind. They’re very bright, matching the pair of LED headlights that are attache to the handlebars.

Apparently [A.Davis12] had some LED strips laying around. There’s not what we’re used to seeing, but they have a similar footprint so you should be able to substitute the kind that come on a spool and may be cut to length. The majority of the build time was spent integrating the lights and their control wires with the frame of the bike. The frame already has holes in it for feeding the control wires for brakes and gear shifting inside the tubing. It sounds like it was a pain, but eventually he managed to get all of the routing done. Two red strips are zip-tied to the back of the seat stays. They are powered by a lithium battery inside the project box which mounts under the back of the saddle. A flip switch on the case lets you turn them on without stopping.

[Thanks Arpad]

Stair Accent Lights Made From Cheap LED Strips

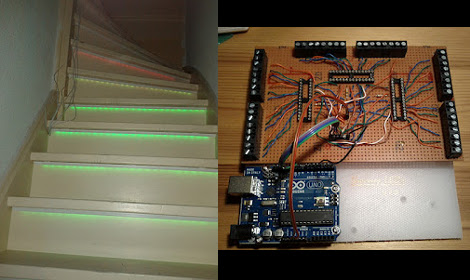
We really like [Geert’s] take on accent lighting for his stairs. He built his own LED channels which mount under the bullnose of each step. The LED strips that he used are actually quite inexpensive. They are RGB versions, but the pixels are not individually addressable. This means that instead of having drivers integrated into the strip (usually those use SPI for color data) this strip just has a power rail and three ground rails for the colors. Ten meters of the strip cost him under forty dollars.

He did want to be able to address each step separately, as well as mix and match colors, so he designed the driver board seen above to use a set of TLC5940 LED drivers. These are controlled by the Arduino which handles color changing and animations. It will eventually include sensors to affect the LEDs as you walk up the stairs. Each strip is mounted in a piece of angle bracket, and they’re connected back to the driver board using telephone extension wire.

Simple Hardware And Python Drive This Splunk LED Meter

Want to monitor the company system without continually loading up the Splunk dashboard? It turns out that they’ve got their own Python package which makes pulling down data a snap. All [Rick] needed to do was hook up an LED meter as an external display.

It used to be that this would take a lot of wire and bit of soldering (or some special Christmas lights), but the advent of affordable LED strips has really taken the guess-work out of it. He’s using an RGB version acquired from Adafruit Industries. These strips are driven using SPI and multiple-colors mean you can display multi-dimensional data using one column. He chose to use a Teensy microcontroller, grabbing some plastic packaging for welding rods as the enclosure. These strips are extremely bright and to help soften the impact he added wax paper to the inside of the enclosure to act as a diffuser.

Looking for more projects that use strips like this one? They make fantastic addressable accent lighting for your home.