Adding Task Lighting Inside A Desk

storage-task-lighting

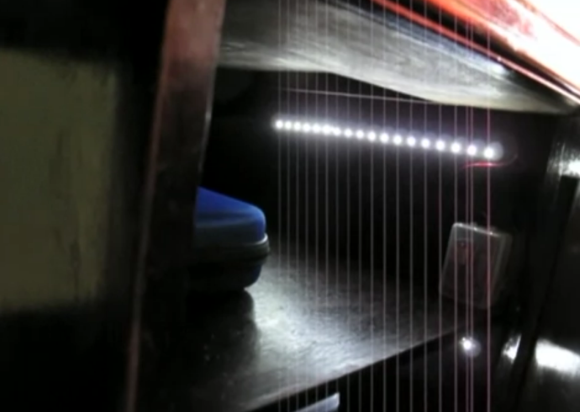
[Mahesh Venkitachalam] wanted to light up the dark recesses of his desk. What good is all that storage if you can’t see a darn thing in there? His solution was to add LED strips which turn on automatically when the door is opened.

The design is quite simple. A 2N2222 NPN transistor is responsible for connecting the ground rail of the LED strips mounted under each shelf. The base of that transistor is held high with a pull-up resistor. But a reed switch always connects the base to ground when the door is shut. Opening the door removes the magnet that keeps that reed switch closed. This allows current to flow from the pull-up to the base, connecting the ground rail to the LED strips and turning them on. You can see the video demo after the break.

One problem that we see with the design is that these are driven by a 9V battery. Over a long period of time that pull-up resistor will drain the cell. You can pick up a magnetic reed switch at the hardware or electronics store that is rated for 500 mA. If you can stay under that with the LED strips, and get one that is open when the magnet is present you will have zero power drain when the lights aren’t being used.

Continue reading “Adding Task Lighting Inside A Desk”

Driving A WS2811 RGB LED Pixel

[Alan] has been working on driving this WS2811 LED module with an AVR microcontroller. It may look like a standard six-pin RGB LED but it actually contains both an LED module and a microcontroller to drive it. This makes it a very intriguing part. It’s not entirely simple to send commands to the module as the timing must be very precise. But once the communication has happened, the LED will remain the same color and intensity until you tell it otherwise. You can buy them attached to flexible strips, which can be cut down to as few as one module per segment. The one thing we haven’t figure out from our short look at the hardware is how each pixel is addressed. We think the color value cascades down the data line as new values are introduced, but we could be wrong. Feel free to discuss that in the comments.

The project focuses on whether or not it’s even possible to drive one of these pixels with a 16MHz AVR chip. They use single-wire communications at 800 kHz and this really puts a lot of demand on the microcontroller. He does manage to pull it off, but it requires careful crafting in assembly to achieve his timing constraints. You can see a quick clip of the LEDs fading between colors after the break.

Continue reading “Driving A WS2811 RGB LED Pixel”

Disco Planet, A Massive RGBW LED Array In A 6′ Globe

About half a year ago [John] over at Frank’s Kitchens came to me with an idea for a giant lighting project. He had this 6ft diameter aluminum frame globe rescued from the Philadelphia Theater Company and wanted it to be an interactive display of sorts. After a few discussions we got together and somehow managed to order 800 3 watt LEDs in red, green, blue, and white. We had a system that worked great on paper, and managed to get it built by Valentines day for a big show. It failed miserably and hardly even illuminated the LEDs. I, naturally, took this far too personally and set out for a complete redesign, looking in the direction of digitally addressable LED strips.

In addition to building a crazy turbo charged LED array I also spent a lot (a whole lot) of time coding a nice clean fully functioning RGB LED strip controller using an Arduino Pro Mini (5V 16 MHz), the MSGEQ7 audio frequency multiplexer (PDF) , and an IR remote. I plan on using this for other projects so the code can be easily reconfigured to use many different LED strips and a whole slew of IR remotes.

The schematic of the globe is here. The top half  of that schematic be catered to other projects using a variety of pre-built LED strips. The pastebin with code is here,  fastSPI_LED and IRRemote here and here. Some code jockeying was required to get IRRemote.h and FastSPI_LED to play nicely together, so check the code comments.

Continue reading “Disco Planet, A Massive RGBW LED Array In A 6′ Globe”

Lightsaber Lets You Pick Just About Any ‘blade’ Color

If you’re staging some epic Star Wars battles you could go original with Red or Blue lightsabers. But what if you decide you’re more of a fan of Jedi and want to go green? Or perhaps the prequels have inspired you to take on purple? Why choose at build time when you can adjust the color to match your mood.

[Phik] built himself a color-selectable lightsaber using RGB LEDs. He sourced a 5M strip of them from eBay for around $20. The pixels are not individually addressable, but each color channel can be driven with a pulse-width modulation signal to mix and match the final color. Now he could have gone with a microcontroller solution, but [Phik] decided to give himself a bit more of a challenge. He built three PWM circuits based on a 555 timer which can be adjusted with a potentiometer. It’s not going to kill any insects, but the keep-it-simple-stupid aspect of the project makes it something we could actually build ourselves. The same cannot be said for most of the replica builds we see.

Time And Date Clock Does It With RGB LED Strips

[Craig’s] color clock really came together quite nicely. The majority of the body is acrylic, with two large clear squares and a pair of colored discs. All are held in place by a ring of hardware with spacers in them, and the RGB LED strip that is used to display time and date wraps around those spacers. This hides the components in the center, with a USB cord connecting to the Arduino compatible board to power the device.

Hours are displayed in red, with minutes shown in green, and blue used as a background color. In the center you can see one of two red LEDs which alternate like a pendulum to mark the passing seconds. There are timed events every ten , fifteen, and thirty minute. At the fifteen minute mark the clock switches to display the date. The other two events are animations to keep things interesting. All of the settings for the clock are accessed using just two momentary push buttons mounted on the back of the clock.

Continue reading “Time And Date Clock Does It With RGB LED Strips”

StripInvaders Puts Colored Lights Everywhere

There’s not much to be gained by living in a discotheque but colored lights are awesome, especially when they’re as well implemented as [michu]’s StripInvaders.

The StripInvaders project takes a gigantic 5 meter LED strip with WS2801 controllers and turns it into an Ethernet-enabled 24 bit display with the new Arduino Ethernet. While the Ethernet-enabled may seem a little superflous, [michu] implements it quite nicely. The entire 5 meter LED strip can be controlled from a tablet or smartphone.

Apart from a tablet/smartphone interface with OSC, there’s also mDNS support so we’re sure the StripInvaders could make for an interesting LAN party with the appropriate scripts. While the cost of the LED strip itself is fairly high, we’re sure some Hack a Day commenter will come up with a cheaper solution.

The firmware for StripInvaders has been posted on Github, but for a real treat, check out the demo after the break.

Continue reading “StripInvaders Puts Colored Lights Everywhere”

Making A Simple Addressable Array From LED Strips

led_array_from_led_strips

[Patrick] was prepping for some future projects he had in mind, for which he will need a simple 2D array of addressable LEDs. While it is certainly possible for him to build his own LED array and control hardware, he thought he would try out some off the shelf products to see if something might fit his needs.

He picked up a strip of addressable RGB LEDs from Adafruit, and while they worked very well, they were a bit too pricey for the amount of LEDs he knew he would need. He picked up a strip of similar LEDs without PWM capabilities built-in, and gave those a spin – they worked well enough, so he got to work building his LED array.

While LED strips might not jump right out as the best way to make an LED array, they can be easily cut and rearranged without any issue, provided you solder in a couple of wires to connect the disjointed strips. [Patrick] did just that, and wrote a small Arduino library that allows for easy control of the grid.

We’re not sure if he plans on scaling these arrays any larger than 8×8, but we are definitely interested to see what he has in store for them.

Check out a quick video of his LED array in action below.

Continue reading “Making A Simple Addressable Array From LED Strips”