
Magic Locket

[Andrey] from RTFM has built himself a glowing LED pendant using only three parts and some simple code. The hack is not particularly complicated but [Andrey] provides some decent instructions on Pickaxe programming via an RS232 serial port and RGB LED control to produce the nice glowing effects. The pendant contains an RGB LED, a Pickaxe-08 microcontroller and a couple of button cell batteries. To cram everything inside the locket, [Andrey] had to grind down the LED and Pickaxe-08 to their minimum dimensions using a file.

All of the Basic code for the pendant is supplied on the project page and [Andrey] describes how he manages to PWM all three LED pins for the colour effects. The video after the break may be of interest to anyone who has not had a go at Picaxe programming before or for a beginner who wants to try out some new embedded devices without a big hit to the wallet.

Continue reading “Magic Locket”

Not Your Ordinary LED Book Light

diy_led_book_light

[Steve Hoefer] is not a huge fan of traditional table lamps, so he set off to build a reading light of his own that was more aesthetically pleasing than the standard fare. He thought it would be pretty appropriate to construct his reading lamp out of a book, and we’re inclined to agree.

He stripped the pages from an old book he found at the thrift store, then built a plywood frame to fill in the recently vacated area. A second frame was built inside the first to support the installation of some warm LED strips as well as the acrylic sheet he used to diffuse the light. A whisker switch was installed in the corner of the frame, which turns the lights on when the book is opened. The lamp puts out about the light equivalent of a 40W bulb, and can be “dimmed” by simply adjusting how far the cover is opened.

It looks great on his bedside table, and like some of his other book-related hacks, it’s quite useful as well!

Be sure to check out the video of the light’s construction we have embedded below.

Continue reading “Not Your Ordinary LED Book Light”

Automated LED Hallway Lighting

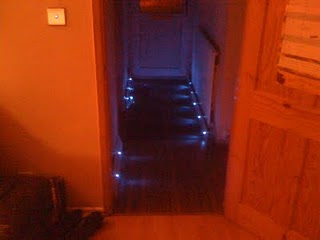
If normal hallway lighting just doesn’t live up to your standards, this hack may be for you. When [Sean] fitted his kitchen, he replaced the flooring leading up to it.  In true hacker form, he decided to forgo (supplement?) traditional lighting and came up with his own solution.

This solution involved embedding the skirting used around his hallway hardwood with blue LED lights. Unfortunately, these LEDs were actually longer than the skirting was thick, so some plaster carving was also necessary.  It is all hidden very well behind the skirting, so you can’t tell. These blue LEDs give a really cool effect, similar to what can be seen at some movie theaters.

Although impressive in itself, [Sean] decided to also hook his setup up to a “Home Easy” device for control. A passive infrared sensor for this system has also been ordered so the lights can turn on without human interaction. We can see this being fantastic for those late night trips to the kitchen for a drink. With this low light solution, you won’t be wondering back to the bedroom without your night vision.

The PixBoard

Many hacks are, of course, interesting in their own right. Hacks like this one, however, fulfill a much greater purpose by helping people overcome their disabilities. The PixBoard is “an illuminated board adapted for disabled people, especially for people with cerebral palsy, giving them access to games using shift technology.”

This device was developed for a girl that has cerebral palsy and can’t control her arms or legs effectively. In order to interact with the world more effectively to play board games and the like, this system was developed. The PixBoard scans an 8×8 matrix of LEDs allowing her to select the piece to be moved and where to move it. This is done using only simple buttons and the processor’s timer.

The system is controlled using an Arduino, so anyone is free to create their own games for this system depending on the situation. The following video is in Spanish, but shows this device in action around 1:20. Continue reading “The PixBoard”

Giant POV Tube For Light Painting

writing_in_the_night_with_the_light_scythe

When you really want your feelings known, we always say that bigger is better. [Gavin Smith, aka The Mechatronics Guy] must come from the same school of thought, because there’s absolutely no mistaking what he is trying to say with his latest project.

Inspired by this WiFi signal painter we featured a while back, the LightScythe is a 2 meter long bar composed of multi-color LED strips that he bought from Adafruit. The light bar is controlled by a Seeduino micro controller, which takes direction from his laptop via a pair of XBee units. Once he generates an image from text with ImageMagic, a Python script is used to match the colors as close as possible to the RGB color space. The image is then converted to raw serial data for playback on the Scythe. When he is ready to go, he triggers his camera to take a 10-15 second exposure, during which he walks across the frame, painting his images with the LightScythe.

We always enjoy seeing creative derivations of previous projects we have covered, and the LightScythe does it well. He actually built a pair of these that can work in concert or independently, which we imagine can make for some pretty awesome pictures.

Be sure to check out his Flickr photostream for more examples of what the LightScythe can do.

A Beautiful Fibre Optic Chandelier

[Bill] Decided that his living room could use some more light, or at least some more colourful light. To meet his needs [Bill] has designed and build what he describes as a modern/contemporary chandelier. The chandelier uses about 250′ of fibre optic cable to distribute the light from eight LED’s, light from the fibre optics is being diffused using marbles in place of the globes you would normally expect in a chandelier.

Control is achieved wirelessly via a pair of Xbee modules, this will allow [Bill] to integrate it into his home automation project he plans for the future. The colours are currently set using three slide potentiometers, and the chandelier is powered using a repurposed ATX power supply. It looks like a lot of time was spent on the acrylic enclosure and it was worth it because the results are fantastic. Check out his website for build details and the video after the break for a demonstration on the chandelier in action.

Continue reading “A Beautiful Fibre Optic Chandelier”

Ring Ring Ring Ring Ring Ring Ring Emotiphone!

emotiphone

Instructables user [zvizvi] was working on putting together a portfolio for his application into Industrial Design school, and thought it would be neat to repurpose an old rotary phone that used to belong to his grandmother.

He originally had pretty lofty goals for the phone, but eventually pared back his vision to include one-way communications to Twitter. After gutting the phone of its unnecessary parts, he got busy installing LEDs behind the dialer’s finger holes. The LEDs were connected to an MCP23017 I/O expander, which takes its direction from an Arduino he crammed into the phone’s shell.

When the receiver is lifted from the cradle, the Arduino initiates a connection to the Internet via the WiFly shield he installed. Once he dials a number, the Arduino translates the digit into a predefined emoticon, posting it to his Twitter page. While the emoticons are not quite as descriptive as the messages from the Tweeting Roomba we featured earlier this week, they relay his mood just fine.

It’s a fun project, and it happened to get [zvizvi] into the design school he was applying at, so we can’t ask for much more than that.