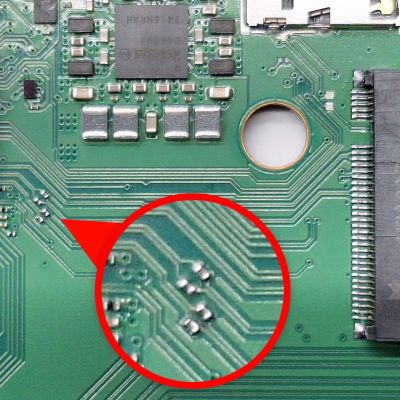
The added 3.3v rail on the Raspberry Pi 500 PCB. (Credit: Samuel Hedrick)

Enabling NVMe On The Raspberry Pi 500 With A Handful Of Parts

With the recent teardown of the Raspberry Pi 500, there were immediately questions raised about the unpopulated M.2 pad and related traces hiding inside. As it turns out, with the right parts and a steady hand it only takes a bit of work before an NVMe drive can be used with the RP500, as [Jeff Geerling] obtained proof of. This contrasts with [Jeff]’s own attempt involving the soldering on of an M.2 slot, which saw the NVMe drive not getting any power.

The four tiny coupling capacitors on the RP500’s PCIe traces. (Source: Jeff Geerling)

The missing ingredients turned out to be four PCIe coupling capacitors on the top of the board, as well as a source of 3.3 V. In a pinch you can make it work with a bench power supply connected to the pads on the bottom, but using the bottom pads for the intended circuitry would be much neater.

This is what [Samuel Hedrick] pulled off with the same AP3441SHE-7B as is used on the Compute Module 5 IO board. The required BOM for this section which he provides is nothing excessive either, effectively just this one IC and required external parts to make it produce 3.3V.

With the added cost to the BOM being quite minimal, this raises many questions about why this feature (and the PoE+ feature) were left unpopulated on the PCB.

Featured image: The added 3.3 V rail on the Raspberry Pi 500 PCB. (Credit: Samuel Hedrick)

Raspberry Pi 500 And The Case Of The Missing M.2 Slot

Raspberry Pi just dropped the new Raspberry Pi 500, which like its predecessor puts the similarly named SBC into a keyboard. In a detailed review and teardown video, [Jeff Geerling] goes over all the details, and what there is to like and not like about this new product.

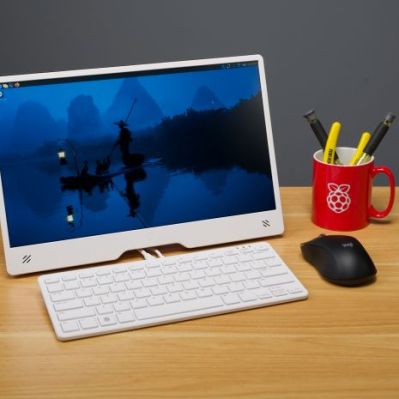
The new Raspberry Pi 500 with the new Raspberry Pi Monitor. (Credit: Jeff Geerling)

Most of the changes relative to the RP400 are as expected, with the change to the same BCM2712 SoC as on the Raspberry Pi 5, while doubling the RAM to 8 GB and of course you get the soft power button. As [Jeff] discovers with the teardown, the odd thing is that the RP500 PCB has the footprints for an M.2 slot, as seen on the above image, but none of the components are populated.

Naturally, [Jeff] ordered up some parts off Digikey to populate these footprints, but without luck. After asking Raspberry Pi, he was told that these footprints as well as those for a PoE feature are there for ‘flexibility to reuse the PCB in other contexts’. Sadly, it seems that these unpopulated parts of the board will have to remain just that, with no M.2 NVMe slot option built-in. With the price bump to $90 from the RP400’s $70 you’ll have to do your own math on whether the better SoC and more RAM is worth it.

In addition to the RP500 itself, [Jeff] also looks at the newly launched Raspberry Pi Monitor, a 15.6″ IPS display for $100. This unit comes with built-in speakers and VESA mount, but as [Jeff] notes in his review, using this VESA mount also means that you’re blocking all the ports, so you have to take the monitor off said VESA mount if you want to plug in or out any cables.

Continue reading “Raspberry Pi 500 And The Case Of The Missing M.2 Slot”

M.2 Makes An Unusual Microcontroller Form Factor

When we think of an m.2 slot in our laptop or similar, it’s usually in the context of its PCI connectivity for high-speed applications such as solid state disks. It’s a connector that offers much more than that interface though, making it suitable for some unexpected add-ons. As an example [MagicWolfi] has produced an m.2 card which contains the equivalent of a Raspberry Pi Pico.

The board itself has the familiar m.2 edge connector at the bottom, and the RP2040 GPIO lines as postage-stamp indentations round the edges. On the m.2 front is uses the USB interface as well as a UART and the I2C lines, as well as some of the interfaces we’re less familiar with such as ALERT, WAKE, DISABLE1/2, LED 1/2, and VENDOR_DEFINED.

On one level this provides a handy internal microcontroller card with which you can do all the things you’d expect from a Pi Pico, but on another it provides the fascinating possibility of the Pico performing a watchdog or other function for the host device. We would be genuinely interested to hear more about the use of the m.2 slot in this way.

If you’d like to know more about m.2, we’ve taken a look at it in more depth.

PC-9800 Boot Sounds For Modern Computers!

There have been many computers that played a little jingle to greet you upon booting. The NEC PC-9800 is a famous example, though almost all the Macintosh computers played either the soothing “booting” chord or sometimes the Sad Mac “error” chord. And of course, consoles have long played music on startup, with the original PlayStation boot music heralding a whole new era of video games. But modern machines don’t do anything, except maybe a single beep if you’re lucky. So why not pop in this M.2 card (JP) and bring some quirky flair to your PC?

While this particular card is aimed at the Japanese market and specifically evokes the PC-9800, we hope to see some hackers creating projects bringing other custom boot sounds to laptops and PCs around the rest of the world! A simple microcontroller, DAC, speaker and flash storage for the waveform would be all that’s required. It could even be capacitively coupled into the system’s sound output for some extra nerd points. You could pull the ultimate prank and have your friend’s laptop play the opening notes to “Never Gonna Give You Up” upon boot. Or you could have your favourite hacker movie quote play – “I can trace her physical location by looking at the binary!”. Brilliant!

In the meantime, if you want one of these cards, you’ll likely have to use a Japanese mail forwarding service as the cards are only available from Japanese retailer Kadenken — though for only ¥2880, or just under $20 USD, which is a great deal.

[via Techspot]

What Else Is An M.2 WiFi Slot Good For?

Many mainboards and laptops these days come with a range of M.2 slots, with only a subset capable of NVME SSDs, and often a stubby one keyed for ‘WiFi’ cards. Or that’s what those are generally intended to be used for, but as [Peter Brockie] found out when pilfering sites like AliExpress, is that you can get a lot of alternate expansion cards for those slots that have nothing to do with WiFi.

Why this should be no surprise to anyone who knows about the M.2 interface is because each ‘key’ type specifies one or more electrical interfaces that are available on that particular M.2 slot. For slots intended to be used with NVME SSDs, you see M-keying, that makes 4 lanes of PCIe available. The so-called ‘WiFi slots’ on many mainboards are keyed usually for A/E, which means two lanes of PCIe, USB 2.0, I2C and a few other, rather low-level interfaces. What this means is that you can hook up any PCIe or or USB (2.0) peripheral to these slots, as long as the bandwidth is sufficient.

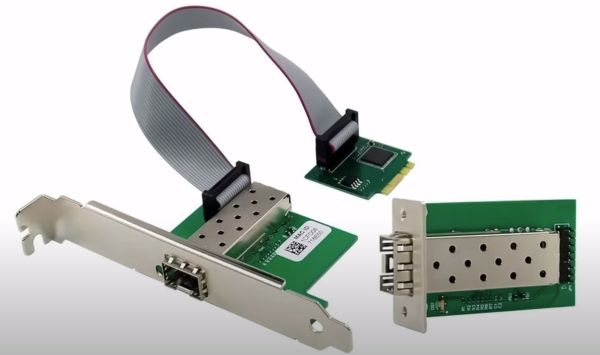
What [Peter] found includes adapter cards that add Ethernet (1 Gb, 2.5 Gb), USB 2.0 ports, SIM card (wireless adapter?), an SFP fiber-based networking adapter, multiple M.2 to 2+ SATA port adapters, tensor accelerator chips (NPUs) and even a full-blown M.2 to x16 PCIe slot adapter. The nice thing about this is that if you do not care about using WiFi with a system, but you do have one of those ports lounging about uselessly, you could put it to work for Ethernet, SFP, SATA or other purposes, or just for hooking up internal USB devices.

Clearly this isn’t a market that has gone unexploited for very long, with a bright outlook for one’s self-designed M.2 cards. Who doesn’t want an FPGA device snuggled in a PCIe x2 slot to tinker with?

Continue reading “What Else Is An M.2 WiFi Slot Good For?”

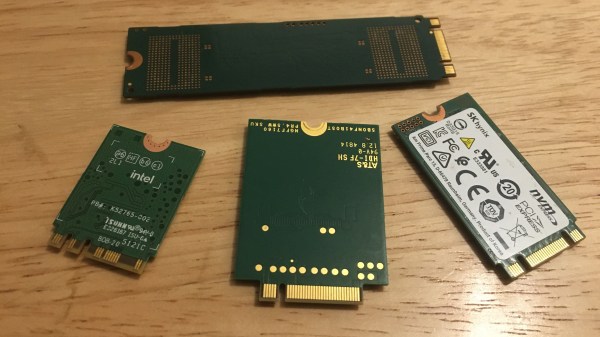
Four M.2 cards of different sizes on a desk surface

M.2 For Hackers – Cards

Last time, I’ve explained everything you could want to know if you wanted to put an M.2 socket onto your board. Today, let’s build M.2 cards! There’s a myriad of M.2 sockets out there that are just asking for a special card to be inserted into it, and perhaps, it’s going to be your creation that fits.

Why Build Cards?

Laptops and other x86 mainboards often come with M.2 slots. Do you have a free B-key slot? You can put a RP2040 and bunch of sensors on a B-key PCB as an experimental platform carried safely inside your laptop. Would you like to do some more advanced FPGA experiments? Here’s a miniscule FPGA board that fits inside your laptop and lets you play with PCIe on this same laptop – the entire setup having a super low footprint. Are you looking for an extra PCIe link because you’re reusing your laptop as a home server? Again, your WiFi slot will provide you with that. Want to get some PCIe out of a SteamDeck? Building a M-key 2230 card seems to be your only hope! Continue reading “M.2 For Hackers – Cards”

M.2 For Hackers – Connectors

In the first M.2 article, I’ve described real-world types and usecases of M.2 devices, so that you don’t get confused when dealing with various cards and ports available out there. I’ve also designed quite a few M.2 cards and card-accepting adapters myself. And today, I’d like to tell you everything you need to know in order to build M.2 tech on your own.

There’s two sides to building with M.2 – adding M.2 sockets onto your PCBs, and building the PCBs that are M.2 cards. I’ll cover both of these, starting with the former, and knowing how to deal with M.2 sockets might be the only thing you ever need. Apart from what I’ll be describing, there’s some decent guides you can learn bits and pieces from, like the Sparkfun MicroMod design guide, most of which is MicroMod-specific but includes quite a few M.2 tips and tricks too.

First, Let’s Talk About The Y-Key

What could you do with a M.2 socket on your PCB? For a start, many tasty hobbyist-friendly SoMs and CPUs now have a PCIe interface accessible, and if you’re building a development board or a simple breakout, an M.2 socket will let you connect an NVMe SSD for all your high-speed low-power storage needs – many Raspberry Pi Compute Module mainboards have M.2 M-key sockets specifically for that, and there’s NVMe support in the RPi firmware to boot. Plus, you can always plug a full-sized PCIe adapter or an extender into such a socket and connect a PCIe network card or other much-needed device – even perhaps, an external GPU! However, as much as PCIe-equipped SoMs are tasty, they’re far from the only reason to use M.2 sockets.

Continue reading “M.2 For Hackers – Connectors”