How Those NES DIP Chips Were Reduced To QFNs

The world of console modding leads us to some extremely impressive projects, and a recent one we featured of note was a portable NES produced by [Redherring32]. It was special because the original NES custom DIP chips had been sanded down to something like a surface-mount QFN package. Back when our colleague [Arya] wrote up the project there wasn’t much information, but since then the full details have been put up in a GitHub repository. Perhaps of most interest, it includes a full tutorial for the chip-sanding process.

To take irreplaceable classic chips and sand them down must take some guts, but the premise is a sound enough one. Inside a DIP package is a chip carrier and a web of contact strips that go to the pins, this process simply sands away the epoxy to expose those strips for new contacts. The result can then be reflowed as would happen with any QFN, and used in a new, smaller NES.

Along the way this provides a fascinating insight into DIP construction that most of us never see. If any of you have ever managed to fatigue a pin off a DIP, you’ll also no doubt be thinking how the technique could be used to reattach a conductor.

You can read our original coverage of the project here.

Commodore Datasette Does Its Own Calibration

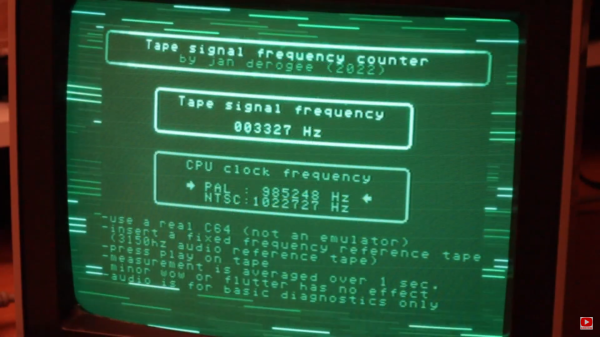
Ah, the beloved Commodore 64. The “best-selling computer system of all time”. And hobbyists are keeping the dream alive, still producing software for it today. Which leads us to a problem with using such old equipment. When you get your copy of Petscii Robots on cassette, and try to fastload it, your machine might just consistently fail to load the program. That’s fine, time to pull out the cue-tips and rubbing alcohol, and give the read heads a good cleaning. But what if that doesn’t do the job? You may just have another problem, like tape speed drift.

There are several different ways to measure the current tape speed, to dial it in properly. The best is probably a reference cassette with a known tone. Just connect your frequency counter or digital oscilloscope, and dial in the adjustment pot until your Datasette is producing the expected tone. Oh, you don’t have a frequency counter? Well good news, [Jan Derogee] has a solution for you. See, you already have your Datasette connected to a perfectly serviceable frequency counter — your Commodore computer. He’s put out a free program that counts the pulses coming from the Datasette in a second. So play a reference cassette, run the program, and dial in your Datasette deck. Simple! Stick around after the break for a very tongue-in-cheek demonstration of the problem and solution.

Continue reading “Commodore Datasette Does Its Own Calibration”

Smelting Solar Style

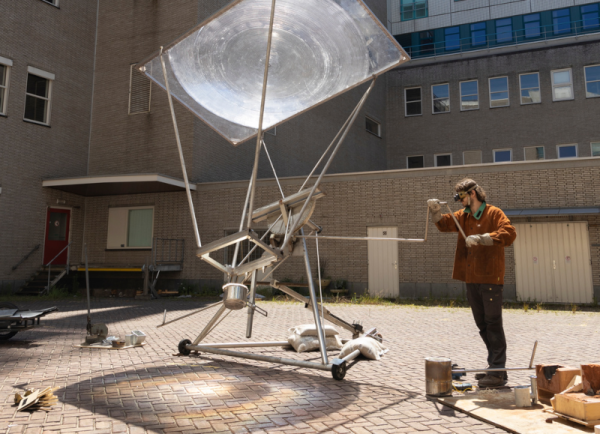
If you attended the 2022 Supercon, you might have heard the story about the SMD soldering challenge table nearly catching on fire. A magnifying lamp caught the sun just right and burned a neat trench into another lamp’s plastic base. While disaster was averted, [Jelle Seegers] does this on purpose using a huge 5-meter lens to smelt metal.

The Design Academy Eindhoven student is participating in Dutch Design Week and built the machine which is able to manually track the sun to maximize the amount of solar energy applied to the metal.

Continue reading “Smelting Solar Style”

Overengineered Fume Extractor, Version 2

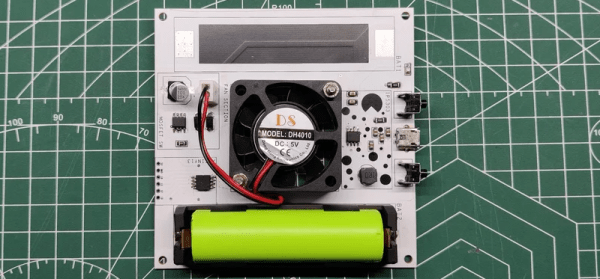
We all know the temptation of adding one more feature to your latest project. [Arnov Sharma] didn’t resist the urge. Building on his 3D-printed fume extractor, he developed a new version made of PCB material.

The device has a 18650 battery and corrects several flaws in the original design we covered earlier. In particular, the new version uses a quiet fan and consumes less power. There is also a 3D-printed filter housing that uses cotton as a filter media. Continue reading “Overengineered Fume Extractor, Version 2”

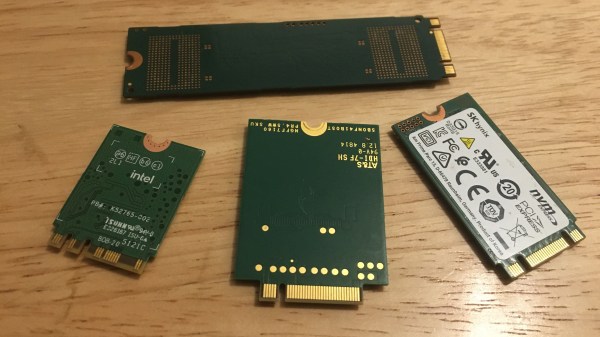
Four M.2 cards of different sizes on a desk surface

M.2 For Hackers – Cards

Last time, I’ve explained everything you could want to know if you wanted to put an M.2 socket onto your board. Today, let’s build M.2 cards! There’s a myriad of M.2 sockets out there that are just asking for a special card to be inserted into it, and perhaps, it’s going to be your creation that fits.

Why Build Cards?

Laptops and other x86 mainboards often come with M.2 slots. Do you have a free B-key slot? You can put a RP2040 and bunch of sensors on a B-key PCB as an experimental platform carried safely inside your laptop. Would you like to do some more advanced FPGA experiments? Here’s a miniscule FPGA board that fits inside your laptop and lets you play with PCIe on this same laptop – the entire setup having a super low footprint. Are you looking for an extra PCIe link because you’re reusing your laptop as a home server? Again, your WiFi slot will provide you with that. Want to get some PCIe out of a SteamDeck? Building a M-key 2230 card seems to be your only hope! Continue reading “M.2 For Hackers – Cards”

An RP2040 Powered Pick And Place

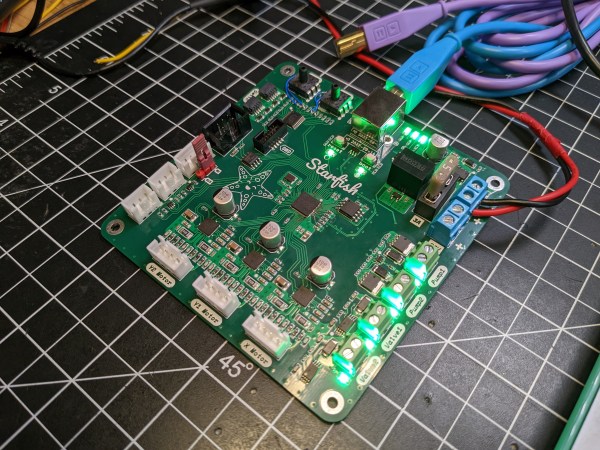
Pick and place machines are a wonder to behold, as they delicately and accurately place part after part. Unfortunately, they have to have a similarly wondrous price tag. Luckily, they aren’t too difficult to make yourself as they share many properties of a 3D printer with some extra constraints. [Stargirl Flowers] released Starfish, an open-source pick-and-place control board based around an RP2040 to help people make their own.

She purchased a LumenPnP, and the itch to tinker became too much to ignore. The STM32 on the stock controller also happened to get fried, leaving an obvious opening to create a custom board. [Stargirl] chose Trinamic TMC2209 motor controllers to drive the three stepper motors. The power circuit is impressively overbuilt with a 3A fuse, a TVS diode for shunting voltage spikes, a P-channel MOSFET for reverse polarity protection, a low-pass filter for AC ripple, and a large 100μF capacitor.

The RP2040 is a good choice since it’s easy to get and has plenty of digital I/O. USB connects the board to the outside work and includes ESD TVS diodes to protect the board when connecting and disconnecting the USB port. Motors for vacuums are controlled by a 74HC2G34 buffer that drives enable lines to two MOSFETs. Solenoids are similar but with a high current peak and a much smaller current to keep them open. The DRV120 fits the bill as it is a single-channel relay with current regulation. I2C vacuum sensors are the same ones on the Lumen motherboard; they just required an I2C multiplexer.

It’s an extremely well-documented project explaining why each part was chosen and why. If you want to create an RP2040 project that needs to last, we consider this a guiding star. It’s all up on GitHub for you to take a look at.

This isn’t the first time we’ve seen RP2040 as part of a motor controller, and we suspect we’ll see more.

Dosimetry: Measuring Radiation

Thanks to stints as an X-ray technician in my early 20s followed by work in various biology labs into my early 40s, I’ve been classified as an “occupationally exposed worker” with regard to ionizing radiation for a lot of my life. And while the jobs I’ve done under that umbrella have been vastly different, they’ve all had some common ground. One is the required annual radiation safety training classes. Since the physics never changed and the regulations rarely did, these sessions would inevitably bore everyone to tears, which was a pity because it always felt like something I should be paying very close attention to, like the safety briefings flight attendants give but everyone ignores.

The other thing in common was the need to keep track of how much radiation my colleagues and I were exposed to. Aside from the obvious health and safety implications for us personally, there were legal and regulatory considerations for the various institutions involved, which explained the ritual of finding your name on a printout and signing off on the dose measured by your dosimeter for the month.

Dosimetry has come a long way since I was actively considered occupationally exposed, and even further from the times when very little was known about the effects of radiation on living tissue. What the early pioneers of radiochemistry learned about the dangers of exposure was hard-won indeed, but gave us the insights needed to develop dosimetric methods and tools that make working with radiation far safer than it ever was.

Continue reading “Dosimetry: Measuring Radiation”