PocketNC P5 Takes Desktop CNC To The 5th Dimension

What do you get when you put together a husband/wife team of a machinist and mechanical engineer? If you’re [Matt and Michelle Hertel], you get a 5 axis CNC, which we think was one of the hidden gems at Maker Faire NY.

Hobby CNC machines have grown by leaps and bounds over the last few years. Nearly all these machines have been 3 axis (X,Y,Z). 5 (and more) axis machines have been around for years in the industrial world. These higher level machines never have made the jump to the hobby/home shop world.

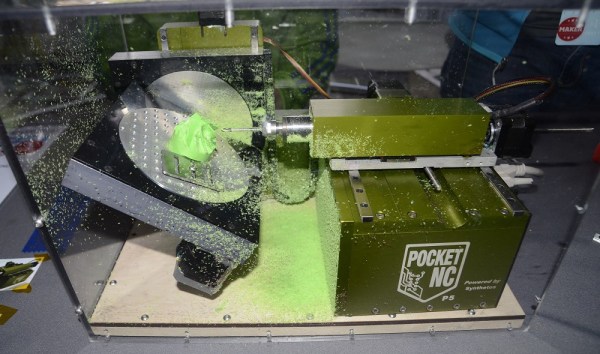
The P5’s two extra axis allow for extremely complex parts to be created in one setup. A good example of this would be a turbine wheel. Compound curves on (and behind) each blade would make this an impossible job for a 3 axis CNC. The P5 was machining these parts all weekend at Maker Faire NY. Even more impressive is the fact that it was cutting Delrin, not wax.

Continue reading “PocketNC P5 Takes Desktop CNC To The 5th Dimension”

FlowFree Goes Life Sized At Maker Faire NY

Maker Faire 2013SetupWillow Glen MakersTeam PathfinderFlow*26

What began as a smartphone game turned into a Maker Faire New York 2013 project for the [Willow Glen Makers]. FlowX26 is a life sized version of the game FlowFree. [The Willow Glen Makers] wanted to build an extendable, easy to set up grid of floor tiles to emulate the game. A CNC machine was employed to create a plywood framework. Not visible in the picture is the fact that each cross member is cut slightly concave.  This concavity allows the clear plastic top to deflect just enough to activate a micro switch inside the tile. The switch sends a signal to the tile’s Arduino Mega controller. The Mega then uses this data to control an array of RGB LEDs.

The next problem was interconnection and communication between the tiles. [The Makers] used copper tape, along with a 3D Printed latch system between each tile side. Six connections per side allow power and data to be transmitted throughout the grid.

Continue reading “FlowFree Goes Life Sized At Maker Faire NY”

World Maker Faire: The New Ultimaker

Ult

Just as the the gates opened at the World Maker Faire in New York City the skies opened, sending everyone underneath the tents and pavilians on the faire grounds. Luckily, I was able to check out the new Ultimaker before that happened, and only a day after it was officially announced.

Compared to the older laser-cut Ultimaker, the Ultimaker 2 is much, much cleaner that’s made more for designers and architects instead of students, hackerspaces and tinkerers. There are a few new additions to the Ultimaker 2 – OLED display, heated bed, and a larger build volume. Basically, if you want Ultimaker quality without a lot of futzing around, go with the Ultimaker 2.

Ultimaker will be shipping a pre-assembled version for €1.895,00, with a kit version to follow shortly. As always, the Ultimaker 2 is open source, and no, this doesn’t mean an end to the classic Ultimaker.

Hackaday Is Going To The NYC Maker Faire!

maker

In just a few short days, the greatest hackers and makers from all around the globe will descend on the Hall of Science in New York City to show off their wares. Our new guy [Adam] and myself will also be there, giving these makers our unending support, putting up a few posts about what they built, and giving out some Hackaday swag.

Continue reading “Hackaday Is Going To The NYC Maker Faire!”

Update: Live Video Played On LED Strip Display

update-live-video-on-led-strip-display

[Paul] took this LED display along with him to Maker Faire. To give it some interactivity he figured out a way to make it play live video. It is also activated using some stomp actuators built from piezo speaker elements and rubber floor mats.

This moves his original project in new directions. Back in February he was showing off the RGB LED strip display. He had it playing video but that was all dependent on using previously processed files. This upgrade uses a BeagleBone Black (the newest rendition of the ARM-based development board). [Paul] had tried using a Raspberry Pi board but had trouble with the webcam (mounted above the LED display) dropping frames. With the new board he is able to use the Video4Linux API to capture 30 frames per second and push them out to the display.

So far he’s had five out of the 1920 LEDs die on him. This shows off a couple of good things about using strips like this. A dead pixel doesn’t affect its neighbors. And replacement is as easy as cutting the ribbon on either side of the bad component, then soldering a new segment in place.


UK Hackerspace Builds Mobile Spaceship Disaster Simulator

mobile-space-ship-simulator

A spaceship simulator sounds fun. But a spaceship disaster simulator is pure win. Members of the London Hack Space poured their hearts and souls into this build which they call the LHS Bikeshed. Now they’re taking the show on the road, letting attendees of Maker Faires all over the UK try their hand at beating the Kobayashi Maru disaster simulation.

The real question is how do you take your simulator on the road with you? You build it in an old camper (or caravan as the Brits call it). The towable sleeping quarters were gutted to make room for the well-crafted command center seen above. The demonstration video also shows off some bulkhead doors which open to reveal a wiring mess that must be fixed to prevent a disaster. Not only does the physical build really sell the concept, but the audio and video produced for the simulator look fantastic too. The link above is a recent post, but you should dig through their archives see multiple steps during the project build.

It makes us thing we should keep going with our VW Bus hacking.

Continue reading “UK Hackerspace Builds Mobile Spaceship Disaster Simulator”