Talkbot: An Arduino-driven Robot For Beginners

talkbotguts

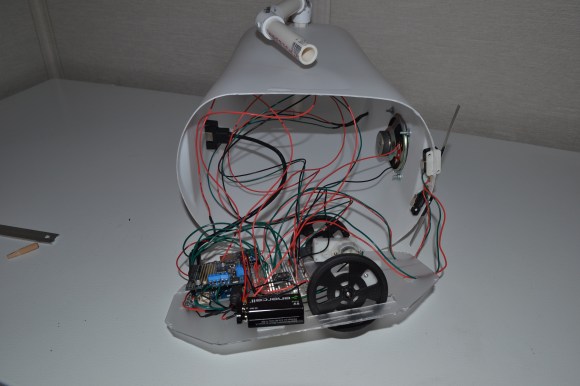
It isn’t exactly WALL-E, but [Bithead’s] affordable introduction to robots — Talkbot — is made out of a trash can. This little guy runs off an Arduino and comes packed with features, including a voice chip, a motor shield, and a pair of bump sensors. Talkbot will cruise around until a bump sensor slams into an obstacle. One of his prerecorded messages will then play through the speaker while he backs up, turns, and tries to find a clearer path.

According to [Bithead’s] build log, tracking down the right bargain voice chip was a bit of a hassle; he skipped over the text-to-speech options only to be stalled by vendor issues. He finally settled on a clone of Sparkfun’s WTV020SD chip sourced from eBay, which allows you to access pre-recorded WAV files stored on a Micro-SD card. The robot’s body comes straight off the hardware store shelf, with PVC pipe for arms and a polystyrene base to hold all the parts.  At the bargain price of $110, [Bithead’s] students will have a true hacker experience cobbling the Talkbot together rather than using a prefab kit.

Be sure to see Talkbot  in a video below, performing either his green-eyed “friendly mode” or red-eyed “grumpy mode,” which dictates how pleasantly he responds to obstacles. Need something more advanced? Check out the tentacle robot, just in time for Halloween.

Continue reading “Talkbot: An Arduino-driven Robot For Beginners”

VCR Centrifuge

VCR’s practically scream “tear me open!” with all those shiny, moving parts and a minimal risk that you’re going to damage a piece of equipment that someone actually cares about. Once you’ve broken in, why not hack it into a centrifuge like [Kymyst]? Separating water from the denser stuff doesn’t require lab-grade equipment. As [Kymyst] explains: you can get a force of 10 G just spinning something around your head. By harvesting some belt drives from a few VCR’s, however, he built this safer, arm-preserving motor-driven device.

[Kymst] dissected the video head rotor and cassette motor drive down to a bare minimum of parts which were reassembled in a stack. A bored-out old CD was attached beneath the rotor while a large plastic bowl was bolted onto the CD. The bowl–here a microwave cooking cover–acts as a protective barrier against the tubes spinning inside. The tube carriers consist of plastic irrigation tubing fitted with a homemade trunnion, which [Kymyst] fashioned from some self-tapping screws and a piece of PVC. At 250 rpm, this centrifuge reaches around 6 G and best of all, gives a VCR something to do again. Take a look at his guide and make your own, particularly if your hackerspace has a bio lab.

Pocket Sized Sattelites For Asteroid Detection

satellite

We’ve seen kicksats before, small pocketable single board satellites designed to orbit Earth. At this year’s Maker Faire, the team behind these kicksats has a new plan: using them to determine the orbits of earth-passing asteroids and hopefully not giving us any forewarning of our imminent extinction.

Instead of simply orbiting Earth, the new plan for these kicksats is to deploy them into the path of an oncoming asteroid such as Apophis so the radio transmissions from each satellite can pinpoint where exactly the asteroid is, something Earthbound optical and radio telescopes struggle with.

Despite the small size, the hardware on each kicksat is pretty impressive; each mini satellite has a solar cell on each side, a low-power MSP430 microcontroller with a radio module, and a few sensors. The system is designed so anyone can pick up the telemetry from these satellites with a small Yagi antenna and an RTL SDR TV tuner dongle.

An impressive bit of kit, but if holding a satellite or asteroid in your hand is more your thing, the same team behind the kicksat put up a whole bunch of 3D models of asteroids and space probes. They’re actually quite impressive when they’re printed out.

World Maker Faire: The New Ultimaker

Ult

Just as the the gates opened at the World Maker Faire in New York City the skies opened, sending everyone underneath the tents and pavilians on the faire grounds. Luckily, I was able to check out the new Ultimaker before that happened, and only a day after it was officially announced.

Compared to the older laser-cut Ultimaker, the Ultimaker 2 is much, much cleaner that’s made more for designers and architects instead of students, hackerspaces and tinkerers. There are a few new additions to the Ultimaker 2 – OLED display, heated bed, and a larger build volume. Basically, if you want Ultimaker quality without a lot of futzing around, go with the Ultimaker 2.

Ultimaker will be shipping a pre-assembled version for €1.895,00, with a kit version to follow shortly. As always, the Ultimaker 2 is open source, and no, this doesn’t mean an end to the classic Ultimaker.

Building A Brushless Motor Controller Around An ATmega Chip

You know when you see something like this it’s just going to be awesome, and we weren’t disappointed by our first impression. [Davide Gironi] built a brushless motor controller from the ground up using an ATmega8 as the brain. If you want to understand every aspect of a subject this is how to do it. Lucky for us he explains what each portion of the prototype does.

Brushless motors have no brushes in them (duh). But what does that really mean? In order to spin the motor a very carefully crafted signal is sent through the motor coils in the stationary portion (called the stator), producing a magnetic field that pushes against permanent magnets in the rotor. A big part of crafting that signal is knowing the position of the rotor. This is often accomplished with Hall Effect sensors, but can also be performed without them by measuring the back EMF in the coils not currently being driven. The AVR-GCC compatible library which [Davide] put together can be tweaked to work with either setup.

Get a good look at the system in action after the break.

Continue reading “Building A Brushless Motor Controller Around An ATmega Chip”

Sending Data Over Bluetooth Low Energy With A Cheap NRF24L01+ Module

nRF24L01+ modules like the one shown above are a great way to send data wirelessly between your projects. They can be found on many websites for less than $1.50 a piece and many libraries exist for them. After having thoroughly looked at the Bluetooth Low Energy (BLE) specifications, [Dimitry] managed to find a way to broadcast BLE data with an nRF24L01+.

Luckily enough, BLE and nRF24L01+ data packets have the same preambles. However, the latter can’t send more than 32 bytes in a packet and can’t hop between frequencies as fast as the BLE specification wants. [Dimitry] found the solution when he discovered that he could send unsolicited advertisements on three specific channels. In the end, considering the 32 bytes the nRF24L01+ can send, you’ll need to use 3 bytes for the CRC, 2 for the packet header, 6 for the MAC address and 5 for devices attributes. This leaves us with 16 bytes of pure data or 14 bytes to split between data and name if you want your project to have one.

Haunted Dollhouse Microcontroller Networking For World Maker Faire

master-slave-networks

It’s pretty awesome to get see the number of projects presented at World Maker Faire. But we still love digging into the gritty details that only an in-depth build post can deliver. Here we get both. You can see the circuits pictured above in the Circuit Castle exhibit at WMF this weekend, and you can read about how the microcontroller network was built in [Jim’s] article.

As the title states, this is a network built for a dollhouse. Each slave device performs a different task; adding color, sound, motion, and interactivity using some sensors.  The post discusses the i2c (or TWI to get around licensing issues as [Jim] mentions) communications used to talk to the ATtiny85 chips on the slave boards. Because the eight-pin package leaves few I/O pins to work with an ATtiny84 was also added. It brings 14-pins to the party, including multiple ADC inputs for reading sensors.

If this ends up being too much of a read for you jog to the “Update 9/17/13” to get the general overview of progress. Like any project on a timeline, not everything works quite as well as they would have liked it to. But it’s the journey that makes something like this so fun — a fully working project would signal an end to the enjoyment, right?

[via Workshop 88]