An ATtiny Metal Detector

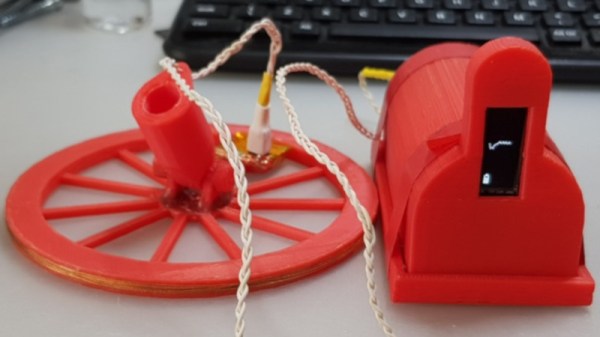
A metal detector used to be an entirely analogue instrument, an oscillator whose frequency changed with the inductance of its sense coil when a piece of metal approached. [Łukasz Podkalicki] shows us a more sophisticated machine, but with judicious use of an ATtiny 13 it is not a complex one.

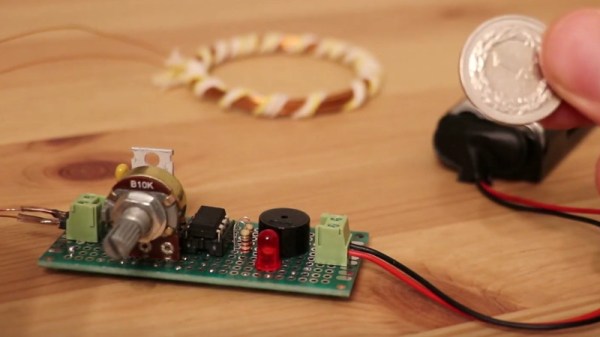
A pulsed induction metal detector induces a current spike in its search coil, and times the decay of the resulting oscillation. The coil is part of a resonant circuit with a capacitor, and any metal in its field will change its resonant frequency. In [Łukasz]’s design the ATtiny13 fires a pulse at his coil using a MOSFET, and the voltages at the coil are sensed by an analogue pin through an appropriate clamp circuit. His software does the timing, and sounds a buzzer upon metal detection. It’s a deliciously simple implementation, and while as he shows us in the video below the break its relatively small coil is more suited to detecting coins or wires behind the drywall than locating lost hoards, there is probably ample scope for further experimentation.

This isn’t the first project from [Łukasz] that has found its way into these pages, his history with the ATtiny13 goes back a few years.

Continue reading “An ATtiny Metal Detector”

A Graph Plotting Metal Detector

Metal detectors can be a great source of fun, and occasionally even found wealth. They allow the detection of metal objects at a distance, enabling hidden treasures to be discovered. They’re also highly critical to the work of minesweepers and unexploded ordnance disposal teams. [Andrius] wanted to add such a device to his kit when motorcycling through the woods of Lithuania, and thus decided to undertake a build of his own. (Editor’s note: original link went bad, this is through the Wayback Machine.)

The detector is a thoroughly modern one – fans of the 555 may want to look away now. A Collpits oscillator, built from two transistors, is used to generate a frequency that is passed through the detection coil. This frequency is measured by an Arduino that plots a graph of the received frequency on an OLED display. As the coil is passed near metal objects, the oscillator frequency changes, and this is visible on the frequency plot on-screen.

Not only is it a quick and easy build that is achievable from what are now junkdraw components, it’s also one that would be readily usable by the hearing-impaired, too. It’s a great project to tackle if you’re looking to get to grips with basic oscillators, frequency measurement, or just microcontroller programming in general.

Still need more inspiration? We’ve seen a similar concept executed before.

Heavy Metal Detectors

Helsinki has a strong underground Heavy Metal scene, so what better way to show it off than to have listeners literally unearth the local sounds themselves with converted metal detectors that play, naturally, Metal? [Steve Maher] built these modified detectors and handed them to a bunch of participants who went on exploratory walks around the city. The tracks from local bands changed as the user moved from one concealed metallic object to the other to create the experience of discovering the hidden soundscape of the land.  Continue reading “Heavy Metal Detectors”

Hackaday Links: December 8, 2013

hackaday-links-chain

Let’s start off with some high voltage. Here’s a sweet Jacob’s Ladder build from [Robert]. The site hosting his short writeup has been up and down for us so here’s a cache link.

Speaking of high voltage, if you want to switch mains with your project [Tom] has a breakout board for cheap mechanical relays. [via Dangerous Prototypes]

[Dario] made his own version of an electronic Advent calendar [translated]. There are no numbers, you must solve the mystery of the flashing LEDs to figure out which package goes with each day.

If you ever work with lighted arcade buttons here’s a guide for swapping out the light for an RGB LED. This hack uses through-hole LEDs. We’ve actually seen a surface mount hack that includes a PCB to mimic the old bulbs.

Next time you stay overnight at an event you can give yourself the best view in the campground. This tiny little camper was mounted on a scissor lift! That first step on the way to the Porta Potty is a doozy! [via Adafruit]

[Žiga] was nice enough to demonstrate this smart-watch hack by displaying our name and logo (we love pandering!). It features the MSP-WDS430 which is a surprisingly stylish offering from Texas Instruments. In addition to analog clock hands it has an OLED display driven by the MSP430 inside.

Here’s a quick PIC-based metal detector which [Nicholas] built.

And finally, [Chet] saw the oil tank level sensor we featured this week. He built a nearly identical system earlier this year. The oil level sensor works in conjunction with the custom thermostat he built around an Android tablet.

DIY Metal Detector

Looking for a light project to teach young hackers some very basic electronics? Here’s a quick and easy weekend project, a simple metal detector!

We all know 555 timers are very useful and pop up in a wide range of projects, but did you know a metal detector is one of them? [vonPongrac] stumbled upon this handy guide, a free eBook on 50 555 Circuits, which contains many cool project ideas, including a simple metal detector circuit. It’s a very basic concept that uses a coil of copper wire as a home-made choke — when metal or a magnet comes near the coil, it varies the output frequency, and the 555 timer in turn, varies the output sound, alerting you of the presence of something metal nearby.

After the break there’s a video of it during its testing phases. If you don’t have a 555 on hand (tisk tisk) but still want to have some treasure hunting fun you can also build one based on an Arduino.

Continue reading “DIY Metal Detector”

Build Your Own Metal Detector

[Dzl] and his rather serious looking son are metal detector enthusiasts. But when they couldn’t find their store-bought metal detector earlier this summer they just went ahead and built their own. [Dzl] starts his write up with an explanation of how most oscillator based metal detectors work. This one differs by using an Arduino to read from the metal detecting coil.

The circuit starts with an oscillator that produces a signal of about 160 kHz which is constantly measured by the Arduino. When metal enters the coil it alters the frequency, which is immediately picked up the Arduino. Instead of that characteristic rising tone this rig uses a Piezo buzzer, issuing the type of clicks you’d normally associate with a Geiger counter.

The last part of the build was to find the best coil orientation. They settled on thirty turns around a metal bucket. An old Ikea lamp is the perfect form factor to host their hardware which seems to work like a charm.

Metal Detection Using An Inductor Instead Of A Clock Crystal.

This project from a few years back is an interesting take on a metal detector. Instead of building a detection circuit, [Bruno Gavand] replaced the external clock crystal with an inductor. Here you can see the inductor coil next to the PIC 12F683. You can see two components jumping from one breadboard to the other. These are smoothing capacitors on the inductor lines.

The watchdog timer for the chip is run by the internal RC oscillator. When the external crystal receives a pulse due to metal inducing a current in the coil, the value of the watchdog timer is compared to it. This data is filtered and if the proper parameters are present the green LED blinks. This is bicolor LED. If the inductor circuit is functioning properly it will blink red at power up. [Bruno] says that results will vary based on that inductor so you may need to try a few to get the calibration light to blink.

We’re thinking this would make a simple stud finder (by detecting where the nails/screws are in the wall). Check out the demo after the break, then let us know what you would use this for by leaving a comment.

Continue reading “Metal Detection Using An Inductor Instead Of A Clock Crystal.”