Common Chemicals Combine To Make Metallic Sodium

There’s no debating that metallic sodium is exciting stuff, but getting your hands on some can be problematic, what with the need to ship it in a mineral oil bath to keep it from exploding. So why not make your own? No problem, just pass a few thousand amps of current through an 800° pot of molten table salt. Easy as pie.

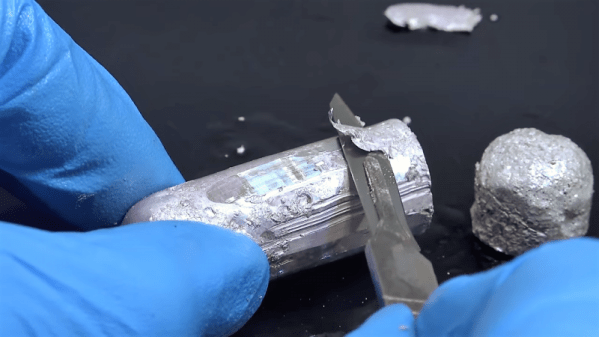
Thankfully, there’s now a more approachable method courtesy of this clever chemical hack that makes metallic sodium in quantity without using electrolysis. [NurdRage], aka [Dr. N. Butyl Lithium], has developed a process to extract metallic sodium from sodium hydroxide. In fact, everything [NurdRage] used to make the large slugs of sodium is easily and cheaply available – NaOH from drain cleaner, magnesium from fire starters, and mineral oil to keep things calm. The reaction requires an unusual catalyst – menthol – which is easily obtained online. He also gave the reaction a jump-start with a small amount of sodium metal, which can be produced by the lower-yielding but far more spectacular thermochemical dioxane method; lithium harvested from old batteries can be substituted in a pinch. The reaction will require a great deal of care to make sure nothing goes wrong, but in the end, sizable chunks of the soft, gray metal are produced at phenomenal yields of 90% and more. The video below walks you through the whole process.

It looks as though [NurdRage]’s method can be scaled up substantially or done in repeated small batches to create even more sodium. But what do you do when you make too much sodium metal and need to dispose of it? Not a problem.

Continue reading “Common Chemicals Combine To Make Metallic Sodium”

Blink An LED On The Internet Of Things

Blinking an LED is generally considered the hardware equivalent of the classic “Hello World” project. It’s a quick and simple test to show that you’ve got the basics worked out, and a launching point for bigger and better things. So why should it be any different in this glorious new Internet of Things era?

The “WiFi HDD LED” created by [Limbo] is essentially just that, a status LED that can be triggered remotely thanks to the WiFi capability of the ever-popular ESP8266. Don’t think there’s much use for a wireless LED that blinks when your computer’s hard drive is thrashing around? Maybe not, but it’s definitely worth checking out if you’re looking for a good way to get your feet wet in the world of ESP hacking.

On the hardware side, this is exactly what you’d expect: an LED hanging off the digital pin of an ESP8266 module. If you go with the bare ESP-01 like [Limbo], things are somewhat more complex due to the need for a voltage regulator, but if you’re using one of the more common ESP development boards then there’s nothing else you need to add. Really, as a proof of concept you could even use the built-in LED on those boards.

As you might imagine, this project is more about the software than the hardware. The code on both sides of the equation has been released as open source for your hacking pleasure, and is more capable than you’d probably expect. The LED is actually an extension of a system activity monitor that [Limbo] had previously developed and includes a binding function to make sure you’re talking to the right blinking ESP. It’s probably overkill for many purposes, but it’s a good example of how to do more robust UDP connections than we’re used to seeing.

This project is one of many that prove there’s more than one way to accomplish a particular goal, and that there’s something to be learned from even the most eccentric of hacks.

Continue reading “Blink An LED On The Internet Of Things”

The No-Parts Temperature Sensor In Your Arduino

[Edward], creator of the Cave Pearl project, an underwater data logger, needed a way to measure temperature with a microcontroller. Normally, this problem is most easily solved by throwing a temperature sensor on the I2C bus — these sensors are cheap and readily available. This isn’t about connecting a temperature sensor in your Arduino. This build is about using the temperature sensor in your clock.

The ATMega328p, the chip at the heart of all your Arduino Uno clones, has within it a watchdog timer that clicks over at a rate of 110 kHz. This watchdog timer is somewhat sensitive to temperature, and by measuring this temperature sensor you can get some idea of the temperature of the epoxy blob that is a modern microcontroller. The trick is calibrating the watchdog timer, which was done with a homemade ‘calibration box’ in a freezer consisting of two very heavy ceramic pots with a bag of rice between them to add thermal mass (you can’t do this with water because you’re putting it in a freezer and antique crocks are somewhat valuable).

By repeatedly taking the microcontroller through a couple of freeze-thaw cycles, [Edward] was able to calibrate this watchdog timer to a resolution of about 0.0025°C, which is more than enough for just about any sensor application. Discussions of accuracy and precision notwithstanding, it’s pretty good.

This technique measures the temperature of the microcontroller with an accuracy of 0.005°C or better, and it’s using it with just the interrupt timer. That’s not to say this is the only way to measure the temperature of an ATMega; some of these chips have temperature sensors built right into them, and we’ve seen projects that use this before. However, this documented feature that’s clearly in the datasheet seems not to be used by many people.

Thanks [jan] for sending this in.

The FAA Mandates External Registration Markings For Drones

Drone fliers in the USA must soon display their registration markings on the exterior of their craft, rather than as was previously acceptable, in accessible interior compartments. This important but relatively minor regulation change has been announced by the FAA in response to concerns that malicious operators could booby-trap a craft to catch investigators as they opened it in search of a registration. The new ruling is effective from February 25th, though they are inviting public comment on it.

As airspace regulators and fliers across the world traverse the tricky process of establishing a safe and effective framework for multirotors and similar craft we’ve seen a variety of approaches to their regulation, and while sometimes they haven’t made complete sense and have even been struck down in the courts, the FAA’s reaction has been more carefully considered than that in some other jurisdictions. Rule changes such as this one will always have their detractors, but as an extension of a pre-existing set of regulations it is not an unreasonable one.

It seems inevitable that regulation of multirotor flight will be a continuing process, but solace can be taken at the lower end of the range. A common theme across the world seems to be a weight limit of 250 g for otherwise unrestricted and unregistered craft, and the prospects for development in this weight category in response to regulation are exciting. If a smaller craft can do everything our 2 kg machines used to do but without the burden of regulation, we’ll take that.

An ATtiny Metal Detector

A metal detector used to be an entirely analogue instrument, an oscillator whose frequency changed with the inductance of its sense coil when a piece of metal approached. [Łukasz Podkalicki] shows us a more sophisticated machine, but with judicious use of an ATtiny 13 it is not a complex one.

A pulsed induction metal detector induces a current spike in its search coil, and times the decay of the resulting oscillation. The coil is part of a resonant circuit with a capacitor, and any metal in its field will change its resonant frequency. In [Łukasz]’s design the ATtiny13 fires a pulse at his coil using a MOSFET, and the voltages at the coil are sensed by an analogue pin through an appropriate clamp circuit. His software does the timing, and sounds a buzzer upon metal detection. It’s a deliciously simple implementation, and while as he shows us in the video below the break its relatively small coil is more suited to detecting coins or wires behind the drywall than locating lost hoards, there is probably ample scope for further experimentation.

This isn’t the first project from [Łukasz] that has found its way into these pages, his history with the ATtiny13 goes back a few years.

Continue reading “An ATtiny Metal Detector”

Hands-on: Hacker Hotel 2019 Badge Packs ESP32, E-Ink, And A Shared Heritage

When you go to a hacker conference, you always hope there’s going to be a hardware badge. This is an interactive piece of custom electronics that gets you in the door while also delighting and entertaining during the con (and hopefully far beyond it).

Hot off the presses then is the Hacker Hotel badge, from the comfortable weekend hacker camp of that name in a Netherlands hotel. As we have already noted, this badge comes from the same team that created the SHA2017 hacker camp’s offering, and shares that badge’s display, ESP32 processor, battery, and firmware. The evolution of that firmware into the badge.team platform is an exciting development in its own right, but in the context of this badge it lends a very familiar feel to the interface for those attendees who were also at the 2017 event.

Continue reading “Hands-on: Hacker Hotel 2019 Badge Packs ESP32, E-Ink, And A Shared Heritage”

Playing Pokemon On A CRT Thanks To A Powerful Microcontroller

Microcontrollers come in a broad swathe of capabilities these days. There are the venerable 8-bit micros that have been around forever and valiantly crunch away, all the way up to modern 32-bit powerhouses with advanced peripherals and huge amounts of RAM and ROM. If you’re blinking a few LEDs or opening a garage door, the former is fine. For what [Jared] had in mind, a little more horsepower was required.

[Jared]’s project started out as an experiment with composite video output on a STM32F446RE microcontroller. Using a 4-bit resistor DAC, the device was able to output NTSC signals, using interrupts and NOPs to handle timing. The hardware worked, and was tested by playing the entirety of Star Wars: A New Hope from an SD card.

Attention then turned to creating a Game Boy emulator for the platform. After many hurdles with various bugs and edge cases, things started working, albeit slowly. The Pokemon game ROM wouldn’t fit in the microcontroller’s limited flash storage, so [Jared] implemented a complicated bank switching scheme. This combined with the limited computational resources meant the game was playable, but limited to just 10 FPS.

Enter the STM32H7. With over double the clock speed and capable of 856 DMIPS versus 225 of the original chip, things were coming together. Pokemon now ran at 60 FPS, and the built-in DAC greatly improved the sound. The DMA subsystem allowed further performance gains, and even running in debug mode, performance far exceeded that of the previous hardware.

With unit prices of most microcontrollers being remarkably low, it goes to show that once you’ve tapped out on performance on one platform, there’s usually a faster option available. It’s possible to emulate the Game Boy on the ESP-32 too, as Sprite_TM showed us in 2016. Video after the break.

[Thanks to Ben for the tip!]

Continue reading “Playing Pokemon On A CRT Thanks To A Powerful Microcontroller”