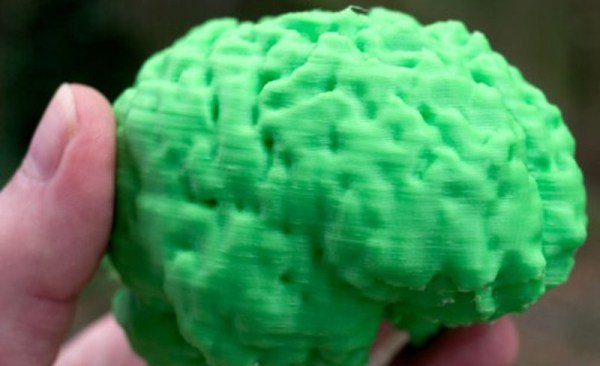
We Should 3D Scan People

In a perfect futuristic world you have pre-emptive 3D scans of your specific anatomy. They’d be useful to compare changes in your body over time, and to have a pristine blueprint to aid in the event of a catastrophe. As with all futuristic worlds there are some problems with actually getting there. The risks may outweigh the rewards, and cost is an issue, but having 3D imaging of a sick body’s anatomy does have some real benefits. Take a journey with me down the rabbit hole of 3D technology and Gray’s Anatomy.

Continue reading “We Should 3D Scan People”

Hackaday Prize Entry: A Better DIY CT Scanner

If you’re entering something in The Hackaday Prize this year, [Peter Jansen] is a guy you need to watch out for. Last year, he won 4th place with the Open Source Science Tricorder, and this year he’s entering a homebrew MRI machine. Both are incredible examples of what can be built with just enough tools to fit on a workbench, but even these builds don’t cover everything [Peter] has built. A few years ago, [Peter] built a desktop CT scanner. The CT scanner worked, but not very well; the machine takes nine hours to acquire a single slice of a bell pepper. At that rate, any vegetable or fruit would begin to decompose before a full scan could be completed.

This didn’t stop a deluge of emails from radiology professors and biomedical folk from hitting [Peter]’s inbox. There are a lot of people who are waiting for back alley CT scans, but the CT scanner, right now, just isn’t up to the task. The solution is iteration, and in the radiology department of hackaday.io, [Peter] is starting a new project: an improved desktop CT scanner.

The previous version of this CT scanner used a barium check source – the hottest radioisotope source that’s available without a license – and a photodiode detector found in the Radiation Watch to scan small objects. This source is not matched to the detector, there’s surely data buried below the noise floor, but somehow it works.

For this revision of a desktop CT scanner, [Peter] is looking at his options to improve scanning speed. He’s come up with three techniques that should allow him to take faster, higher resolution scans. The first is decreasing the scanning volume: the closer a detector is to the source, the higher the number of counts. The second is multiple detectors, followed up by better detectors than what’s found in the Radiation Watch.

The solution [Peter] came up with still uses the barium check source, but replaces the large photodiode with multiple PIN photodiodes. There will be a dozen or so sensors in the CT scanner, all based on a Maxim app note, and the mechanical design of this CT scanner greatly simplifies the build.

Compared to the Stargate-like confabulation of [Peter]’s first CT scanner, the new one is dead simple, and should be much faster, too. Whether those radiology professors and biomed folk will be heading out to [Dr. Jansen]’s back alley CT scan shop is another question entirely, but it’s still an amazing example of what can be done with a laser cutter and an order from Mouser.


The 2015 Hackaday Prize is sponsored by:

Hackaday Prize Entry: A Low Cost, Open Source MRI

This low cost magnetic resonance imager isn’t [Peter]’s first attempt at medical imaging, and it isn’t his first project for the Hackaday Prize, either. He’s already built a CT scanner using a barium check source and a CCD marketed as a high-energy particle detector. His Hackaday Prize entry last year, an Open Source Science Tricorder with enough sensors to make [Spock] jealous, ended up winning fourth place.

[Peter]’s MRI scanner addresses some of the shortcomings of his Open Source CT scanner. While the CT scanner worked, it was exceptionally slow, taking hours to image a bell pepper. This was mostly due to the sensitivity of his particle detector and how hot a check source he could obtain. Unlike highly radioactive elements, you can just make high strength magnetic fields, making this MRI scanner potentially much more useful than a CT scanner.

There are a few things that make a low-cost MRI machine possible, the first being a way to visualize magnetic fields. For this, [Peter] is using an array of Honeywell HMC5883L 3-axis magnetometers, the smallest sensors he could find with the largest range. These magnetometers are I2C devices, so with a few multiplexers it’s actually a relatively simple build.

Imaging with these magnetometers is not simple, and it’s going to take a lot of work to make a signal from all the noise this magnetic camera will see. The technique [Peter] will use isn’t that much different from another 2014 Hackaday Prize entry, A Proton Precession Magnetometer. When a proton in your body is exposed to a high strength magnetic field, it will orient towards the high strength field. When the large field is turned off, the proton will orient itself towards the next strongest magnetic field, in this case, the Earth. As a proton orients itself to the Earth’s magnetic field, it oscillates very slightly, and this decaying oscillation is what the magnetic camera actually detects.

With some techniques from one of [Peter]’s publication, these oscillations can be turned into images. It won’t have the same resolution as an MRI machine that fills an entire room, but it will work. Imagine, an MRI device that will sit on a desktop, made out of laser-cut plywood. You can’t have a cooler project than that.


The 2015 Hackaday Prize is sponsored by:

Husband Uses MRI Images To 3D Print Wife’s Skull And Tumor

[Michael Balzer] shows us that you are your own best advocate when it comes to medical care – having the ability to print models of your own tumors is a bonus. [Michael’s] wife, Pamela, had been recovering from a thyroidectomy when she started getting headaches. She sought a second opinion after the first radiologist dismissed the MRI scans of her head – and learned she had a 3 cm tumor, a meningioma, behind her left eye.  [Michael], host of All Things 3D, asked for the DICOM files (standard medical image format) from her MRI.  When Pamela went for a follow-up, it looked like the tumor had grown aggressively; this was a false alarm. When [Michael] compared the two sets of DICOM images in Photoshop, the second MRI did not truly show the tumor had grown. It had only looked that way because the radiologist had taken the scan at a different angle! Needless to say, the couple was not pleased with this misdiagnosis.

However, the meningioma was still causing serious problems for Pamela. She was at risk of losing her sight, so she started researching the surgery required to remove the tumor. The most common surgery is a craniotomy: the skull is sawed open and the brain physically lifted in order to access the tumor below it. Not surprisingly, this carries a high risk of permanent damage to any nerves leading to loss of smell, taste, or sight if the brain is moved the wrong way. Pamela decided to look for an alternative surgery that was less invasive. [Michael] created a 3D print of her skull and meningioma from her MRIs. He used InVesalius, free software designed to convert the 2D DICOM files into 3D images. He then uploaded the 3D rendered skull to Sketchfab, sharing it with potential neurologists. Once a neurologist was found that was willing to consider an alternative surgery, [Michael] printed the skull and sent it to the doctor. The print was integral in planning out the novel procedure, in which a micro drill was inserted through the left eyelid to access the tumor. In the end, 95% of the tumor was removed with minimal scarring, and her eyesight was spared.

If you want to print your own MRI or CT scans, whether for medical use or to make a cool mug with your own mug, there are quite a few programs out there that can help. Besides the aforementioned InVesalius, there is DeVIDE, Seg3D, ImageVis3D, and MeshLab or MeshMixer.

Converting CTs And MRIs Into Printable Objects

People get CT and MRI scans every day, and when [Oliver] needed some medical diagnostic imaging done, he was sure to ask for the files so he could turn his skull into a printable 3D object.

[Oliver] is using three different pieces of software to turn the DICOM images he received from his radiologist into a proper 3D model. The first two, Seg3D and ImageVis3D, are developed by the University of Utah Center for Integrative Biomedical Computing. Seg3D stitches all of the 2D images from an MRI or CT scan into a proper 3D format. ImageVis3D allows [Oliver] to peel off layers of his flesh, allowing him to export a file of just his skull, or a section of his entire face. The third piece of software, MeshMixer, is just a mesh editor and could easily be replaced with MeshLab or Blender.

[Oliver] still has a lot of work to do on the model of his skull – cleaning up the meshes, removing his mandible, and possibly plugging the top of his spinal column if he would ever want to print a really, really awesome mug. All the data is there, though, ready for digital manipulation before sending it off to be printed.

Continue reading “Converting CTs And MRIs Into Printable Objects”