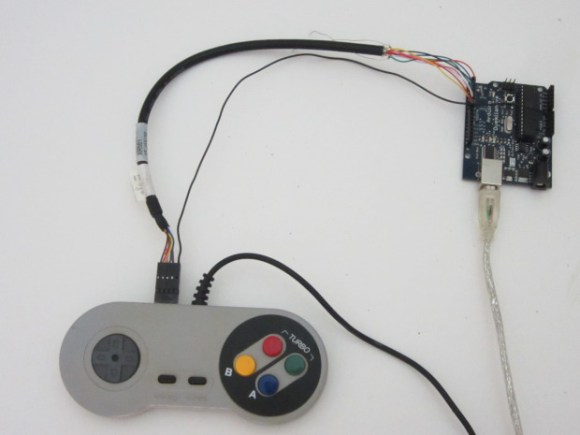
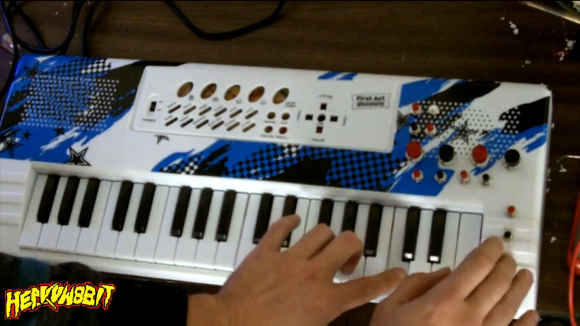
Mario Plays Piano With A Little Help From Raspberry Pi

mario-piano

[David] has created his own live robot band to play live versions of the music and sound effects of NES games. Most of us who grew up in the 80’s and 90’s have the music of Nintendo games burned into our brains. While there have been some amazing remixes created over the years, [David] has managed to do something truly unique. Armed with an emulator, some software prowess, and a pair of Raspberry Pis, [Dave] created a system that plays game music and sound effects on analog instruments. A Yamaha Disklavier player piano handles most of the work through a connection to a Raspberry Pi. Percussion is handled by a second Pi.  Snare drum, wood block, and tambourine are all actuated by a custom solenoid setup.

The conversion process all happens on the fly as the game is played. [Dave] says the process has about ½ second of lag when played live, but we’re sure that could be fixed with some software tweaks. Continue reading “Mario Plays Piano With A Little Help From Raspberry Pi”

NESPo: Another 3D Printed Portable NES

portableNESSide2

Grab your favorite cartridge and violently blow into the end, because [Dave Nunez] is sending us on a nostalgia trip with his 3D printed portable NES. He takes the typical route of chopping up a Nintendo on a chip (NOAC) retro machine rather than sacrifice a real NES, and opts for a NiMH battery over lithium (which isn’t a bad idea; they can burst into flames if you charge them incorrectly). The battery life is, however, tolerable: 2.5 to 3 hours.

All the components are packed into a custom-made 3D printed PLA enclosure, which [Dave] kindly shares on thingiverse. He also decided to 3D print each of the buttons and their bezels/housings, which he then topped off by cutting acrylic sheets that seal up the front and back. As a final touch, [Dave] slips in some custom art under the acrylic and mounts a printed LED nameplate in the corner.

We’ve seen [Dave’s] work at Hackaday before, when he built a one-size-fits-all-consoles arcade controller.

Proposing With A Contra ROM Hack

contra

We’ve seen marriage proposals via modified Nintendo games before, but most of these put the proposal just after the first level. It’s one thing to have the old man in Zelda present your SO with a ring, but it’s another thing entirely to beat the game before getting on one knee. That’s what [Quinn] forced [Amy] to do when he proposed by modifying the ROM for Contra to display a proposal right before the end credits.

By tearing open a few cartridges, [Quinn] found himself with a bunch of EPROMs and NES cartridge PCBs. After grabbing the Contra ROM off the Internet, [Quinn] edited the game’s end screen to his proposal. This was then burned onto a 1 Megabit EPROM, soldered onto a cartridge, and put into the NES for his now-fiance to play. Once [Amy] and [Quinn] finished the game (without cheating, by the way), [Amy] saw her proposal and [Quinn] pulled out the ring.

Hackaday Links: Sunday, July 14th, 2013

hackaday-links-chain

Wanting to repair his much-used NES controllers [Michael Moffitt] sourced a replacement for the rubber button pads. They didn’t work all that well but he fixed that by using angle clippers on the part that contacts the PCB traces.

Here’s a neat Claw Game project show-and-tell video. [Thanks David]

We already know that [Bunnie] is building a laptop. Here’s an update on the project.

Hackaday alum [Caleb Kraft] continues his helpful hacking by adding an alternative to clicking an Xbox 360 stick.

[Blackbird] added a camera to the entry door of his house. He didn’t want to forget to shut it off (wasting power) so he built an automatic shutoff.

We’re not really sure what this computational photography project is all about. It takes pictures with the subject illuminated in different colors then combines individual color channels with a MATLAB script.

Finally, [Dave Jones] tears down a Nintendo 64 console on a recent EEVblog  episode.

No Nonsense Guide For Patching Into A Gaming Controller

patching-into-a-gaming-controller

Here a straight-forward guide for tapping into the buttons on most gaming controllers. Why do something like this? Well there’s always the goal of conquering Mario through machine learning. But we hope this will further motivate hackers to donate their time and expertise developing specialized controllers for the disabled.

In this example a generic NES knock-off controller gets a breakout header for all of the controls. Upon close inspection of the PCB inside it’s clear that the buttons simply short out a trace to ground. By soldering a jumper between the active trace for each button and a female header the controller can still be used as normal, or can have button presses injected by a microcontroller.

The Arduino seen above simulates button presses by driving a pin low. From here you can develop larger buttons, foot pedals, or maybe even some software commands based on head movement or another adaptive technology.

Continue reading “No Nonsense Guide For Patching Into A Gaming Controller”

The 14th Game For The Nintendo Power Pad

[youtube=http://www.youtube.com/watch?v=6x23TWrInpI&w=580]

Released 25 years ago, the Nintendo Power Pad, a plastic mat that plugged into an NES, saw very limited success despite its prevalence in basements and attics. In total, only six games for the Power Pad were released in North America, and only 13 worldwide. The guys over at cyborgDino thought they should celebrate the sliver anniversary of the Power Pad by creating its 14th game, using an Arduino and a bit of playing around in Unity 3D.

The first order of business was to read the button inputs on the Power Pad. Like all NES peripherals, the Power Pad stores the state of its buttons in a shift register that can be easily read out with an Arduino. With a bit of help from the UnoJoy library, it was a relatively simple matter to make the Power Pad work as intended.

The video game cyborgDino created is called Axis. It’s a bit like a cross between Pong and a tower defense game; plant your feet on the right buttons, and a shield pops up, protecting your square in the middle of the screen from bouncing balls. It’s the 14th game ever created for the Power Pad, so that’s got to count for something.

Video of the game below.

Continue reading “The 14th Game For The Nintendo Power Pad”

FPGA Plays Mario Like A Champ

fpga-controls-mario-bros

This isn’t an FPGA emulating Mario Bros., it’s an FPGA playing the game by analyzing the video and sending controller commands. It’s a final project for an engineering course. The ECE5760 Advanced FPGA course over at Cornell University that always provides entertainment for us every time the final projects are due.

Developed by team members [Jeremy Blum], [Jason Wright], and [Sima Mitra], the video parsing is a hack. To get things working they converted the NES’s 240p video signal to VGA. This resulted in a rolling frame show in the demo video. It also messes with the aspect ratio and causes a few other headaches but the FPGA still manages to interpret the image correctly.

Look closely at the screen capture above and you’ll see some stuff that shouldn’t be there. The team developed a set of tests used to determine obstacles in Mario’s way. The red lines signify blocks he will have to jump over. This also works for pits that he needs to avoid, with a different set of tests to detect moving enemies. Once it knows what to do the FPGA emulates the controller signals necessary, pushing them to the vintage gaming console to see him safely to the end of the first level.

We think this is more hard-core than some other autonomous Mario playing hacks just because it patches into the original console hardware instead of using an emulator.

Continue reading “FPGA Plays Mario Like A Champ”