Polyurethane Protecting PCBs

PCB

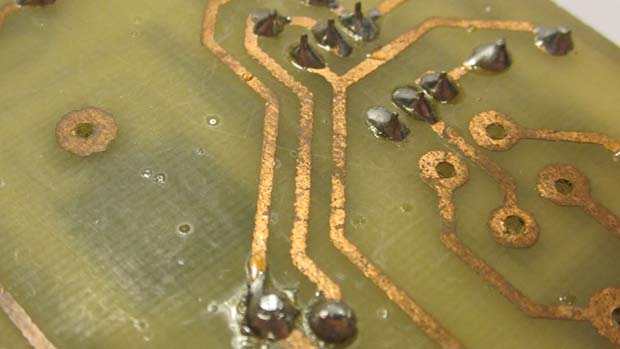
What you see above is a home-made PCB. No, this isn’t an example of a terrible toner transfer job, but rather evidence of the ravages of time. This board is seven years old, and the corrosion and broken traces show it. Luckily, [George] already has seven years of environmental data for a cheap DIY soldermask.

Seven years ago, [George] took a piece of copper clad board, masked half of it off, and sprayed it with fast drying polyurethane. After drying, he put it on a shelf in his garage. The results were fairly surprising – the uncovered portion is covered in verdigris, while the coated half is still shiny and new.

[George] took this a bit further and experimented with other spray can coverings. He found Testors spray enable worked just like the polyurethane, burning off when the heat of a soldering iron was applied, and also passed for a professional PCB.

Learn Machining From An Old School Metal Master

In the depths of YouTube there are still some jewels to be found. [Keith Fenner] is one of them. [Keith] owns Turn Wright Machine Works in Cape Cod, MA. From his small shop, He works on everything from sailboats to heavy equipment.

[Keith] describes himself as “An artist, and a jobber, 36 years in the trade”. We think he could add teacher to that list, as we’ve learned quite a bit about machining from his Youtube channel.

One of the interesting things about [Keith] is his delivery on camera. He makes the viewer feel like an apprentice machinist working alongside him. Rather than carefully setup shots with graphics, [Keith] narrates as he works paying jobs. He also has no problem showing us his mistakes – and recovery from them, as well as his victories.

The main tools at Turn Wright are the lathe and mill, but [Keith] isn’t old fashioned by any means. He has a complete PlasmaCAM setup and isn’t afraid to do a little computer work.

Most of [Keith’s] projects are broken up into several videos. One of our favorites is “So you broke it off in your hole”. In this series [Keith] shows what it takes to get a broken screw extractor (or EZ Out) out of a large diesel turbo. Get a feeling for what [Keith] has to offer with his “Day in the LIfe” video after the break.

Continue reading “Learn Machining From An Old School Metal Master”

Heavy Lifting Copters Can Apparently Lift People

Online RC store Hobby King is once again encouraging people to push the limits of what quadcopters and other multirotor remote control vehicles can do. They call it the beerlift and the goal is simple: build a multirotor craft capable of carrying the greatest amount of beer (or water, everything is measured by weight).

The competition is over, but the results were spectacular. The vehicle with the largest lift capacity – pictured above – was built by [Olaf Frommann] and carried 58.7 kilograms, or nearly 128 pounds to a hover a few feet off the ground. Last year the biggest lift was a mere 47 kg with an eight-rotor craft.

It was still an impressive showing all around. The biggest lift in the 700 class – 700 mm from rotor to rotor – was done by [David Ditch] with 19.6 kg. You can check out some of the best entries below, including an amazing aerobatic quadcopter that can successfully loop carrying a cup of beer,

Continue reading “Heavy Lifting Copters Can Apparently Lift People”

Getting Your Feedback And A Staff Update

had-staff-update-9-2013

Please join me in welcoming four new members to our crew. I published a post calling for applications almost two weeks ago. I wouldn’t say we were overwhelmed with applications. But I would say we were overwhelmed with qualified applicants. Hackaday writers need to be Jacks of all Trades in order to recognize and feature the best hacks from a wide range of disciplines. To this end we chose writers who have interests in areas what will complement those already represented by the team. I couldn’t be happier with the new contributors. Please join me in welcoming [James Hobson], [Todd Harrison], [Phillip Ryals], and [Adam Fabio]. They’ve already been hard at work dishing up fresh hacks, but you can learn more about their backgrounds by reading the biographies on our Staff Page.

You may have noticed a change this week. Although we’re an English language blog based in the United States, our statistics show readers throughout the world (in fact, almost a third of our writing team aren’t Americans). For this reason we changed our post scheduling earlier this week to a 24-hour cycle. This means more time between posts, and of course new posts being published in the middle of the night. Keep reading for a few more tidbits and a chance to give us your feedback.

Continue reading “Getting Your Feedback And A Staff Update”

Visually Tune Your HF Antenna Using An Oscilloscope And Signal Generator

Lots of readers are into toying around with RF and ham radios. One thing that is always of concern is tuning the antenna. New equipment is never cheap, so whenever another option comes along that uses existing test gear it gets our attention. [Alan Wolke] aka [w2aew] covers a process he uses to tune his HF antenna using a signal generator and oscilloscope.

The process is more of a teaching aid than a practical replacement for commercial equipment mostly because proper signal generators and oscilloscopes are large items and sometimes not available or affordable. That said, if you do have such test gear you only need build a simple breakout board containing a form of wheatstone bridge where the unknown Rx is the antenna. Two oscilloscope probes are connected across the bridge balance nodes. Some special care needs to be taken matching probe cable length and 50 ohm input impedance to the oscilloscope. A couple of 1K probe coupling resistors are also needed to prevent affecting the impendence at the hookup points. Once the selected signal is injected you can adjust an antenna tuner until the two voltage waveforms match on the oscilloscope indicating your antenna network is tuned to 50 ohm impedance with no reactance.

Being able to tune your antenna visually can really help you understand what is going on in the turning process; matching not only input impedance but also phase shift indicating inductive or capacitive reactance. Join us after the break to see the video and for information on what’s presented in the second part of [Alan’s] presentation.

Continue reading “Visually Tune Your HF Antenna Using An Oscilloscope And Signal Generator”

DIY Ultrasonic Acoustic Levitation

[Mike] saw a few videos of ultrasonic acoustic levitation rigs put together by student researchers. Figuring it couldn’t be that hard to replicate, he set out and built his own using surplus parts and whatever was sitting around his parts drawer.

The build began with a huge ultrasonic transducer from an old ultrasonic cleaning tank [Mike] picked up on eBay for $20 £20. He didn’t pick up the standard driver board, as those don’t have a very clean output – something desperately needed if you’re setting up a standing wave. He did manage to put a simple supply together with a 555 timer, a MOSFET and a 12 V transformer connected backwards, though.

The test rig is pretty simple – just the transducer sitting on a table with an aluminum plate sitting above it on threaded rods. By adjusting the distance between the transducer to the aluminum plate, [Mike] managed to set up some standing waves he was able to suspend small Styrofoam balls in. It’s not quite precise enough to levitate small chunks of sodium and water, but it makes for an excellent science fair-type project.

Continue reading “DIY Ultrasonic Acoustic Levitation”

Mario Plays Piano With A Little Help From Raspberry Pi

mario-piano

[David] has created his own live robot band to play live versions of the music and sound effects of NES games. Most of us who grew up in the 80’s and 90’s have the music of Nintendo games burned into our brains. While there have been some amazing remixes created over the years, [David] has managed to do something truly unique. Armed with an emulator, some software prowess, and a pair of Raspberry Pis, [Dave] created a system that plays game music and sound effects on analog instruments. A Yamaha Disklavier player piano handles most of the work through a connection to a Raspberry Pi. Percussion is handled by a second Pi.  Snare drum, wood block, and tambourine are all actuated by a custom solenoid setup.

The conversion process all happens on the fly as the game is played. [Dave] says the process has about ½ second of lag when played live, but we’re sure that could be fixed with some software tweaks. Continue reading “Mario Plays Piano With A Little Help From Raspberry Pi”