The ESP: A New 1kB Contender Appears

The ESP8266 is officially checking into the Hackaday 1kB Challenge. Doing something meaningful in 1kB of compiled code is tricky; modern SDKs like the ones often used for ESP8266 compile even the simplest programs to nearly that size. If you want to use this hardware in your 1kB Challenge entry, I have a solution for you!

The ESP8266 now has a barebones build environment focused on minimizing code size, as little as 131 bytes to boot up and blink an LED. It also “supports” some new, insane clock rates (like 346 MHz) and crazy development cycle speeds. The WiFi is stuck in “airplane mode,” but it will be worth your time to consider the ESP for the next non-WiFi project you’ll be doing.

Far too often, we follow design patterns that ‘just work’ instead of looking for the ones that are optimal because we’re afraid of wasting time. The benefits of keeping code tight and small are frequently overlooked. When code is small and environments minimal, RAM and FLASH become easier to come by, compiled binaries shrink and time wasted by compiling and flashing can decrease by an order of magnitude! We rarely see just how much value is added when we become a good engineer: being done only when there’s nothing left to remove from a design. Nosdk8266 will let you see what it’s like to test out code changes several times a minute.

Just a month ago, when preparing the ESP8266 for a USB bootloader, I had to make a stripped-down environment for it. It’s not based on the Official Non-OS SDK or the RTOS sdk, but an environment that can boot up and blink an LED. Not just blink an LED, but tweak the clock in some totally unexpected ways and even run the I2S bus (used for espthernet and Color NTSC Broadcast Video). If you’re not at the submission phase for your 1kB challenge, you can even use the mask ROM for printf! Now you can tweak your code and — in under 2 seconds — see what the new code does!

Even in PICO mode, the part still has to use the mask ROM to be loaded, but thankfully, the 1kB Challenge has added an exception for unavoidable bootloaders. No longer bound by the shackles of WiFi, I can’t wait to see what you’ll do with the ESP8266. Just beware that the processor may not work reliably when overclocked at 346 MHz (332.5%,) and you’ll certainly be voiding any warranties you may have. Sounds like fun, right?

Editorial Note: This is a guest article from Charles Lohr, aka [CNLohr]. Although he has written a few other guest articles, he is not a regular contributor to Hackaday and therefore, this article does not disqualify him from entering the 1kB Challenge. We felt it more fair to publish this article which shares the tools he’s using to make code smaller, rather than to keep them to himself for fear of disqualification. While we have your attention, we wanted to mention one of Charles’ articles which was published on April 1st — we still think there’s a lot of people who don’t realize it wasn’t a prank.

Overclocking The Raspberry Pi 3 For Tasty Speed Increases

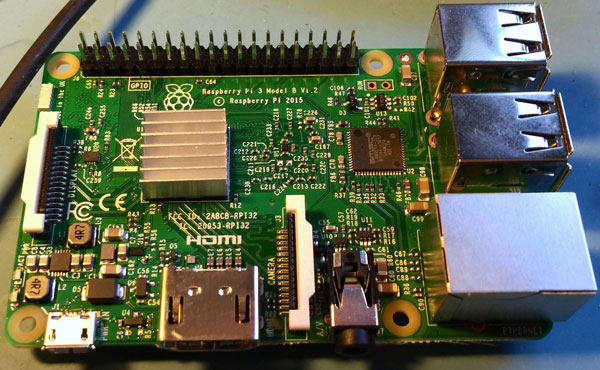
Some people are never happy. [Jackenhack] got hold of a couple of shiny new Raspberry Pi 3s, and the first thing he did is to start overclocking them. Fortunately, he knows what he is doing, so none of the magic smoke escaped, but it seems not all Pis are happy with the process.

For one of the three seemingly identical Pi 3, adding heat sinks let him push the CPU from the native 1.2GHz up to 1.45GHz. That did involve a bit of overvolting (increasing the voltage to the CPU), but that can be easily done in software. He also experimented with adding heat sinks to the memory, then bumping up the speed of the memory to increase throughput. Again, he was able to make some impressive gains, bumping the speed up from the native 400 Mhz to 500 Mhz. Both of those are stable overclocks: he was able to run the system at 100% CPU load for an extended time, and has incorporated the overclocked Pi into his system that contributes to the NTP pool project.

However, when he tried the same overclock with the second of the Pi 3 victims test subjects, it failed due to the CPU overheating. So, it seems that there is a lot of variation in the individual bits of silicon on the Pi 3. Perhaps some liquid nitrogen would help? It did for an Arduino…

Making A Mobility Scooter Drastically More Mobile

Do you have a spare mobility scooter sitting unused in your garage? Or, maybe you’ve got a grandmother who has been complaining about how long it takes her to get to bingo on Tuesdays? Has your local supermarket hired you to improve grocery shopping efficiency between 10am and 2pm? If you answered “yes” to any of those questions, then the guys over at Photon Induction have an “overclocked” mobility scooter build which should provide you with both inspiration and laughs.

They’ve taken the kind of inexpensive mobility scooter that can be found on Craigslist for a couple hundred dollars, and increased the battery output voltage to simultaneously improve performance and reduce safety. Their particular scooter normally runs on 24V, and all they had to do to drastically increase the driving speed was move that up to 60V (72V ended up burning up the motors).

Other than increasing the battery output voltage, only a couple of other small hacks were necessary to finish the build. Normally, the scooter uses a clutch to provide a gentle start. However, the clutch wasn’t up to the task of handling 60V, so the ignition switch was modified to fully engage the clutch before power is applied. The horn button was then used as the accelerator, which simply engages a solenoid with massive contacts that can handle 60V. The result is a scooter that is bound to terrify your grandmother, but which will get her to bingo in record time.

Continue reading “Making A Mobility Scooter Drastically More Mobile”

640×480 VGA On An Arduino

There are dozens, if not hundreds of examples around the Intertubes of an Arduino generating a VGA video output. The Arduino isn’t the fastest chip by far, and so far, all of these VGA generation techniques have peaked out at lower resolutions if you want to control individual pixels.[PK] has an interesting technique to generate 640×480 VGA at 60 frames per second without overclocking. It’s hacky, it’s ugly, but surprisingly, it actually works.

The VGA standard of 640×480 @ 60 fps requires pixels to be clocked out at 25.175 MHz, and the ATMega chips found in Arduinos top out at 20 MHz. [PK] wanted to generate VGA signals without overclocking, He did this by doubling the clock frequency with digital logic. The ATMega generates a clock, an inverter delays that clock so it is 90 degrees out of phase, and the two clocks are XORed, doubling clock output of the micro. It produces a very ugly square wave at 32 MHz – an error of 27% compared to the VGA spec. Somehow it still works.

With a hilariously out of spec clock, the rest of the project was pulled together from [Nick Gammon]’s VGA library, a 16×16 font set, and a project from [lft]. Video below.

Continue reading “640×480 VGA On An Arduino”

Liquid Nitrogen (finally) Makes An Arduino Project Cool

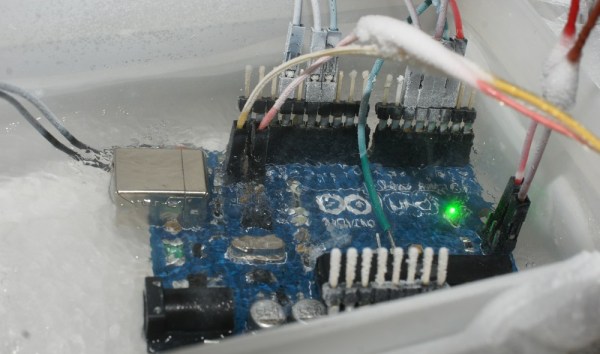
At $1.5 a liter in Moscow, [Michail] couldn’t resist buying some liquid nitrogen for himself. He thought that because Arduinos were quite popular among geeks, he’d try to overclock one while bringing its temperature down to -196°C/-320°F.

To check the ATmega was still working correctly, [Michail] designed several stability tests: SRAM read/write, flash read, arithmetic math and program flow tests (code with some conditionals). He used a standard HD44780 LCD to view the tests results but also an LED, blinking the number of the test it would have failed. The Arduino was externally clocked by a TTL-logic based square signal generator he designed, which can produce a clock between 16 and 100MHz. It turns out that you can run an Arduino at 65.3MHz when it is cooled with liquid nitrogen!

[Michail]’s article also explains what happens to the different on-board components when cooled with LN2: electrolytic capacitors becomes virtually non-existent, X7R capacitors’ impedance drop by 2/3, silicon diodes voltage drop increase by 50% and LED’s colors change. Check out the video below:

Continue reading “Liquid Nitrogen (finally) Makes An Arduino Project Cool”

Overclocking Microcontrollers

We’re all familiar with overclocking desktop computers; a wonderful introduction to thermal design power and the necessities of a good CPU cooler. [Marcelo] wanted to see how far he could overclock a microcontroller – in this case an ATMega328 – and ended up with a microcontroller designed for 20 MHz running at 30 MHz.

To verify that his uC could run at higher clock speeds, [Marcelo] began his experiments by uploading a piece of code that toggled a few pins as fast as possible. He needed to upload this code with a common 16 MHz crystal – AVRDude simply won’t work when a chip is clocked at higher speeds.

After successfully demonstrating his microcontroller will turn pins on and off at 30 MHz, [Marcelo] wanted to see if he could do something useful. By editing a single setting in his Arduino boards.txt file., [Marcelo] was able to have his overclocked microcontroller read and reply to characters sent over a serial connection. It worked, demonstrating an overclocked microcontroller could be useful in some situations.

As for what [Marcelo] plans to do with his faster microcontroller, he’s thinking of improving a ATMega-powered VGA color generator. A higher clock speed means he can push more pixels out to a VGA monitor.

Update: Foundation PC Cooling

coolupdate

[gigs], whose foundation-based PC cooling project we covered earlier, has posted his initial test results. There was a large debate going back and forth in the comments as to whether or not this would work, and hopefully this should clear most of it up. He used a 150W fish tank heater to simulated his system’s heat output, and used a quiet fish tank pump to keep the water flowing. Over 8 hours, he was able to maintain a constant temperature 16° C (61° F). While not quite frigid, this would definitely provide ample cooling for normal operation with some headroom for overclocking.

Chart of results after the jump.

[thanks to gigs for getting back with real data so soon]

Continue reading “Update: Foundation PC Cooling”