Put A Little Pigeon In Your Next Clock Project

If you’re anything like us, you’ve probably wondered why gear teeth are shaped the way they’re shaped. But we’ll go out on a limb and say you’ve never wondered why gear teeth aren’t shaped like pigeons, and what a clock that’s not quite a clock based around them would look like.

If this sounds like it has [Uri Tuchman] written all over it, give yourself a cookie. [Uri] has a thing for pigeons, and they make an appearance in nearly all his whimsical builds, from his ink-dipping machine to his intricately engraved metal mouse. For this build, pigeons are transformed into the teeth of a large, ornate wheel, cut from brass using an impressive Friedrich Deckel pantograph engraver. To put the pigeon wheel to work, [Uri] built an escapement and a somewhat crooked pendulum, plus a drive weight and dial. It’s almost a clock, but not quite, since it doesn’t measure time in any familiar units, and the dial has a leg rather than hands — classic [Uri].

It may not be [Clickspring]-level stuff, but it’s still a lovely piece of work, and instructive to boot. The way [Uri] figured out the profile for the meshing teeth by looking at the negative space swept out by the pigeon profiles was pretty sweet. Plus, pigeons.

Continue reading “Put A Little Pigeon In Your Next Clock Project”

Exhaust Fan-Equipped Reflow Oven Cools PCBs Quickly

With reflow soldering, sometimes close is good enough. At the end of the day, the home gamer really just needs a hot plate or an old toaster oven and a calibrated Mark I eyeball to get decent results. This exhaust fan-equipped reflow oven is an attempt to take control of what’s perhaps the more challenging part of the reflow thermal cycle — the cool down.

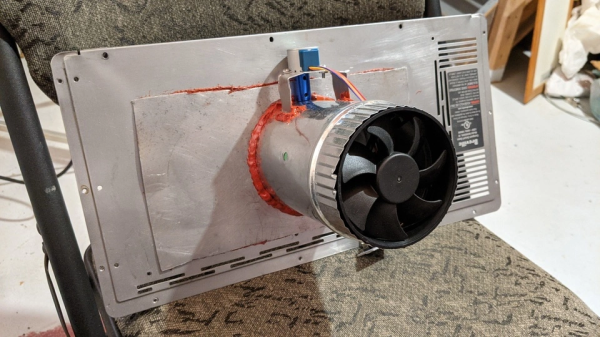
No fan of the seat-of-the-pants school of reflow soldering, [Nabil Tewolde] started with a cast-off toaster oven for what was hoped to be a more precise reflow oven. The requisite temperature sensors and solid-state relays were added, along with a Raspberry Pi Zero W and a small LCD display. Adding the cooling assist started by cutting a gaping hole cut in the rear wall of the oven, which was then filled with a short stretch of HVAC duct and a stepper-controlled damper. The far end of the duct was fitted with a PC cooling fan; while it seems sketchy to use a plastic fan to eject hot air from the oven, [Nabil] says the exhaust isn’t really that hot by the time it gets to the fan. At the end of the reflow phase of the thermal profile, the damper opens and the fan kicks on, rapidly cooling the oven’s interior.

Unfortunately, [Nabil] still needs to crack open the oven door to get decent airflow; seems like another damper to admit fresh air would help with that. That would complicate things a bit, but it still wouldn’t be as over-the-top as some reflow builds we’ve seen. Then again, that calibrated eyeball thing can work pretty well too, even without a toaster oven.

Continue reading “Exhaust Fan-Equipped Reflow Oven Cools PCBs Quickly”

2D-Scanner Records Surfboard Profiles For Posterity

[Ryan Schenk] had a problem: he built the perfect surfboard. Normally that wouldn’t present a problem, but in this case, it did because [Ryan] had no idea how he carved the gentle curves on the bottom of the board. So he built this homebrew 2D-scanner to make the job of replicating his hand-carved board a bit easier.

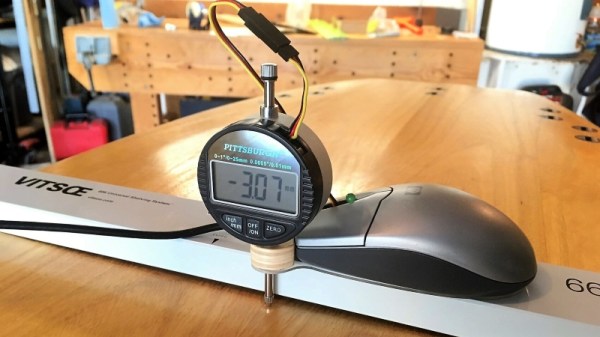
Dubbed the Scanbot 69420 – interpretation of the number is left as an exercise for the reader, my dude – the scanner is pretty simple. It’s just an old mouse carrying a digital dial indicator from Harbor Freight. The mouse was gutted, with even the original ball replaced by an RC plane wheel. The optical encoder and buttons were hooked to an Arduino, as was the serial output of the dial indicator. The Arduino consolidates the data from both sensors and sends a stream of X- and Z-axis coordinates up the USB cable as the rig slides across the board on a straightedge. On the PC side, a Node.js program turns the raw data into a vector drawing that represents the profile of the board at that point. Curves are captured at various points along the length of the board, resulting in a series of curves that can be used to replicate the board.

Yes, this could have been done with a straightedge, a ruler, and a pencil and paper – or perhaps with a hacked set of calipers – but that wouldn’t be nearly as much fun. And we can certainly see applications for this far beyond the surfboard shop.