2D-Scanner Records Surfboard Profiles For Posterity

[Ryan Schenk] had a problem: he built the perfect surfboard. Normally that wouldn’t present a problem, but in this case, it did because [Ryan] had no idea how he carved the gentle curves on the bottom of the board. So he built this homebrew 2D-scanner to make the job of replicating his hand-carved board a bit easier.

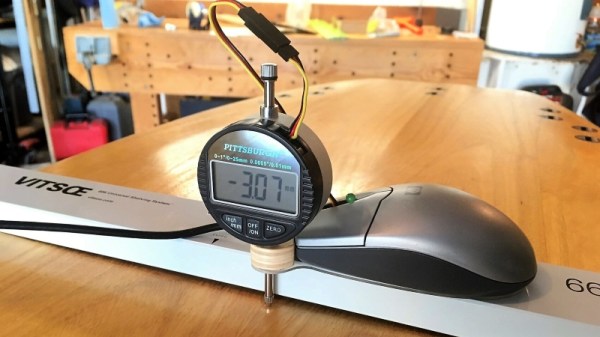
Dubbed the Scanbot 69420 – interpretation of the number is left as an exercise for the reader, my dude – the scanner is pretty simple. It’s just an old mouse carrying a digital dial indicator from Harbor Freight. The mouse was gutted, with even the original ball replaced by an RC plane wheel. The optical encoder and buttons were hooked to an Arduino, as was the serial output of the dial indicator. The Arduino consolidates the data from both sensors and sends a stream of X- and Z-axis coordinates up the USB cable as the rig slides across the board on a straightedge. On the PC side, a Node.js program turns the raw data into a vector drawing that represents the profile of the board at that point. Curves are captured at various points along the length of the board, resulting in a series of curves that can be used to replicate the board.

Yes, this could have been done with a straightedge, a ruler, and a pencil and paper – or perhaps with a hacked set of calipers – but that wouldn’t be nearly as much fun. And we can certainly see applications for this far beyond the surfboard shop.

Professional Audio On An ESP32

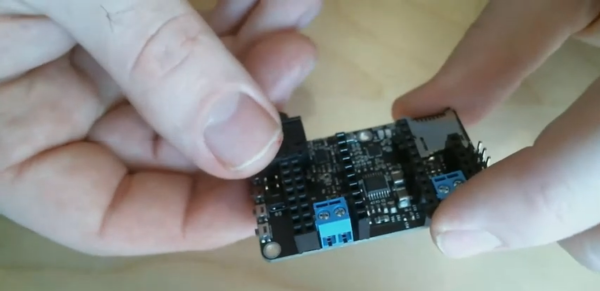
Audiophiles have worked diligently to alert the rest of the world to products with superior sound quality, and to warn us away from expensive gimmicks that have middling features at best. Unfortunately, the downside of most high quality audio equipment is the sticker price. But with some soldering skills and a bit of hardware, you can build your own professional-level audio equipment around an ESP32 and impress almost any dedicated audiophile.

The list of features the tiny picoAUDIO board packs is impressive, starting with a 3.7 watt stereo amplifier and a second dedicated headphone amplifier. It also has all of the I/O you would expect something based on an ESP32 to have, such as I2S stereo DAC, an I2S microphone input, I2C GPIO extenders and, of course, a built-in MicroSD card reader. The audio quality is impressive too, and the project page has some MP3 files of audio recorded using this device that are worth listening to.

Whether you want the highest sound quality for your headphones while you listen to music, or you need a pocket-sized audio recording device, this might be the way to go. The project files are all available so you can build this from the ground up as well. Once you have that knocked out, you can move on to building your own speakers.

Continue reading “Professional Audio On An ESP32”

Hackaday Links Column Banner

Hackaday Links: October 6, 2019

“If you or someone you love has been exposed to questionable quality electrolytic capacitors, you could be entitled to financial compensation.” Perhaps that’s not exactly the pitch behind this class action lawsuit against capacitor manufacturers, but it might as well be. The suit claims that the defendants, a group of capacitor manufacturers that includes Nichicon, Matsuo, ELNA, and Panasonic, “engaged in an unlawful conspiracy to fix, raise, maintain, or stabilize the prices of Capacitors.” Translation: if you bought capacitors between 2002 and 2014 from a distributor, you paid too much for them. The suit aims to recover a bunch of money from the defendants and divide it up between all the class members, so make sure you go back through all your receipts from Mouser and DigiKey over the last 17 years so you can file a claim that could be worth several dozen cents.

When are people going to learn that posting pictures of their illegal activities online is an Official Bad Idea? One SpaceX fan earned a night in jail after posting selfies he took with Starhopper, the SpaceX test article currently residing at Elon Musk’s would-be spaceport at Boca Chica, Texas. JB Wagoner, a SpaceX super-fan, made the pilgrimage from California to Texas — in his Tesla of course — to see the recent Starship Mark 1 unveiling, and decided to take a side trip to see the Starhopper. He parked at a beach, climbed a dune, and was able to walk right up to Starhopper and go selfie-crazy. After posting the pictures on Facebook, he was arrested, interviewed by Homeland Security, charged with criminal trespass, and thrown in a cell overnight. Wagoner has since been bonded out, but the charges might not stick, since Texas trespassing law requires clear signage or verbal notification of trespass, neither of which Wagoner encountered. SpaceX had even let the fence between the beach and the Starhopper collapse, so Wagoner seems to have had no way of knowing he was trespassing. Still, posting the pictures online was probably asking for trouble.

As satire and dark comedy, the 1987 cyberpunk classic RoboCop can’t be beat. But it also managed to accurately foreshadow a lot of what was to come in the world in terms of technology. No, we don’t have cyborg law enforcement — yet — but we do have something predicted by one throwaway scene: robotic realtors. In the movie, kiosks were set up around Murphy’s old house to extol the various virtues of living there, which ended up triggering the cyborg and starting the film’s climactic rampage. The real-life robotic realtor is a little more flexible, more like a telepresence robot — described aptly as “a Segway with an iPad on top.” The robotic realtor is not autonomous; it only lets a remote realtor interact with potential homebuyers without having to travel to multiple homes. It seems a little gimmicky to us, but the robots are reported to have made 25 sales in their first year on the job.

We’ve been seeing a lot of cheap resin printers these days, enough to make us want to jump into the market and start playing with them. But the cheap ones are all cheap for the same reason — they’re so dang small! They all use LCD screens from phones to mask off the UV light used to cure the resin, and the resulting print volume is tiny. Clem Mayer from MayerMakes has bigger ideas, though: he wants to make a giant resin printer using an LCD monitor as the mask. It’s not as simple as using a bigger screen, though; the film used between the screen and the resin, a fluoropolymer film called FEP, gets deformed when used on larger screens. So Clem is looking at a new built-plate interface that floats the resin on a layer of denser, immiscible liquid. It’s an interesting idea that is still clearly in the proof-of-concept phase, but we look forward to seeing what progress Clem makes.

Soldering Your Own Soldering Iron

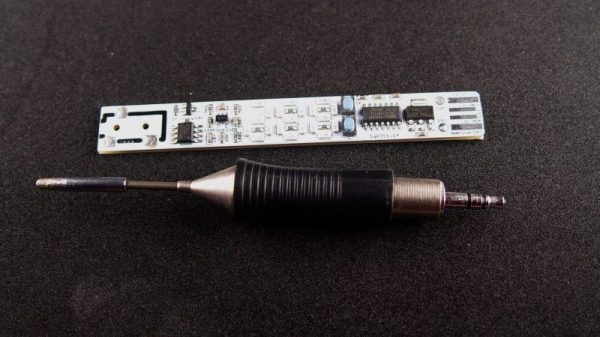
A device that even DIY enthusiasts don’t usually think to DIY is the humble soldering iron. Yet, that’s exactly what one Hackaday.io user did by building a USB-powered soldering pen with better performance than a $5 Chinese soldering pen.

The project draws inspiration from another Weller RT tip-based soldering pen by [vlk], although this project has a simpler display than an OLED. Slovakia-based maker [bobricius] was inspired by the DiXi ATSAMD11C14-based development board. The project uses the same 32-bit ATMEL ARM microcontroller with a USB bootloader, which makes updating the firmware a lot easier.

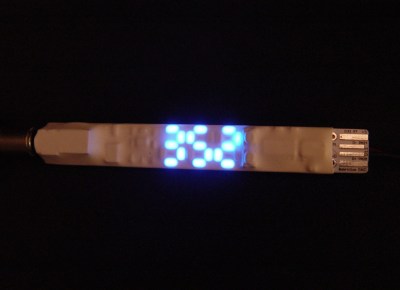
Two buttons control the heat (+/-) and the jack for the Weller RT soldering tip controls the power out with PWM. For the display, 20 Charlieplexed 3014 LEDs are used to show the temperature from 0-399. The last missing LED is left out since 5 GPIO pins can only drive 20 LEDs.

Assuming that the main heating controls stay the same as [vlk]’s project, the pen uses a current sensor and heating controller for PID control of a heating module, which connects to the SMT connector for the Weller RT soldering iron tip. The temperature sensor uses a an op-amp for amplification of the signal from a type K thermocouple.

While there aren’t currently GERBER files for the PCB yet, the project is based on the open-source OLED display soldering pen project by [vlk], whose schematic for the device is published.

Continue reading “Soldering Your Own Soldering Iron”

A Modular Ecosystem That Evolved Around A Simple Diesel Engine

High volume commodity products are a foundation of hacking, we’ve built many projects around popular form factors like NEMA 17 stepper motors, 608 bearings, and 280 DC motors. Their high volume led to lower cost, which further increased popularity, and the cycle repeats. A similar thing happened to a style of single-cylinder diesel engine in China, and [Jalopnik] takes us through an exploration of these “Tuo La Ji” (tractor) machines.

Like many popular standards, circumstances elevated this style of engine to become more popular than its peers. Judging from the pictures, the idea is similar to NEMA 17 in that the core essence is a bolt pattern and an output shaft. Different manufacturers offer various capabilities within this space, and a wild assortment of machinery evolved to take advantage of this class of power source.

It starts with a set of wheels and handlebars to create a walk-behind farm tractor, something pretty common around the world. But this particular ecosystem grew far beyond that to many other applications, including full sized trucks with off-road capability that would embarrass most of the genteel SUVs cruising our roads today. They may not be fast, but they only needed to be faster and have longer endurance than beasts of burden to be effective as “a horseless horse”.

Due to factors such as poor crash safety, absence of diesel emission controls, and affordability of more powerful (and faster!) vehicles, these machines are a dying breed. But that won’t change the fact there was a fantastic amount of mechanical hacking ingenuity that had sprung up around this versatile engine building simple and effective machines. Their creativity drew from the same well that fed into these Indonesian Vespas.

Photo by [Brian Holsclaw] CC BY-ND 2.0

Building A Cyberpunk Multi-Touch Input Device

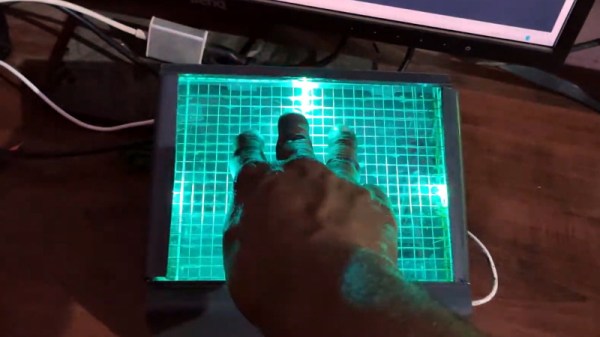
This multi-touch touch panel built by [thiagesh D] might look like it came from the retro-futuristic worlds of Blade Runner or Alien, but thanks to a detailed build video and a fairly short list of required parts, it could be your next weekend project.

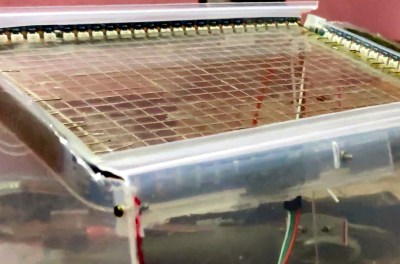
The build starts with a sheet of acrylic, which has a grid pattern etched into it using nothing more exotic than a knife and a ruler. Though if you do have access to some kind of CNC router, this would be a perfect time to break it out. Bare wires are then laid inside the grooves, secured with a healthy application of CA glue, and soldered together to make one large conductive array. This is attached to a capacitive sensor module so it’ll fire off whenever somebody puts a finger on the plastic.

With RGB LED strips added to the edges, you could actually stop here and have yourself a very cool looking illuminated touch sensitive panel. But ultimately, it would just be a glorified button. There’s plenty of interesting applications for such a gadget, but it’s not going to be terribly useful attached to your computer.

To turn this into a viable input device, [thiagesh D] is using a Raspberry Pi and its camera module to track the number and position of fingertips from the other side of the acrylic with Python and OpenCV. His code will even pick up on specific gestures, like a three finger drag which changes the colors of the LEDs accordingly in the video below. The camera’s field of view unfortunately means the box the panel gets mounted to has to be fairly deep, but if recessed into the surface of a desk, we think it could look incredible.

Custom multi-touch panels have been a favorite project of hackers for years now, and we’ve got examples going all the way back to the old black and white days. But larger and more modern incarnations like this one have the potential to change how we interface with technology on a daily basis.

Continue reading “Building A Cyberpunk Multi-Touch Input Device”

DIY Clapper Lets You Pick Your Components

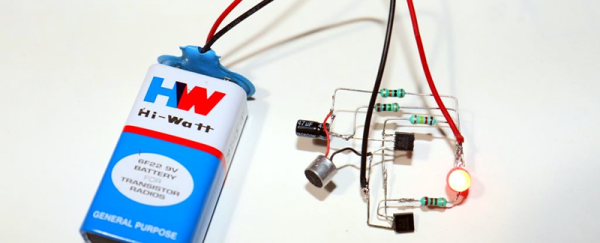
One thing that always means the end of the year is close is the reappearance of TV ads for “The Clapper.” After all, who needs home automation when you can clap on and clap off? While we’re partial to our usual home automation solutions, [Utsource123] shows us that building a clapper can be a fun and easy project using several similar circuits. One with a few transistors and another one with a 555 because, after all, what can’t a 555 do?

Of course, these circuits usually have a microphone. We were trying to think of how you could make a sound-sensitive element out of common parts. After all, you don’t care about the fidelity of the microphone pickup, just that it hears a loud noise. The circuits are about what you’d expect. The transistor version uses one to amplify the microphone and another to switch on the LED. You’d need a bit more to trigger a relay. The 555 uses an even simpler preamp transistor as a trigger.

While we aren’t bowled over with the idea of a clapper, we imagine these circuits aren’t far removed from the ones you buy in stores. For about $16 you also get enough switching to handle a simple AC load, though. Maybe Alexa and Google should allow making clapping a wake up word?

This is sure simpler than the last clapper clone we saw. Then there’s the deluxe DIY version.