Building A Better Game Boy With A Pi

The most collectible Game Boy, by far, would be the Game Boy Micro. This tiny Game Boy is small enough to lose in your pocket. It can only play Game Boy Advance games, the screen is tiny, but just look at the prices on eBay: it’s one of the few bits of consumer electronics that could be seen as an investment in retrospect.

The popularity of the Game Boy Micro, the ability for the Raspberry Pi to emulate old game consoles, and the introduction of the Raspberry Pi Zero could only mean one thing. It’s the PiGrrl Zero, a modern handheld to play all your retro games.

The design goals for the PiGRRL Zero were simple enough: a 2.2 inch 320×240 display, a d-pad, four buttons on the face and two shoulder buttons. There’s a big battery, audio output, and a 3D printed case. This would be somewhat unremarkable if it weren’t for the PCB designed for PiGRRL Zero. It’s designed to be soldered directly onto the Raspberry Pi Zero, taking advantage of the mostly component-free back side of this tiny single board computer.

With this PCB, the Pi Zero is turned into a tiny battery-powered computer running emulations of all the classics. NES, SNES, Sega, and of course Game Boy Advance games are readily playable on this devices, and for a price that’s a fair bit lower than what a mint condition Game Boy Micro goes for. Our judges thought it was cool enough to be one of the winners of the Pi Zero Contest. Check it out!


Raspberry_Pi_LogoSmall

The Raspberry Pi Zero contest is presented by Hackaday and Adafruit. Prizes include Raspberry Pi Zeros from Adafruit and gift cards to The Hackaday Store!
See All the Entries

Mobile Text Reader With OCR And Text To Speech

There are devices out there that will magnify text using fancy cameras and displays, devices that will convert these to Braille, and text-to-speech software has been around for thirty years. For his entry into our Raspberry Pi Zero contest, [Markus] decided to combine all these ideas into a simple device that will turn the printed word into speech.

The impetus for [Markus]’ project came to him in the form of a group of blind computer science  students. These students used a specialized program that used specialized hardware and software such as mobile Braille terminals, OCR, and oral exams that allowed these students to study the same thing as everyone else. [Markus] wanted to produce something similar, using simple text-to-speech software instead of a complicated Braille display.

The physical design of [Markus]’ project is uniquely functional – a hand-held device with a camera up front, a Pi in the middle, and a speaker and headphone jack on the back. The hand grip includes a large battery and a trigger for telling the Pi to read a few words aloud.

The software is built around the SnapPicam and includes a lot of the functionality already needed. OCR is largely a solved problem with Tesseract, and text-to-speech is easy with Festival.

Although [Markus] is just plugging a few existing software modules together, he’s come up with a device that is certainly unique and could be exceptionally useful to anyone with a vision impairment.


Raspberry_Pi_LogoSmall

The Raspberry Pi Zero contest is presented by Hackaday and Adafruit. Prizes include Raspberry Pi Zeros from Adafruit and gift cards to The Hackaday Store!
See All the Entries

Raspberry Pi Zero Contest Grand Prize Winners!

The Raspberry Pi Zero Contest presented by Adafruit and Hackaday came to a close last week, as the clock struck 11:59 am on Sunday, March 13, 2016. Since then our team of judges has been working to pick the top three entries. It was a hard job sorting through nearly 150 amazing creations.  In the end though, the judges were able to pick three grand prize winners. Each winner will receive a $100 gift card to The Hackaday Store.  So let’s get to the winners!

[JohSchneider] and [Markus Dieterle] both won Pi Zero boards and went on to win $100 gift certificates. [shlonkin] didn’t win a Pi Zero, but persevered and continued working on the classroom music teaching aid even without a Zero board. The top winners aren’t the only ones who are doing well. Everyone who entered has a head start on a great project for The 2016 Hackaday Prize.

I’d like to thank Hackaday’s own [Dan Maloney], [Kristina Panos], [Sophi Kravitz] and [Brian Benchoff] who joined me to judge the contest. The entire Hackaday staff is indebted to [Limor Fried] and [Phil Torrone] over at  Adafruit for coming up with 10 live videos, and providing 10 hard to find Pi Zero boards for our winners. The biggest thanks go to the entrants. If I could send a prize out to each and every one of you, I would!

Better Sailing Computers With Wearable Electronics

Sailing – specifically small boats in regattas – is a hobby that requires a lot of skill. Like any hobby, there are devices and electronics to make the hobby easier. For sailing, its tactical sailing compasses and GPS units. Remember, you probably don’t want to sail in a straight line, and that means offloading decades of experience to electronics. Instead of spending hundreds of dollars on a sailing computer, [Brook] thought it would be a better idea to build his own robot sailor from a Raspberry Pi and a Pebble smartwatch.

The sensors required for a sailing computer are par for the course – a Ublox GPS unit, a magnetometer, an acceleratometer, and a gyro. Being used on a sailboat also means there’s an anemometer thrown into the mix. These parts are stuffed into a waterproof polycarbonate field box with a USB power bank battery and a Bluetooth USB dongle.

With the hardware in place, it was time to write the software. The UI for this device is a Pebble smartwatch, which means there was a lot of futzing around with C# and Mono. This device is also a sailing data recorder, meaning [Brook] can integrate this project with VisualSail, a desktop application he wrote a few years ago to create 3D replays of sailing races using GPS data.


Raspberry_Pi_LogoSmall

The Raspberry Pi Zero contest is presented by Hackaday and Adafruit. Prizes include Raspberry Pi Zeros from Adafruit and gift cards to The Hackaday Store!
See All the Entries

Making Dumb Robots Evolve

Evolution is a fact of life, except in Kansas. It is the defining characteristic of life itself, but that doesn’t mean a stupid robot can’t evolve. For his entry into the Hackaday Pi Zero contest, [diemastermonkey] is doing just that: evolution for robots built around microcontrollers and a Raspberry Pi.

[diemastermonkey]’s project is a physical extension to genetic algorithms. Just like DNA and proteins have no idea what they’re actually doing, microcontrollers don’t either. Instead of randomly switching up base pairs and amino acids, [diemastermonkey]’s project makes random connections pins depending on the values of those pins.

The potential of these crappy, randomly programmed robots is only as good as the fitness function, and so far [diemastermonkey] has seen some surprising success. When putting these algorithms into a microcontroller connected to a tilting table mechanism and a PIR sensor, the robot eventually settled on a bit of code that would keep a ball in motion. You can check out the video of that below.


Raspberry_Pi_LogoSmall

The Raspberry Pi Zero contest is presented by Hackaday and Adafruit. Prizes include Raspberry Pi Zeros from Adafruit and gift cards to The Hackaday Store!
See All the Entries

Continue reading “Making Dumb Robots Evolve”

A $5 Graphics Card For Homebrew Computers

While not very popular, building a homebrew computer can be a fun and rewarding process. Most of the time, though, the video capabilities of these computers is as bare bones as it can get – running headless, connected to a terminal. While this is an accurate reproduction of the homebrew computers of the 1970s and 80s, there’s a lot to be said about a DIY computer with an HDMI-out port.

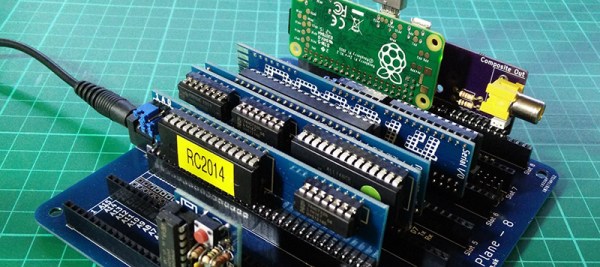
[spencer] built a Z-80-based homebrew computer a few years ago, and while connecting it to a terminal was sufficient, it was a build that could use a little more pizzazz. How did he manage to stuff a terminal in a tiny project box? With everyone’s favorite five dollar computer, the Raspberry Pi Zero.

The computer [spencer] built already had serial inputs, outputs, power, and ground rails – basically, a serial port. The Raspberry Pi also has TX and RX pins available on the 40-pin header, and with a stupidly simple board that [spencer] whipped up in KiCad, he could plug a Pi into the backplane of his homebrew computer. A few setup scripts, and a few seconds after turning this computer on [spencer] could mash a keyboard and wail away on some old school BASIC.

This isn’t a use case that is the sole domain of the Pi Zero. A Parallax Propeller chip makes for a great video terminal with inputs for PS/2 keyboards and mice. A largish AVR, with the requisite NTSC video library, also makes for a great video interface for a homebrew computer. The Pi Zero is only five dollars, though.


Raspberry_Pi_LogoSmall

The Raspberry Pi Zero contest is presented by Hackaday and Adafruit. Prizes include Raspberry Pi Zeros from Adafruit and gift cards to The Hackaday Store!
See All the Entries

A Pi Powered Recording Studio

In the mid-90s, you recorded your band’s demo on a Tascam cassette tape deck. These surprisingly cheap four-track portable studios were just low tech enough to lend an air of authenticity to a band that calls itself, ‘something like Pearl Jam, but with a piano’. These tape decks disappeared a decade later, just like your dreams of being a rock star, replaced with portable digital recording studios.

The Raspberry Pi exists, the Linux audio stack is in much better shape than it was ten years ago, and now it’s possible to build your own standalone recording studio. That’s exactly what [Daniel] is doing for our Raspberry Pi Zero contest, and somewhat predictably he’s calling it the piStudio.

Although the technology has moved from cassette tapes to CompactFlash cards to hard drives, the design of these four-track mini recording studios hasn’t really changed since their introduction in the 1980s. There are four channels, each with a fader, balance, EQ, and a line in and XLR jack. There are master controls, a few VU meters, and if the technology is digital, a pair of MIDI jacks. Since [Daniel] is using a Raspberry Pi for this project, he threw in an LCD for a great user interface.

As with all digital recorders, the money is in the analog to digital converters. [Daniel] is using a 24-bit, 216kHz, four-channel chip, Texas Instruments’ PCM4204. That’s more than enough to confuse the ears of an audiophile, although that much data will require a hard drive. Good thing there will be SATA.

Although you can buy an eight-channel solid state recorder for a few hundred dollars – and [Daniel] will assuredly put more than that into this project, it’s a great application of a ubiquitous Linux computer for a device that’s very, very useful.


Raspberry_Pi_LogoSmall

The Raspberry Pi Zero contest is presented by Hackaday and Adafruit. Prizes include Raspberry Pi Zeros from Adafruit and gift cards to The Hackaday Store!
See All the Entries || Enter Your Project Now!