A Guide To Running Your First Docker Container

While most of us have likely spun up a virtual machine (VM) for one reason or another, venturing into the world of containerization with software like Docker is a little trickier. While the tools Docker provides are powerful, maintain many of the benefits of virtualization, and don’t use as many system resources as a VM, it can be harder to get the hang of setting up and maintaining containers than it generally is to run a few virtual machines. If you’ve been hesitant to try it out, this guide to getting a Docker container up and running is worth a look.

The guide goes over the basics of how Docker works to share system resources between containers, including some discussion on the difference between images and containers, where containers can store files on the host system, and how they use networking resources. From there the guide touches on installing Docker within a Debian Linux system. But where it really shines is demonstrating how to use Docker Compose to configure a container and get it running. Docker Compose is a file that configures a number of containers and their options, making it easy to deploy those containers to other machines fairly straightforward, and understanding it is key to making your experience learning Docker a smooth one.

While the guide goes through setting up a self-hosted document management program called Paperless, it’s pretty easy to expand this to other services you might want to host on your own as well. For example, the DNS-level ad-blocking software Pi-Hole which is generally run on a Raspberry Pi can be containerized and run on a computer or server you might already have in your home, freeing up your Pi to do other things. And although it’s a little more involved you can always build your own containers too as our own [Ben James] discussed back in 2018.

Modeling Network Latency

The selfhosting community is an interesting and useful part of the Internet dedicated to removing one’s own services and data from the cloud and hosting it on their own servers, often on hardware that can be physically touched. With that kind of network usage, it’s not uncommon for people to build their own routers, firewalls, and other network support systems from the ground up. And, if you go deep enough, maybe even a home lab dedicated to testing and improving the network’s various layers. This piece of software helps simulate network latency to more accurately assess quality of service, performance, and the optimization of one one’s own networks.

The tool, called Speedbump, allows a network administer to quickly build a test network where characteristics of the network such as base latency and wave shape and size can be set up. From there, a TCP proxy sends the network traffic through the virtual network, adding in a set amount of delay to anything traveling on the network. It can be installed (or built from source) on an existing installation or used from within a Docker terminal, so there are plenty of options depending on preference. It’s also available as a library for any programs written in Go.

While this certainly has applications for home labs where self-hosting services is done at a high level, this could have professional applications as well. For troubleshooting simpler network issues we’d always recommend this tool which allows a more comprehensive network test than the standard “ping” command, and if you haven’t heard of selfhosting before it’s probably time to read this primer on it and build a hobby web server from scratch.

Self-Hosted Chatbot Focuses On Privacy

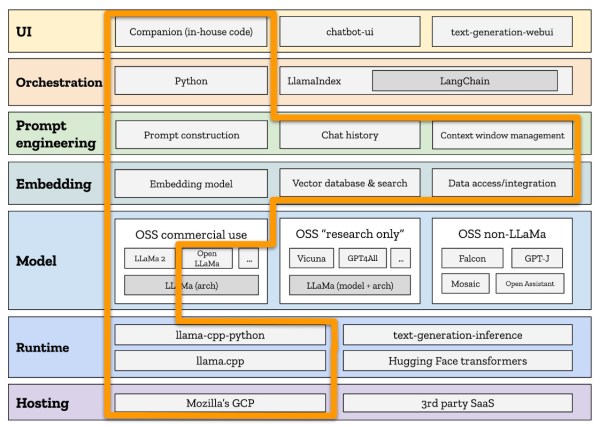
Large language models (LLMs) have been all the rage lately, assisting from all kinds of tasks from programming to devising Excel formulas to shortcutting school work. They’re also relatively easy to access for the most part, but as the old saying goes, if something on the Internet is free the real product is you (and your data). Luckily there are ways of hosting LLMs on your own to avoid your personal data getting harvested, as well as taking advantage of open-source solutions, but building these systems takes a little bit of effort. [Stephen] and a team from Mozilla walk us through this process and show us a number of options currently available.

Working from the ground up, the group first decides on hosting, which (unsurprisingly) involves using Mozilla hosting services. The choice of runtime environment was a little bit more challenging. The project was time constrained, so they looked at two options here: Hugging Face and llama.cpp. Eventually deciding to move forward with llama.cpp largely due to its ability to run on more consumer-oriented hardware (especially Apple silicon) and the fact that it doesn’t need a powerful GPU, the next task was to choose the model. Settling on the LLaMa model that Facebook recently open-sourced, this model works well with the runtime environment and is essentially the only one that does.

From there, the team at Mozilla wanted to make sure their chat bot would be able to provide other Mozilla employees with information more readily pertinent to their jobs, so they trained their model with some internal Mozilla data as well as other more generic information. This doesn’t mean the job is done, though, there are a number of other factors that went in to designing this system before it was finally complete. Even then, since they built this in a week it’s not perfect; there are some issues with non-permissive licensing of some of the components and many of the design choices may not have been ideal. It’s impressive what’s out there if you’re hosting your own system, though, and while this might be a little more advanced for a self-hosted project, take a look at some other more beginner-friendly projects you can try if you’re just starting out on the self-hosted path.

Fight Disease With A Raspberry Pi

Despite the best efforts of scientists around the world, the current global pandemic continues onward. But even if you aren’t working on a new vaccine or trying to curb the virus with some other seemingly miraculous technology, there are a few other ways to help prevent the spread of the virus. By now we all know of ways to do that physically, but now thanks to [James Devine] and a team at CERN we can also model virus exposure directly on our own self-hosted Raspberry Pis.

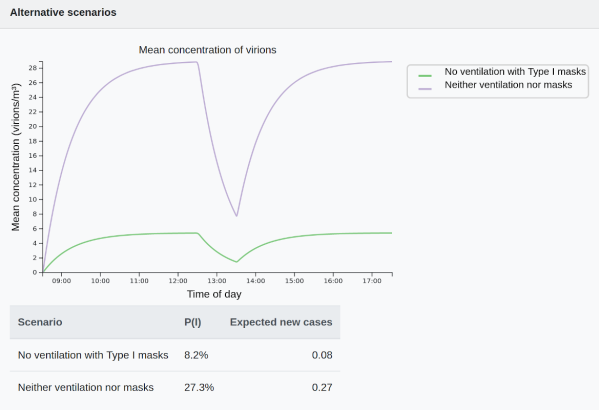
The program, called the Covid-19 Airborne Risk Assessment (CARA), is able to take in a number of metrics about the size and shape of an area, the number of countermeasures already in place, and plenty of other information in order to provide a computer-generated model of the number of virus particles predicted as a function of time. It can run on a number of different Pi hardware although [James] recommends using the Pi 4 as the model does take up a significant amount of computer resources. Of course, this only generates statistical likelihoods of virus transmission but it does help get a more accurate understanding of specific situations.

For more information on how all of this works, the group at CERN also released a paper about their model. One of the goals of this project is that it is freely available and runs on relatively inexpensive hardware, so hopefully plenty of people around the world are able to easily run it to further develop understanding of how the virus spreads. For other ways of using your own computing power to help fight Covid, don’t forget about Folding@Home for using up all those extra CPU and GPU cycles.