Fight Disease With A Raspberry Pi

Despite the best efforts of scientists around the world, the current global pandemic continues onward. But even if you aren’t working on a new vaccine or trying to curb the virus with some other seemingly miraculous technology, there are a few other ways to help prevent the spread of the virus. By now we all know of ways to do that physically, but now thanks to [James Devine] and a team at CERN we can also model virus exposure directly on our own self-hosted Raspberry Pis.

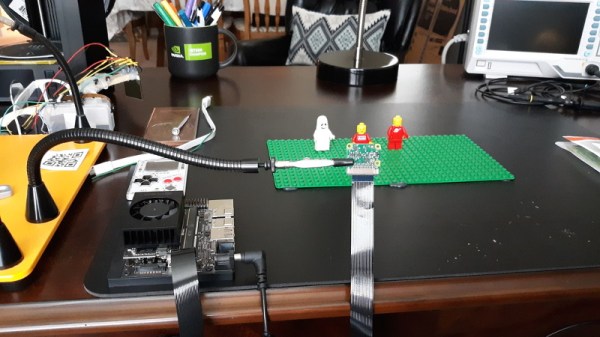
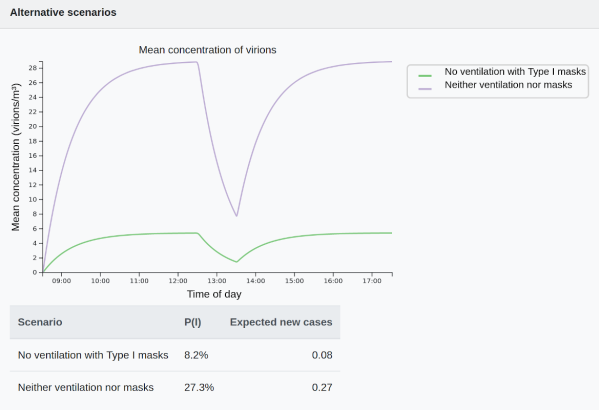
The program, called the Covid-19 Airborne Risk Assessment (CARA), is able to take in a number of metrics about the size and shape of an area, the number of countermeasures already in place, and plenty of other information in order to provide a computer-generated model of the number of virus particles predicted as a function of time. It can run on a number of different Pi hardware although [James] recommends using the Pi 4 as the model does take up a significant amount of computer resources. Of course, this only generates statistical likelihoods of virus transmission but it does help get a more accurate understanding of specific situations.

For more information on how all of this works, the group at CERN also released a paper about their model. One of the goals of this project is that it is freely available and runs on relatively inexpensive hardware, so hopefully plenty of people around the world are able to easily run it to further develop understanding of how the virus spreads. For other ways of using your own computing power to help fight Covid, don’t forget about Folding@Home for using up all those extra CPU and GPU cycles.

Broadband Across The Congo

If you live in much of the world today, high-speed Internet is a solved problem. But there are still places where getting connected presents unique challenges. Alphabet, the company that formed from Google, details their experience piping an optical network across the Congo. The project derived from an earlier program — project Loon — that used balloons to replace traditional infrastructure.

Laying cables along the twisting and turning river raises costs significantly, so a wireless approach makes sense. Connecting Brazzaville to Kinshasa using optical techniques isn’t perfect — fog, birds, and other obstructions don’t help. They still managed to pipe 700 terabytes of data in 20 days with over 99.9% reliability.

Continue reading “Broadband Across The Congo”

An AMD GPU plugged into an ATX PSU and Raspberry PI CM4

Raspberry Pi With Some Serious Graphical Muscle

[Jeff Geerling] routinely tinkers around with Raspberry Pi compute module, which unlike the regular RPi 4, includes a PCI-e lane. With some luck, he was able to obtain an AMD Radeon RX 6700 XT GPU card and decided to try and plug it into the Raspberry Pi 4 Compute Module.

While you likely wouldn’t be running games with such as setup, there are many kinds of unique and interesting compute-based workloads that can be offloaded onto a GPU. In a situation similar to putting a V8 on a lawnmower, the Raspberry Pi 4 pulls around 5-10 watts and the GPU can pull 230 watts. Unfortunately, the PCI-e slot on the IO board wasn’t designed with a power-hungry chip in mind, so [Jeff] brought in a full-blown ATX power supply to power the GPU. To avoid problems with differing ground planes, an adapter was fashioned for the Raspberry Pi to be powered from the PSU as well. Plugging in the card yielded promising results initially. In particular, Linux detected the card and correctly mapped the BARs (Base Address Register), which had been a problem in the past for him with other devices. A BAR allows a PCI device to map its memory into the CPU’s memory space and keep track of the base address of that mapped memory range.

AMD kindly provides Linux drivers for the kernel. [Jeff] walks through cross-compiling the kernel and has a nice docker container that quickly reproduces the built environment. There was a bug that prevented compilation with AMD drivers included, so he wasn’t able to get a fully built kernel. Since the video, he has been slowly wading through the issue in a fascinating thread on GitHub. Everything from running out of memory space for the Pi to PSP memory training for the GPU itself has been encountered.

The ever-expanding capabilities of the plucky little compute module are a wonderful thing to us here at Hackaday, as we saw it get NVMe boot earlier this year. We’re looking forward to the progress [Jeff] makes with GPUs. Video after the break.

Continue reading “Raspberry Pi With Some Serious Graphical Muscle”

Mastering Stop Motion Through Machine Learning

Stop motion animation is notoriously difficult to pull off well, in large part because it’s a mind-numbingly slow process. Each frame in the final video is a separate photograph, and for each one of those, the characters and props need to be moved the appropriate amount so that the final result looks smooth. You don’t even want to know how long Ben Wyatt spent working on Requiem for a Tuesday, though to be fair, it might still get done before the next Avatar.

But [Nick Bild] thinks his latest project might be able to improve on the classic technique with a dash of artificial intelligence provided by a Jetson Xavier NX. Basically, the Jetson watches the live feed from the camera, and using a hand pose detection model, waits until there’s no human hand in the frame. Once the coast is clear, it takes a shot and then goes back to waiting for the next hands-free opportunity. With the photographs being taken automatically, you’re free to focus on getting your characters moving around in a convincing way.

If it’s still not clicking for you, check out the video below. [Nick] first shows the raw unedited video, which primarily consists of him moving three LEGO figures around, and then the final product produced by his system. All the images of him fiddling with the scene have been automatically trimmed, leaving behind a short animated clip of the characters moving on their own.

Now don’t be fooled, it’s still going to take awhile. By our count, it took two solid minutes of moving around Minifigs to produce just a few seconds of animation. So while we can say its a quicker pace than with traditional stop motion production, it certainly isn’t fast.

Machine learning isn’t the only modern technology that can simplify stop motion production. We’ve seen a few examples of using 3D printed objects instead of manually-adjusted figures. It still takes a long time to print, and of course it eats up a ton of filament, but the mechanical precision of the printed scenes makes for a very clean final result.

Continue reading “Mastering Stop Motion Through Machine Learning”

Nissan Leaf Zooms By with 110KW power after Inverter swap and hack

Open Source Hot Rod Mod Gives More Power To EV Owners

Meet [Daniel Öster]. [Daniel] is a self-professed petrolhead. In other words, he’s a hot rodder who can’t leave well enough alone. Just because he’s driving a 2012 Nissan Leaf doesn’t mean he isn’t looking for a bit more kick. Having already upgraded the battery, [Daniel] turned his attention to upgrading the 80KW inverter. Not only was [Daniel] successful, but the work has been documented and the Open Source code made available on GitHub. Part of [Daniel]’s mission is to open up otherwise closed ecosystems and make EV hacking and repair approachable by mere mortals.

To get an extra 50hp, [Daniel] could have just swapped in the 110KW drivetrain from a 2018 or newer Leaf, but a less expensive route of swapping in only the 110KW inverter was chosen. By changing out just the inverter, the modification becomes more affordable for others to do. [Daniel] expertly documents how the new 110KW inverter has to be matched to the existing motor by setting a resolver correction value in the inverter.

Swapping Connectors for the new Inverter
Not for the faint of heart, the inverter swap requires changing connectors to a later style.

Cutting into the wiring harness of a vehicle that one is still making payments on is an exercise reserved for only the most dedicated modders, but a change in connectors between 2012 and 2018 made it necessary. The only tools needed were wire cutters, a soldering iron, heat shrink, and perhaps some liquid courage.

Although the hack was successful, no performance gains were had initially, because the CAN bus signal going to the inverter never told it to provide more than the original 80KW. A CAN bus Man In The Middle attack was done by adding a CAN bridge device that listens to traffic on the CAN bus and bends it to [Daniel]’s will. By multiplying the KW signal by 1.3, the 80KW signal becomes 110KW, and full Ludicrous Speed is achieved! Excellent gains in  0-100kph times are seen, but [Daniel] isn’t done. His next hack will be to put in a 160KW inverter for even more go-pedal madness.

Be sure to watch the introduction video below the break. You might also be interested in Nissan Leaf hacks we’ve featured previously such as retrofitting a fast charging port, salvaging batteries from wrecks, and partly resolving serious charging flaws.

Continue reading “Open Source Hot Rod Mod Gives More Power To EV Owners”

Hacking When It Counts: Surgery Fit To Save A Future King

When we picture the Medieval world, it conjures up images of darkness, privations, and sickness the likes of which are hard to imagine from our sanitized point of view. The 1400s, and indeed the entirety of history prior to the introduction of antibiotics in the 1940s, was a time when the merest scratch acquired in the business of everyday life could lead to an infection ending in a slow, painful death. Add in the challenges of war, where violent men wielding sharp things on a filthy field of combat, and it’s a wonder people survived at all.

But then as now, some people are luckier than others, and surviving what even today would likely be a fatal injury was not unknown, as one sixteen-year-old boy in 1403 would discover. It didn’t hurt that he was the son of the king of England, and when he earned an arrow in his face in combat, every effort would be made to save the prince and heir to the throne. It also helped that he had the good fortune to have a surgeon with the imagination to solve the problem, and the skill to build a tool to help.

Continue reading “Hacking When It Counts: Surgery Fit To Save A Future King”

A wall clock with exposed circuit boards

Drunk Wall Clock Uses Convoluted Circuits To Display Time

Here at Hackaday we can never get enough of odd clocks, and we’re delighted to see [Dan O’Shea]’s creation called the Wifi-Telnet-FPGA-NTSC Drunk Wall Clock. That mouthful is an accurate description of what it does: at the heart of the device is an ESP32 that uses WiFi to connect to a Raspberry Pi. It then telnets into the system, logs in, and requests the current time using the Linux date command. So far, so ordinary.

The “FPGA” part is where it gets weirder: the ESP32 is hooked up to a VGA1306 board. This is a little PCB with an FPGA that emulates an OLED display and outputs the image to a VGA connector. [Dan] could have simply hooked up a VGA display to this, but instead went for another layer of complexity by converting the VGA signal to something resembling composite video, using nothing more than three resistors. The resulting “NTSC” signal is then fed into a small TFT display that shows the time.

The clock got its “drunk” label because the process of repeatedly running the date command and parsing its output is slow and prone to hiccups, resulting in a display where the seconds advance in a somewhat unsteady manner. This fits well with the overall aesthetic of the clock, which consists of a heap of PCBs held together with cable ties and electrical tape. Mounted on a round panel of recycled wood, it makes a beautiful wall ornament for any hacker lab.

We love projects like this that accomplish a simple task in a convoluted way, and there’s no shortage of needlessly complicated clocks, whether physically drawing the time or using machine-learning data. But if you simply like your clocks with their electronics exposed, check out this free-form LED clock or this neat circuit sculpture clock.

Continue reading “Drunk Wall Clock Uses Convoluted Circuits To Display Time”