Pi Pico Calculates Water Usage

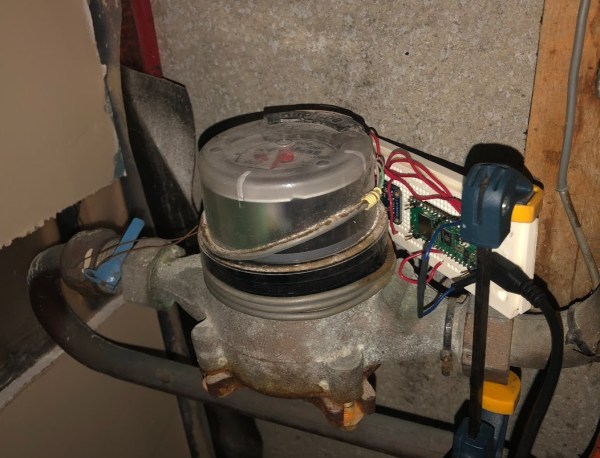
Modern WiFi-enabled microcontrollers have made it affordable and easy to monitor everything from local weather information to electricity usage with typically no more than a few dollars worth of hardware and a little bit of programming knowledge. Monitoring one’s own utility data can be a little bit more difficult without interfering with the metering equipment, but we have seen some clever ways of doing this over the years. The latest is this water meter monitoring device based on a Raspberry Pi Pico.

The clever thing here isn’t so much that it’s based on the tiniest of Raspberry Pis, but how it keeps track of the somewhat obscured water flow information coming from the meter. Using a magnetometer placed close to the meter, the device can sense the magnetic field created as water flows through the meter’s internal sensors. The magnetic field changes in a non-obvious way as water flows through it, so the program has to watch for specific peaks in the magnetic field. Each of these specific waveforms the magnetometer detects counts to 0.0657 liters of water, which is accurate for most purposes.

For interfacing with a utility meter, this is one of the more efficient and elegant hacks we’ve seen in a while. There have, of course, been other attempts to literally read the meter using web cams and computer vision software, but the configuration for these builds is much more complex than something like this. You can interface with plenty of utility meters other than water meters, too, regardless of age.

Abacus Synthesizer Really Adds Up

The abacus has been around since antiquity, and takes similar forms over the hundreds of cultures that have embraced it. It may be one of the first devices to be considered as having a “user interface” in the modern context — at least for simple arithmetic calculations. But using an abacus as the UI for a music synthesizer seems like something entirely new.

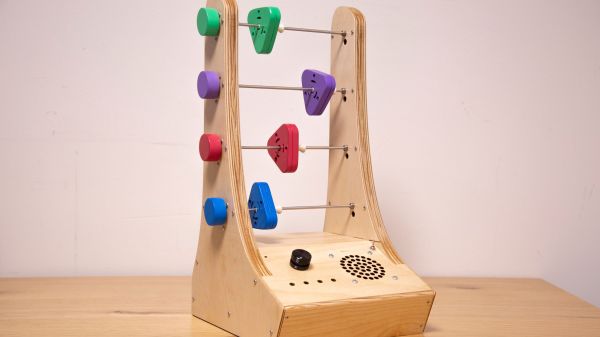
Part art concept project and part musical instrument, the “Abacusynth” by [Elias Jarzombek] is a way to bring a more visual and tactile experience to controlling a synth, as opposed to the usual knobs and switches. The control portion of the synth consists of four horizontal rods spanning two plywood uprights. Each rod corresponds to a voice of the polyphonic synth, and holds a lozenge-shaped spinner mounted on a low-friction bearing. Each spinner can be moved left and right on its rod, which controls the presence of that voice; spinning the slotted knob controls the modulation of the channel via photosensors in the uprights. Each rod has a knob on one side that activates an encoder to control each voice’s waveform and its harmonics.

In use, the synthesizer is a nice blend of electronic music and kinetic sculpture. The knobs seem to spin forever, so Abacusynth combines a little of the fidget spinner experience with the exploration of new sounds from the built-in speaker. The synth also has a MIDI interface, so it works and plays well with other instruments. The video below shows the hardware version of Abacusynth in action; there’s also a web-based emulation to try before you build.

Continue reading “Abacus Synthesizer Really Adds Up”

Testing Hardware With ASCII Waveforms

Testing software is — sometimes — easier than testing hardware. After all, you can always create test files and even fake user input before monitoring outputs using common tools. Hardware though, is a bit different. Sometimes it is hard to visualize exactly what’s happening. [Andrew Ray’s] answer? Produce simulated waveforms using ASCII text.

The process uses some custom tools written in OCaml, but the code is available for you on GitHub. The tool, called Hardcaml, allows you to write test benches for hardware — not a new idea for FPGA developers. The output, however, is an ASCII text waveform and common software development tools can check that waveform against the expected output.

Continue reading “Testing Hardware With ASCII Waveforms”

Daphne Oram And The Birth Of Electronic Music

For most of human history, musical instruments were strictly mechanical devices. The musician either plucked something, blew into or across something, or banged on something to produce the sounds the occasion called for. All musical instruments, the human voice included, worked by vibrating air more or less directly as a result of these mechanical manipulations.

But if one thing can be said of musicians at any point in history, it’s that they’ll use anything and everything to create just the right sound. The dawn of the electronic age presented opportunities galore for musicians by giving them new tools to create sounds that nobody had ever dreamed of before. No longer would musicians be constrained by the limitations of traditional instruments; sounds could now be synthesized, recorded, modified, filtered, and amplified to create something completely new.

Few composers took to the new opportunities offered by electronics like Daphne Oram. From earliest days, Daphne lived at the intersection of music and electronics, and her passion for pursuing “the sound” lead to one of the earliest and hackiest synthesizers, and a totally unique way of making music.

Continue reading “Daphne Oram And The Birth Of Electronic Music”

Listen To A Song Made From Custom Nintendo LABO Waveform Cards

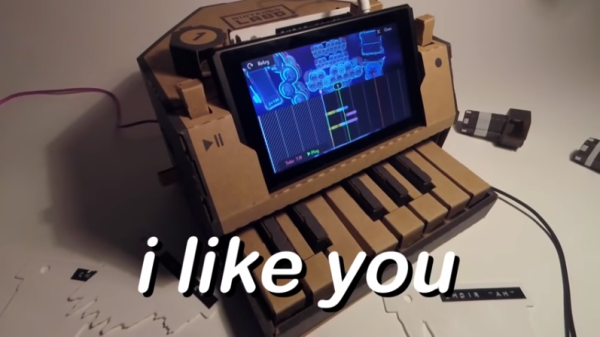
[Hunter Irving] has been busy with the Nintendo LABO’s piano for the Nintendo Switch. In particular he’s been very busy creating his own custom waveform cards, which greatly expands the capabilities of the hackable cardboard contraption. If this sounds familiar, it’s because we covered his original method of creating 3D printed waveform cards that are compatible with the piano, but he’s taken his work further since then. Not only has he created new and more complex cards by sampling instruments from Super Nintendo games, he’s even experimented with cards based on vowel sounds in an effort to see just how far things can go. By layering the right vowel sounds just so, he was able to make the (barely identifiable) phrases I-LIKE-YOU, YOU-LIKE-ME, and LET’S-A-GO.

Those three phrases make up the (vaguely recognizable) lyrics of a song he composed using his custom waveform cards for the Nintendo LABO’s piano, appropriately titled I Like You. The song is at the 6:26 mark in the video embedded below, but the whole video is worth a watch to catch up on [Hunter]’s work. The song is also hosted on soundcloud.

Continue reading “Listen To A Song Made From Custom Nintendo LABO Waveform Cards”

Learn About Waveforms Interactively

We’ll be honest: If you are a regular Hackaday reader, you probably won’t learn much new information about waveforms from this website. However, the presentation is a great example of using React on a webpage and — who knows — you might just pick up something interesting. At the very least, it’ll be a great resource the next time you try to help someone starting out.

The animated waveform is cool enough. It is also interesting that it changes based on where you are in the text. The really interesting part though is that you can press the M key to unmute your audio and hear what the wave sounds like. You can also use adjustments to control the frequency and amplitude of the wave.

Continue reading “Learn About Waveforms Interactively”

Wishing The Family A Sinusoidal Christmas

When it’s time to put together the annual Christmas card, most families take a few pictures of the kids, slap on a generic greeting, and call it a day. It used to be fairly common for the whole family to get dressed up and pose for a special Christmas picture, but who has the time anymore? It’s not like we have hours and hours to slave over a unique and memorable gift we can mail out to a dozen (or more) people.

Unless you’re [Chris Wolsey], anyway. Rather than take the easy way out and simply mailing some pictures of his daughter out to friends and family, he recorded her giving a Christmas greeting and turned the waveform of her voice into a framed physical memento. Way to wreck the curve for the rest of us, [Chris].

Evolution of the printed waveform.

As it turns out, getting sound into CAD software isn’t exactly straightforward. To start, he made a recording of his daughter saying the words “Happy Christmas From the Wolsey Family” with Audacity, and then took a screenshot of the resulting waveform. This screenshot was then brought into Adobe Illustrator and exported to SVG, which Fusion 360 (and most other CAD packages) is able to import.

Now that the wave was in Fusion 360 he could scale it to a reasonable size, and use the revolve function to bring it into three dimensions. Cutting that object in half down the length then gave [Chris] a shape which should, theoretically, be printable on his FDM printers. But unfortunately, it wasn’t so easy. His personal Anet A8 had a tough time printing it, and the Prusa i3 MK2 at work didn’t fare much better. In the end, he had to make the leap to SLA, getting the shape printed on a Form 2 via 3D Hubs.

With the finalized shape in hand, [Chris] just need to put them into production. Printing them all via 3D Hubs wasn’t really an option, so he decided to make a mold and cast them in resin. He printed up a mold box, and after fiddling around with the mix a bit, was able to settle on a resin which allowed him to de-mold the shapes just 30 minutes after pouring.

Finally, he made frames for each cast waveform, and printed up a little label explaining just what the recipient was looking at; even going as far as showing which word corresponded to which section of the shape.

This is a fantastically executed and documented project, and while it’s too late to whip up your own version this year, we have no doubt they’ll be a few people “borrowing” this idea next time the holidays roll around.

It’s never too early to start planning for next Christmas. We’ve covered unique takes on the traditional holiday card before, as well as a sleighful of holiday decorating projects.