ATtiny Gets A Tiny Software UART

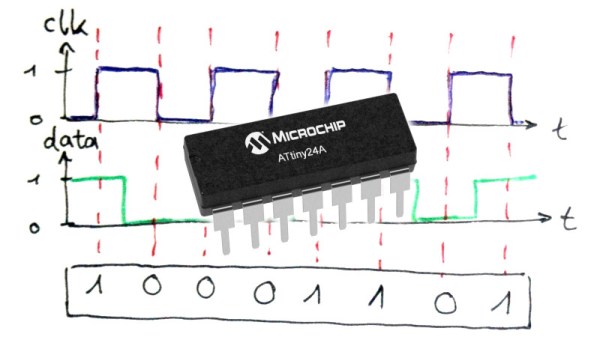
Modern microcontroller platforms spoil us with their performance and expansive spec sheets. These days it’s not uncommon to be developing for a cheap micro that has a clock rate well in excess of 100MHz, with all manner of peripherals baked in. DACs, WiFi, you name it – it’s in there, with a bunch of libraries to boot. It wasn’t always this way, and sometimes you would even find yourself lacking hardware serial support. In these cases, the bitbanged software UART is your friend, and [MarcelMG] decided to document just how it’s done.

The amateur programmer’s first recourse may be to use delays to properly time the output data stream. This has the drawback of wasting processor cycles and doesn’t let the microcontroller do much else useful. Instead, [Marcel] discusses the proper way to do things, through the use of interrupt service routines and hardware timers.

[Marcel]’s implementation is for the ATtiny24A, though it should be easily portable to other AVR8 processors. Taking up just 2 bytes of RAM and 276 bytes of program space, it’s compact – which is key on resource-limited 8-bit devices. The code is available on Github if you fancy trying it out yourself.

It’s a technique that is more than familiar to the old hands, but useful to those new to the art. It can be particularly useful if you need to get data out of a legacy platform with limited options. As times change, it’s important to pass on the techniques of yesteryear to the new generation. Of course, if things are really tight, you can even do a half-duplex UART on a single pin.


Arduino Revives A Classic 1980s Minitel Terminal

Before there was the Internet, there were a lot of would-be Internets. Compuserve comes to mind, as do Prodigy, GEnie, Delphi, and the innumerable BBS systems that were once gateways to worlds beyond our CRT monitors and 300 baud Hayes Supermodems.

Service providers varied by region, of course. The French postal and telephone service rolled out their service, Médium interactif par numérisation d’information téléphonique, in 1978. Mercifully and memorably shortened to Minitel, the service was originally intended primarily as an online telephone directory, and later expanded to include other services. [Kevin Driscoll] and [Julien Mailland] recently resurrected a Minitel terminal, a Videotex terminal that was the gateway to the service. The terminal they used, a model 1B, is a stylish machine with a monochrome CRT display and compact “AZERTY” keyboard. [Kevin] and [Julien] built a Videotex server for it using an Uno and a logic-level converter to keep the two talking. Using the hardware, they’ve developed a Twitter client, a webcam display, and dumb Linux terminal.

[Julien] and  [Kevin] previously authored a great history of Minitel that’s worth a read. And we’ve seen a few Minitel hacks before, including converting one to USB for use as a Raspberry Pi terminal.

Custom Jig Makes Short Work Of Product Testing

When you build one-off projects for yourself, if it doesn’t work right the first time, it’s a nuisance. You go back to the bench, rework it, and move on with life. The equation changes considerably when you’re building things to sell to someone. Once you take money for your thing, you have to support it, and anything that goes out the door busted is money out of your pocket.

[Brian Lough] ran into this fact of life recently when the widget he sells on Tindie became popular enough that he landed an order for 100 units. Not willing to cut corners on testing but also not interested in spending days on the task, he built this automated test jig to handle the job for him. The widget in question is the “Power BLough-R”, a USB pass-through device that strips the 5-volt from the line while letting the data come through; it’s useful for preventing 3D-printers from being backfed when connected to Octoprint. The tester is very much a tactical build, with a Nano in a breakout board wired to a couple of USB connectors. When the widget is connected to the tester, a complete series of checks make sure that there are no wiring errors, and the results are logged to the serial console. [Brian] now has complete confidence that each unit works before going out the door, and what’s more, the tester shaved almost a minute off each manual test. Check in out in action in the video below.

We’ve featured quite a few of [Brian]’s projects before. You may remember his Tetris-themed YouTube subscriber counter, or his seven-segment shoelace display.

Continue reading “Custom Jig Makes Short Work Of Product Testing”

Years Don’t Dim The Shine Of These Curious Gadgets

[Maarten Tromp] recently took the time to document some of the unusual and creative electronic projects he received as gifts over the years. These gadgets were created in the early 2000’s and still work flawlessly today. Two of our favorites are shown here: Hardware Tetris Unit (shown in the image above) and Heap of Electronic Parts.

The “Heap of Electronic Parts” makes sounds when in sunlight.

Heap of Electronic Parts was a kind of hardware puzzle and certainly lives up to its name. It’s a bunch of parts soldered in a mystifying way to the backs of four old EPROMs — the chips with the little window through which UV is used to erase the contents. Assured that the unit really did have a function, [Maarten] eventually figured out that when placed in sunlight, the device ticks, buzzes, and squeals. [Jeroen] had figured out that the EPROMs could act like tiny solar cells when placed in sunlight, and together the four generate just enough power to drive an oscillator connected to a piezo speaker. It still chirps happily away, even today.

Hardware Tetris plays in a terminal window.

Hardware Tetris Unit was a black box intended to be plugged into a serial port. With a terminal opened using the correct serial port settings, a fully-functional Tetris game using ASCII-art graphics could be played. It was even self-powered from the serial port pins.

Inside Hardware Tetris is an AVR microcontroller with some level shifters, and the source code and schematics are available for download. 14 years later, computers no longer have hardware serial ports but [Maarten] says a USB-to-serial converter worked just fine and the device still functions perfectly.

There are a couple more devices documented on [Maarten]’s gifts page, including a Zork-inspired mini text adventure and a hardware board that does some trippy demos on an old Nokia color LCD.  [Maarten]’s friend [Jeroen Domburg] (aka Sprite_tm) had a hand in creating most of the gadgets, and he’s someone whose brilliant work we have had the good fortune to feature many times in the past.

Arduino And Pi Share Boardspace

A Raspberry Pi Zero (W) and Arduino are very different animals, the prior has processing power and connectivity while the latter has some analog to digital converters (ADCs) and nearly real-time reactions. You can connect them to one another with a USB cable and for many projects that will happily wed the two. Beyond that, we can interface this odd couple entirely through serial, SPI, I2C, and logic-level signaling. How? Through a device by [cburgess] that is being called an Arduino shield that supports a Pi0 (W). Maybe it is a cape which interfaces with Arduino. The distinction may be moot since each board has a familiar footprint and both of them are found here.

Depending on how they are set up and programmed, one can take control over the other, or they could happily do their own thing and just exchange a little information. This board is like a marriage counselor between a Raspberry Pi and an Arduino. It provides the level-shifting so they don’t blow each other up and libraries so they can speak nicely to one another. If you want to dig a bit deeper into this one, design files and code examples are on available.

Perhaps we’ll report on this board at the heart of a pinball machine retrofit, a vintage vending machine restoration, or maybe a working prop replica from the retro bar in Back to the Future II.

“DB” = Abbreviated Microcontroller Debugging

We’ve all been there. When debugging a microcontroller project, we just want to put in a print statement to figure out what’s going on with the microcontroller in real time. However, advanced embedded programmers know that printf statements are verboten: they’re just too SLOW. While not fixing this plight entirely, [Atakan Sarioglu] has come up with a clever way to create readable debug messages with minimal runtime overhead.

[Atakan Sarioglu]’s innovation, called BigBug (Github), is a dynamically-generated codebook. The codebook translates abbreviated messages sent over serial (UART here) to longer-form human-readable messages. To generate the codebook, BigBug automatically parses your comments to create a lookup between an abbreviation and the long-form message. When you are running your program on the microcontroller, BigBug will translate the short codes to long messages in real-time as you send log/debug data over serial. Continue reading ““DB” = Abbreviated Microcontroller Debugging”

Behold The WT-220: A ‘Clever’ VT-220 Terminal

[John Whittington] failed to win a bid for an old VT-220 serial terminal on eBay, so he decided to make his own version and improve it along the way. The result is the Whitterm-220 (or WT-220) which has at its core a Raspberry Pi and is therefore capable of more than just acting as a ‘dumb’ serial terminal.

Rear of the WT-220 with paint-filled laser engraving and all necessary connectors.

The enclosure is made from stacked panels of laser-cut plywood with an acrylic plate on the back for labels and connectors, where [John] worked paint into the label engravings before peeling off the acrylic’s protective film. By applying paint after laser-engraving but before peeling off the film, it acts as a fill and really makes the text pop.

Near the front, one layer of clear acrylic among the plywood layers acts as a light guide and serves as a power indicator, also doing double duty as TX/RX activity lights. When power is on, that layer glows, serving as an attractive indicator that doesn’t interfere with looking at the screen. When data is sent or received, a simple buffer circuit tied to the serial lines lights up LEDs to show TX or RX activity, with the ability to enable or disable this functionality by toggling a GPIO pin. A video overview is embedded below, where you can see the unit in action.

Continue reading “Behold The WT-220: A ‘Clever’ VT-220 Terminal”